
Color Managed Brand Colors in DaVinci Resolve
Learn how to use project-wide DaVinci Resolve Color Management and maintain precise branding colors for Text Plus and Fusion-generated graphics without bypassing or pre-rendering anything.
In the past, I had avoided project-level color management in DaVinci Resolve because Graphics would never match the specific branding colors. See below - This tutorial discusses bypassing color management and rendering in place. But today’s post and tutorial go a bit deeper as I’ve gained a better understanding of how to “discover” wide gamut, linear brand colors. This was inspired by a series that Chris Zwar did with Pro Video Coalition as part of an extensive series on Color Management and how it relates within Adobe After Effects.
But, it turns out that it is very possible to achieve accurate colors from Fusion graphics (you know, text plus, or any graphics template you’re using), and this is how I plan to work moving forward.
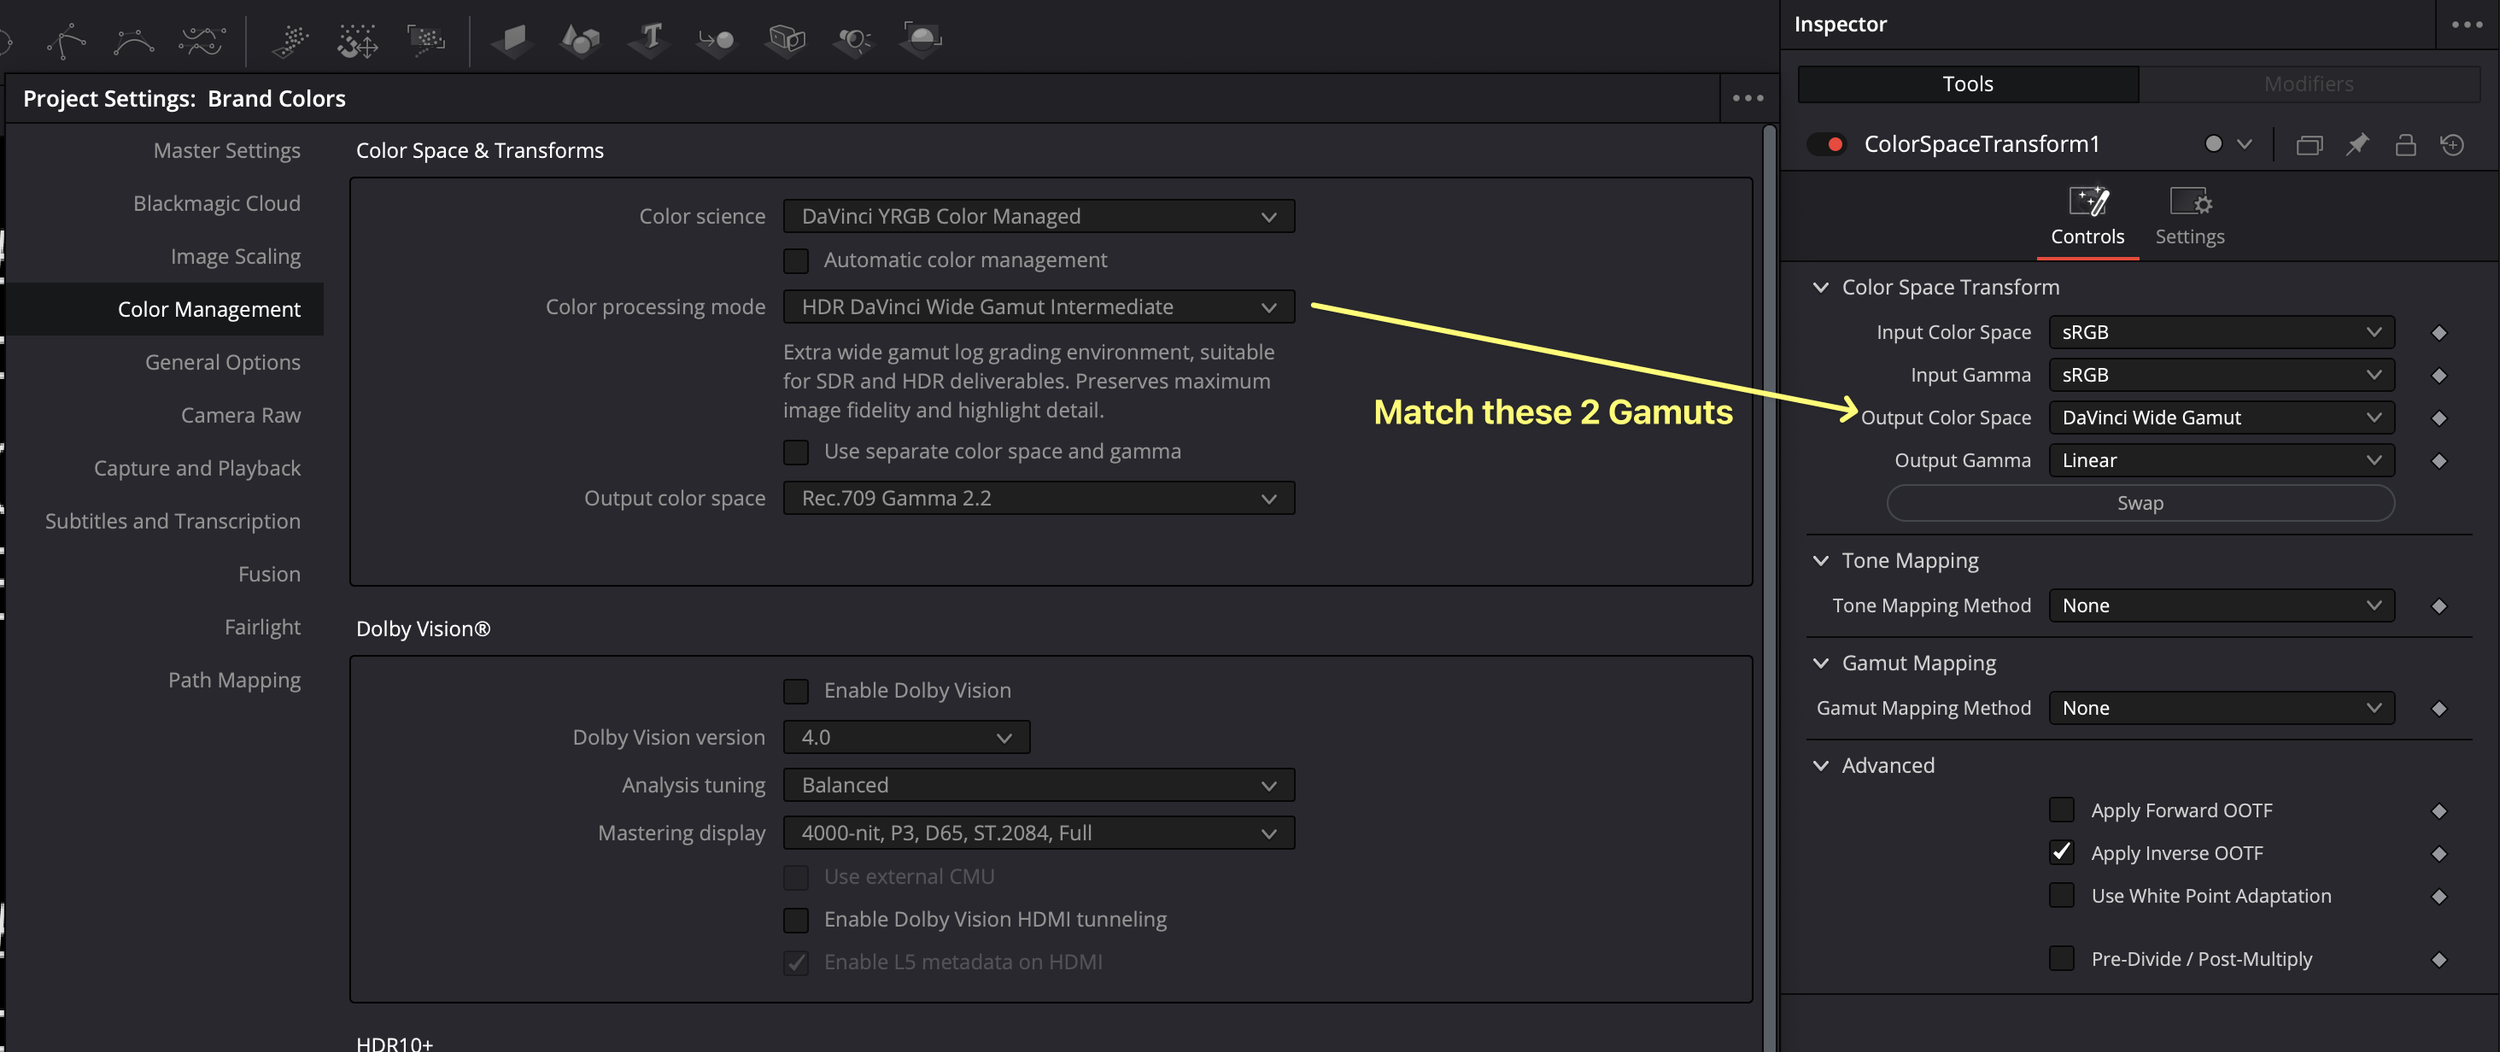
Long story short - In Fusion, convert your Fusion-generated color with a color space transform node from sRGB to your timeline workspace (timeline workspace is also known as the color processing mode in the project settings, but use linear gamma, and check the box to apply inverse OOTF. This is your new corporate brand color. You can use the color picker on a new background node and place it in your macOS system color picker chips for use on the edit page graphics.

But why does this work? What do I do if I change working color spaces? And what if I don’t want to use a color space transform?
Physically Accurate Compositing
In color grading, you hear about Gamma, which came as a solution to a problem from CRT TVs, or maybe you know about Log footage, which originated as a solution for scanning motion picture film. Even our eyes behave in a non-linear fashion.
But none of these non-linear relationships of light intensity exist in the physical world. Adding and subtracting light in the physical world is Linear. So we should comp in Fusion without these transfer functions and that is exactly what DaVinci Resolve color management does for us under the hood.
When you create a Fusion composition with Resolve Color Management turned on, you are working in a color space that matches the timeline working space “the color processing mode” and white point - often called gamut, primaries, chromaticities - but it is converted to Linear going into Fusion and going back out of Linear as it leaves. You can check this working space by opening the subview and viewing the metadata, and you’ll find the actual chromaticities of the current working space.
Fusion maintains the project gamut while linearizing the transfer function seamlessly.
And you’ll also notice there is a fusion view lut turned on, so you can view the linear image on your computer screen. Without the view lut enable the image appears too dark, and just like log - it's never intended to be viewed in this state for making creative and corrective adjustments.
So Linear Light is perfect for compositing and placing objects and colors “into the scene”. But the issue you might have experienced is why my hexadecimal color is not displaying correctly on my timeline?
Hexadecimal Values IMPLY sRGB
Hexidecimal color codes, also called hex numbers or values, or often given an RGB triplet listed in a brand guideline document, and they are ALWAYS CREATED AND ASSUMED TO BE IN THE sRGB color space. I created the thumbnail document in Affinity Photo in sRGB with real brand colors for us to use as a reference and test. I’ll even post a link so you can download the png and test this workflow for yourself, all I ask is that I can have your email to notify you when I have new tutorials or courses available.
The point is - brand colors are given in a specific color space, which is really just a measurement system AND BRAND COLOR Values only make sense, within that particular measurement system - which is sRGB.
Here I’m pouring 1 quart of liquid into a container in slow motion because it just looks cool. Remember it’s only 1 quart, but if I rotate it around and we see the metric unit of 1 liter (a different measurement system, or color space). It’s not filling up to the same value of 1 on the metric side. 1 quart does not equal 1 liter. You already knew that.

They’re pretty close - but they ARE different. Some color spaces are closer then others (like Rec 709 is close to sRGB, but it’s not the same) - and Resolve color management helps do the conversions for us, but for Fusion generated colors we have to do an extra step to discover our new brand colors.
If you change the color space, it’s changing the measurement system and the RGB value has to change to keep up with appearance. For example - this is Home Depot orange and the values that are required in different color spaces. For wide gamuts like DaVinci Wide Gamut - this can be very different from the original sRGB Hex values.

Discovering the “NEW” Brand RGB Triplet
Resolve Color Managed means colors are getting automatically mapped from an input - to a timeline workspace (the color processing mode) - to an output. The beauty is you can change your output colorspace for different deliverables at any time (change from gamma 2.4 to 2.2), and all color grades and fusion graphics will just work. You just need to settle in and choose a “color processing mode”, sometimes called the timeline working space, and leave it - standardize to it because your new color swatches and color chips will relate to this color space.
Step 1
In Fusion, create a new background node and type in the coroporate brand HEX value into the operating system color picker. Rembember this value is only vailid in sRGB, so when you view it as is (in a Wide Gamut linear workspace, which is what Fusion is with color management enabled) it will be wrong.

Step 2
Add a color space transform after the generated hexadecimal color code node with sRGB as the input color space and gamma, tranfering the color into the color processing mode output color space with output gamma set to linear and Apply the Inverse OOTF.

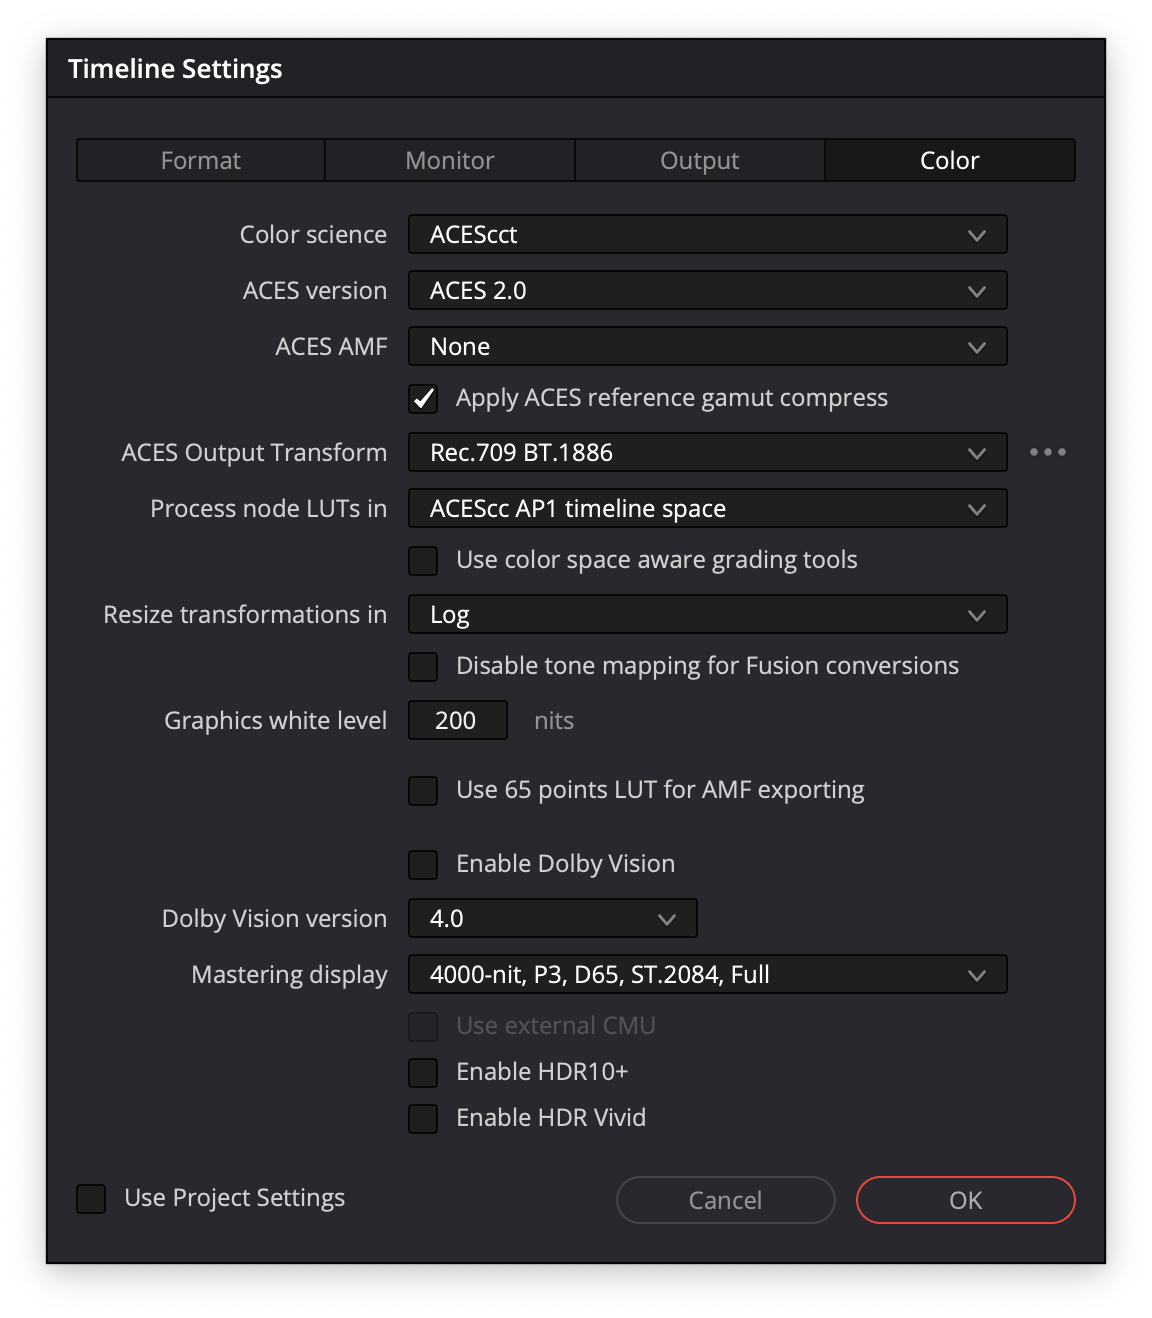
If you prefer to use ACEScct instead, the working primaries in Fusion will be AP1 linear, also know as ACEScg. So for ACES project level color management I would instead use an ACES transform node with the input set to sRGB (Texture) to output set to ACEScg. It is also important to NOT use any gamut compression - set gamut compress to none.

Step 3
Grab a new background node and color pick, sample the new output color from the color space transform. To sample a color in Fusion you must hold and drag the eye dropper all the way into the viewer. Feel free to know use the Mac OS system color picker tool, to drop your new Wide Gamut - Linear brand color in you color chips for use on the edit page with any Text Plus or Fusion graphic templates.

If you need to clean up and remove chips from your Mac OS color picker, you can click and drag them to the trash can in your dock to clean this up after you’re done working with a particular client.
Recap
Project-wide Color Management in DaVinci Resolve is a wonderful thing. It requires no extra transforms on the color page for Raw and log-encoded footage to appear correct on our Rec. 709 displays and retains all the flexible nature of recording Log for sculpting a grade or making corrections “under the hood”.
I’m also told that it can give you better performance on your computer versus using color page node-based color space transforms. Now that you know how to find your new Text Plus Linear brand colors, hopefully, you can embrace project-wide color management too! I’m Chadwick - I finish commercials for many brands you know and love, so I have a lot of experience with “brand colors” - and I would love to teach you everything I know about Resolve. I often have availability for one-on-one training over Zoom. And because there’s so much more to learn, I’ll see you in the next video!