
Little Things w/ Big Impact in DaVinci Resolve 20
Multicam from Timeline with Source Audio
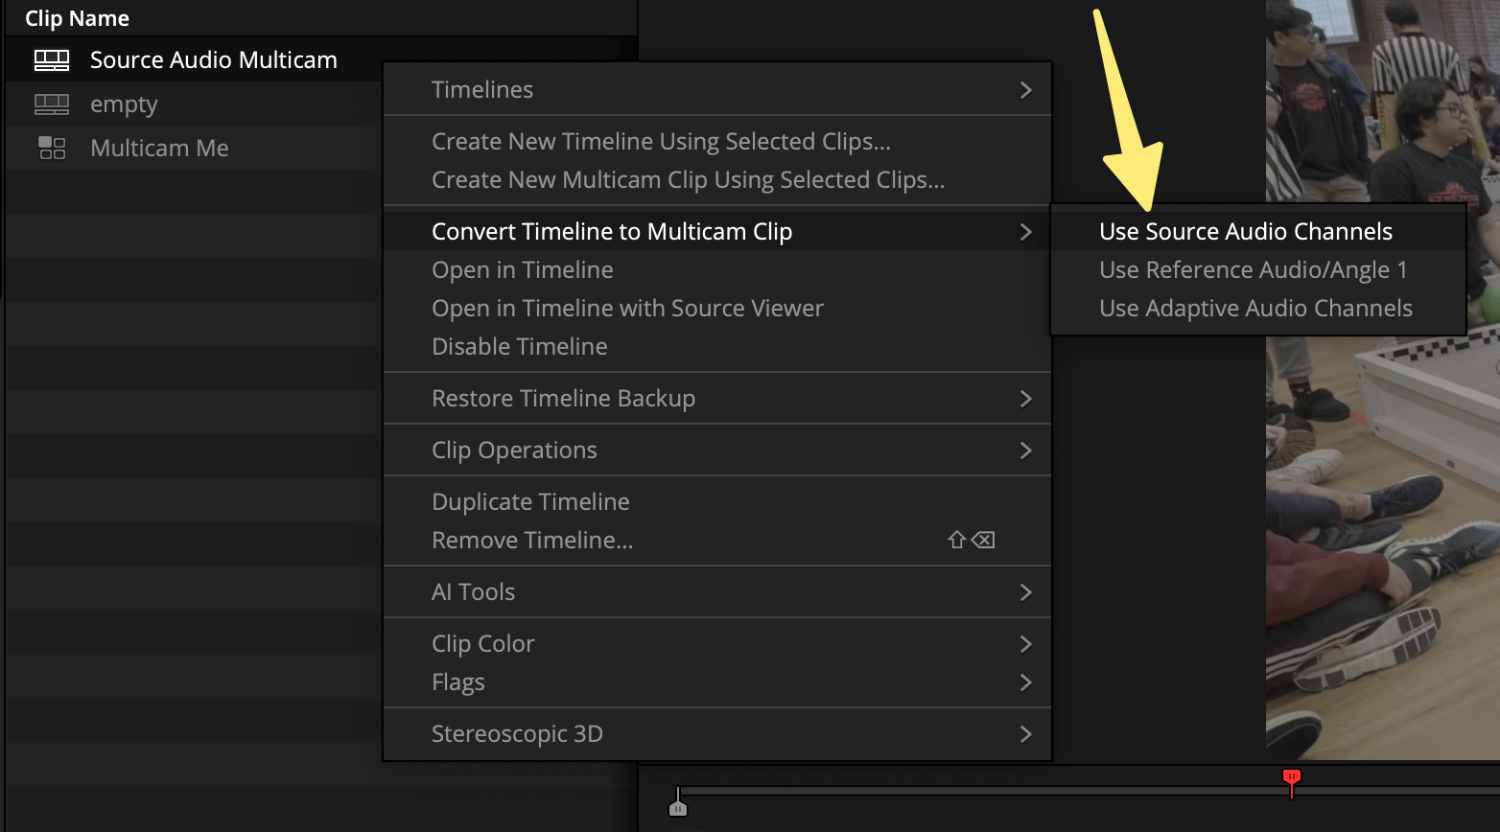
Support for selecting a single reference audio track for multicam clips. A reference audio track, refers to a secondary audio recording from a device like a Sound Devices Mix Pre, or a music track for a music video.
The part that excites me is the ability to sync using source audio channels, previously only available when syncing multicam in the media pool and not on the timeline. The source audio channels mean we never need to create adaptive audio tracks in the future and will always have access to the original microphone channels without flattening the multicam clip.
Transcription Export with Speaker & Timecode
Export audio transcriptions with speaker and timecode information. This sounds simple enough, but is fantastic that in DaVinci Resolve 20, we can share the results of the auto-generated transcriptions with producers that won’t open DaVinci Resolve.
A producer or director could review the exported text file and mark it up for an editor to easily reference for making the initial rough cut or radio edit.
Edit Page Viewer Updates

Support for Alert Red viewer background mode. This new timeline viewing option clearly shows if pixels are not extending all the way out to the bounds of the frame size.
I can’t tell you how many times I see conforms for high-end work that misses a pixel or two of black lines, and they aren’t caught until much later after commercials have shipped.
Another new timeline viewer change is that the zoom with the mouse wheel now obeys the pointer location of the mouse. In the past, the viewer always zoomed to the center, and if you needed to inspect a corner, you had to middle-mouse click and pan. But now, place the cursor where you want it to move, and you’re there.
Finally, the timeline dropdown at the top will display all of the timelines in your project. In the past, I believe it only showed the last ten opened timelines.
Custom Grid Bin Frame View

You can now sort media pool clips in icon view in custom order. From the sort menu, select custom. This allows you to organize your media visually in the media pool by grouping shots and takes. With snap to grid option enabled in the sort menu, you can keep icons aligned, or you can disable the option to organize clips without any restriction.
This is very welcome, and Avid editors will rejoice if they are fans of the Frame view mode for storyboarding out the order of their program.
Remote Monitoring

DaVinci Resolve 20 now has the ability to also show power windows and other overlays over the remote stream. This is primarily designed for workflows where the system is in a remote location and the colorist needs to ability to see the overlays in their local reference monitor.
This function can be enabled from the Color page viewer 3-dot menu by selecting "Show Viewer Overlands on Remote Monitor". When this option is enabled, the overlays are shown on the remote monitoring stream rather than the local reference monitor.
Additionally, the new version also adds the ability to stream H.265 4:2:2 from a macOS system.
Auto Resync Bins
Auto resync media bins now supports still images and frame sequences. The Auto Resync bins function is accessible by right clicking a bin in the media pool and will automatically import footage added to that location on a hard drive.
Fusion Media Out Color

View color grade in media out node.
You can choose color grade modes when previewing MediaOut on the Fusion viewer:
None (default) - To preview only the composition output.
Color Grade - To preview the clip with composition and color grade adjustments from the Color Page.
Mix - To preview the overall timeline snapshot of the clip context - with color, background tracks, overlays, and transitions. This is similar to the unmix button on the color page.
Preference & GUI Upgrades

Fusion now allows consistent frame numbering for all compositions, including trimmed clips. Any composition created in Fusion can start with the same start frame number. In new projects in DaVinci Resolve 20, you can change the default start frame for Fusion compositions in the project settings.
This helps with Visual FX workflows in three ways:
Matching existing keyframes to the right frame offsets - when replacing an asset with mismatched frame offsets (e.g., a subclip, different format round trip, or VFX connect workflows with mismatching handles).
Rendering to specific frame ranges - when aligning to delivery standards for commercial workflows (e.g., compositions should start at sequence frame 1000)
Consistent Referenced Comp behavior - Essential when applying a referenced composition to different clips with different trims.
The legacy frame count behavior continues to anchor Fusion composition zero frames to the first frame of the source media for the composition.

New user preference for automatic cache and storage management
In Preferences, under User, Cache Management, you can set render cache older than a certain time to be removed automatically. By default, all render cache is retained, and the user can use the Playback > Manage Render Cache dialog to manually manage caches.
User Media Location in Working Folders

When creating new Local or Network projects, you can now specify a location for all DaVinci Resolve-generated media. These files include voiceover captures, Voice Convert media, bounced audio, and deck captures.