
7 Sound Tips for Fairlight in DaVinci Resolve
If you cut videos with DaVinci Resolve and care about your audio, then THIS TUTORIAL is for you. There are tricks you can do using the fully-featured DAW included on the Fairlight page, like stacking new audio clips automatically from your bin by command dragging a whole batch of music tracks to an empty timeline space to try out. If you're on a pc, that's control and drag.
And just like that, you have new stereo tracks created and stacked vertically for each song you'd like to test out. To mute them, you can turn clips on and off with D to disable or enable them.

You'll learn a thing or two you didn't know to use Fairlight, as a video editor, to edit your video's audio much faster and easier.
We're spending today on the Fairlight page, which is this music note icon at the bottom of the DaVinci Resolve interface, but it's a great idea to learn that Shift seven will take you there directly from the edit page. So if you're on the edit page - Shift seven over, and you can integrate all of these tips to work between pages more like they're just different timeline views and not workflow steps. That's what I do anyway.
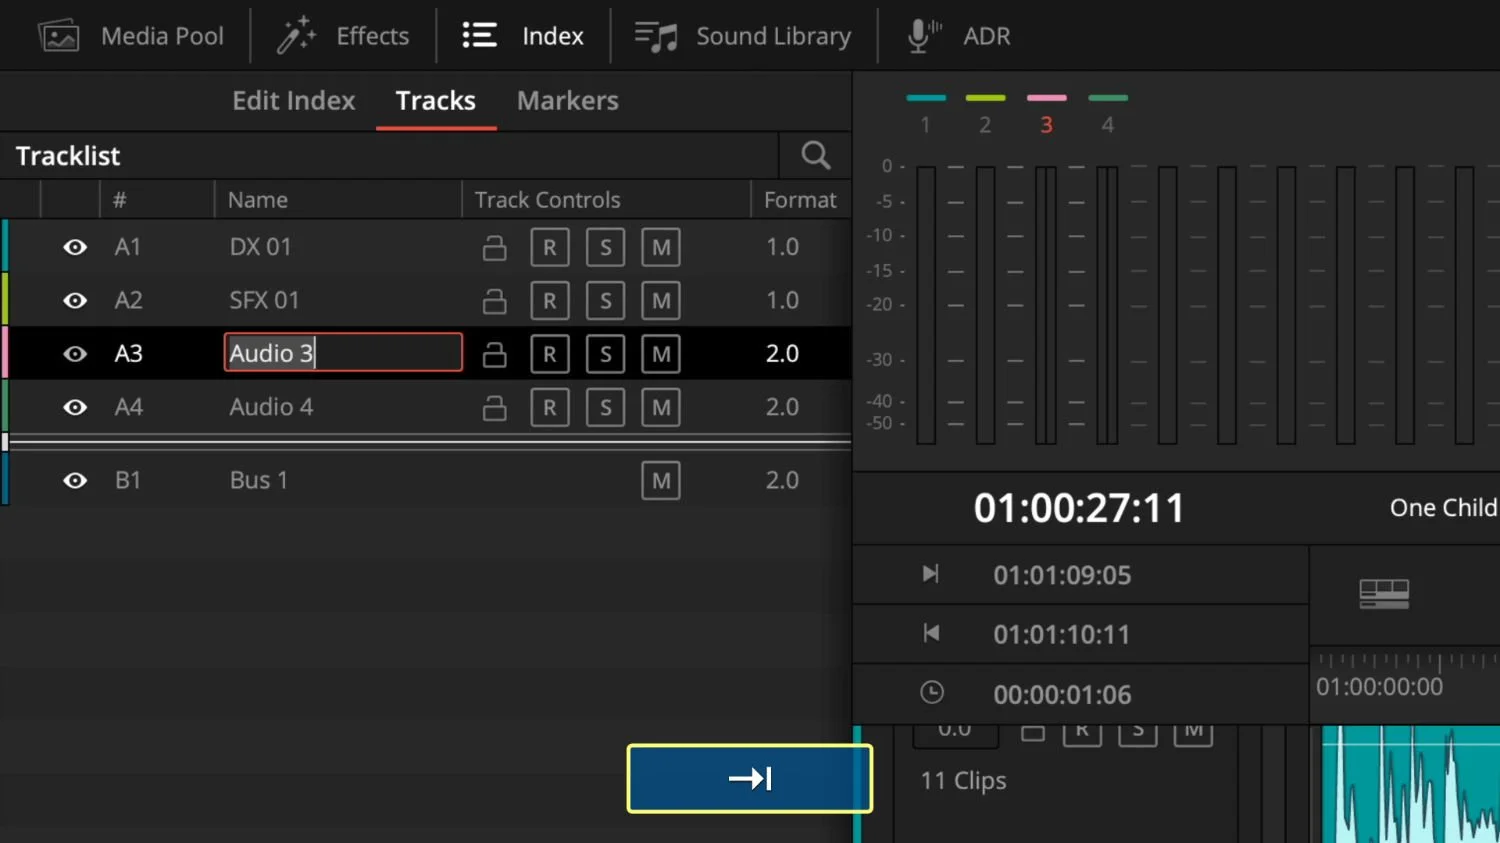
Rename, Re-Order, & Hide Tracks
In the upper left of the Fairlight page, click index.
And then tap on the tracks tab.
If you click the name field, you can quickly rename them to be more descriptive of what's on that track.
That could be the type of mic, the talent's voice on the track, or if the track is for music or sound effects. These custom labels help you stay organized so YOU or an audio engineer can EQ at a track level.
To quickly rename all of the audio tracks, one after the other, and without grabbing the mouse, you can use the tab key on the keyboard to jump to the next track.
Another helpful thing you can do in the track index is clicking and dragging to re-order them. Maybe you want to prioritize a track to be higher than another one. Just click and drag the tracks here, and this order is mirrored back over on the edit page. That's Shift four to jump back over to video editing mode. See how it's the same?
Now let's shift seven back to Fairlight and look at that index one more time. There is an eyeball you can turn on and off. This will hide an active track to clean up your desktop if you have limited screen space. It's like a shied After Effects layer, so you'll still hear the hidden audio track in the mix, but it's just a nice space saver in Fairlight.
Automatic Keyframe Music Ducking
This tip goes out to all my Final Cut Pro friends that miss the range selection tool for selecting and ducking a music track under the dialogue.
Well, it turns out you can do this with Fairlight using the Edit Selection Tool.
First, click the timeline view options to turn on your video tracks (because that's always helpful to see when the picture changes) and also turn on your gain line to display them.
Now click to use the Edit Selection Tool, but before you use it, you might want to increase the height of your track by clicking and dragging or holding shift with your scroll wheel because WHERE you position the edit selection tool matters.
If you use the tool on the top half of the clip, you can select a range, which is what we want for this tip, but if you hover over the bottom, it will move the clips' position around on the timeline.
So make a selection on the top half of the clip by clicking and dragging the area you want to lower the volume.
And then over the gain line, drag that gain line down, and it will automatically create four keyframes to move that section of the music level down so the dialogue can cut through the mix. Another cool thing about this edit selection tool is that it lets you play back your timeline while using it to make changes. It doesn't force a pause.

If you did this manually, you would need to option-click each keyframe, which is much more tedious. Or you could also do a similar technique in the dynamics window with side chain compression using a send and listen, but honestly, simply moving the gain line down is a great way to duck audio, and it behaves just like final cut pro's range selection tool.
Sample Level Audio Repair
And now, just like in Pro Tools, you can surgically remove pops and clicks manually by redrawing actual audio samples.
Click and drag with the arrow selection tool to smooth out abrupt changes. By smoothing out the shape of the sin wave, pops and clicks disappear from the audio when you play it back.
Just zoom all the way into the sample level with option (alt on a pc) and the mouse scroll wheel, or there is also a horizontal zoom slider here in the toolbar.
Find the segment with an abrupt change and take a listen to that pop.
Now smooth it out by dragging and smooth line.
Take a listen.
And pops are gone.
If you ever messed up with redrawing the samples and you're passed the point of an undo, you can right-click and choose reset edited samples.

Track Waveform Zoom
Sometimes you need to see the waveforms a little easier, but you don't want to increase the volume to see what's really there because your mix is already in a good spot. Well, one thing similar to Avid is that you can increase the track waveform zoom by Option Command Mouse Wheel scrolling to change the appearance of the waveform, which is perfect for seeing the quiet moments.
So you have bigger waveforms without making the clip louder.
That shortcut was option command on a mac and alt control with the mouse wheel on a pc. Super helpful, and only on the Fairlight page.

Non-Destructive Layered Audio Editing
Sure, you know your timeline stacks up audio tracks, but did you know you can have a layered stack within a single track? And what makes that layered audio track special is that it doesn't mix the layers together? It's like audio on or off based on the highest layer at full opacity.
This is layered audio editing, and it's turned on by going to the timeline dropdown menu and choosing layered audio editing. That enables it.
Then to see the layers go to view - show audio track layers.
And let's set up the timeline here by making the track as large as possible by shift scroll wheel, mousing it up really big because we want to really see the waveforms of our music track.
And that's because you'll see a ghost waveform image overlayed of one track over the other. This is perfect for lining up down beats of a song.

Just click and drag the lower layer to visually match up the beats and smooth the transition by always using the topmost layer to create a crossfade.
After you drag a fade handle to cross fade the cut point, all of the sound comes from the top most layer.
But if you haven't caught it yet, you still have all the sound available on the lower layers, so another excellent use for layered audio tracks is to audition out voice-over narration takes.
You can label each vo take with a different clip color with a right-click, rearrange them and constrain the position to move one on top of the other with a shift mouse drag, and even cut up a clip to choose the best segment of a clip (all the specific selects) and put them all at the top of the stack.
Loudness Normalization
Did you know you can mix to spec for YouTube and all the major delivery platforms for consistent results with Loudness meters built right into Fairlight? Loudness measures audio over time with how you actually perceive sound and not instantaneous samples. I have a great in-depth video I'd love for you to check out all about this that will be linked up in the description. Still, the gist is that it helps you set an optimal listening volume to your mix, so nobody needs to reach to turn up that volume, and platforms like YouTube aren't turning it back down because it's too hot.
One quick way to loudness normalize in DaVinci Resolve is to go up to the timeline menu and bounce mix to track.
Choose the destination track to be a new track.
Click ok.
And Resolve is baking a new file on your disk with all your mix work applied into a single stereo track that we will solo.
This is an audio-only version of a video mixdown.
Once this clip is rendered, you can right-click and choose to analyze audio levels.
If the loudness isn't as loud as you need, you can select the mix and right-click to normalize audio levels.
Set them to an appropriate level like -14 lkfs for YouTube with a -1 dB True Peak.

Analyze audio levels again, and you'll be in a good ballpark to maximize your Loudness for YouTube.
It's not an exact normalization like you can get from Adobe Audition, but it's still very close and super useful.