3 Underrated Timeline Tips in 3 Minutes for DaVinci Resolve
Premiere Pro lets you see a full-screen timeline by tapping the tilde key on your keyboard and then toggle back to your standard view with just another tap of the tilde key. It's that key up next to number one.
Well, guess what? You can do the same thing in DaVinci Resolve when working with two monitors, and I also have two other quick timeline tips to make your life a little easier working on the edit page.
Full-Screen Timeline
So to see your timeline fill up an entire screen using the drop-down menus. It's a 2 step process.
Go to Workspace
Dual Screen
And Click to turn it on
Then go back up to Workspace
Dual Screen
And now you can turn on Full-Screen timeline

Great right? Well, you can make this more Premiere-like by setting all of this to a single shortcut by going to the DaVinci Resolve drop-down to open Keyboard Customization.
Click in the search box for the word "Full Screen."
And you'll see there isn't a key assigned to this command yet, so click in the keystroke column until it's outlined in orange and tap that tilde key.
You'll get a warning that the tilde key is already assigned to the undo command. That's ok. Click assign.
And now search for undo
You'll see you have two commands for undo, command Z, which makes more sense to me, and tilde.
Just click the x next to tilde for the undo edit command, and the conflict of re-used keyboard shortcuts is all fixed.
You'll see the asterisks next to the keyboard set in the upper right, which means you should probably save this as a new keyboard setup.
Click Save. Give it a name, something like, like this keyboard tip.
And click ok.
Close the keyboard customization window, and now you can tap that tilde key to toggle a full-screen timeline on one monitor and all of your windows that aren't your timeline on the other.
Tap tilde again, and you're back to seeing your viewer above the timeline.
Duplicate Timeline
You might know that you can make a copy of your sequence by right-clicking and choosing duplicate timeline in a media pool bin. But did you know you can quickly assign this to a keyboard shortcut to work much faster?
Open up keyboard customization again, but this time use command option K, which is the keyboard shortcut to create keyboard shortcuts.
That's command option k on a mac, and I think control alt k on a pc.
Search for the word duplicate
And for the longest time, I'd look here and see there is no duplicate timeline option!
Well, there is, but it's disguised as duplicate item.
Click in the field for duplicate item. And I like to use option or alt D.

Click Save, and then close.
Now you can duplicate new versions of your timelines all day long with option D.
I do this every time I want to iterate a new idea and send a video out for client notes because then I have a reference to what their notes are based on as I continue working on a newer version and waiting on them to get back to me.
And a super pro tip is to ensure you never re-name a timeline outside your project. Make them match so anyone can backtrack an exported video.
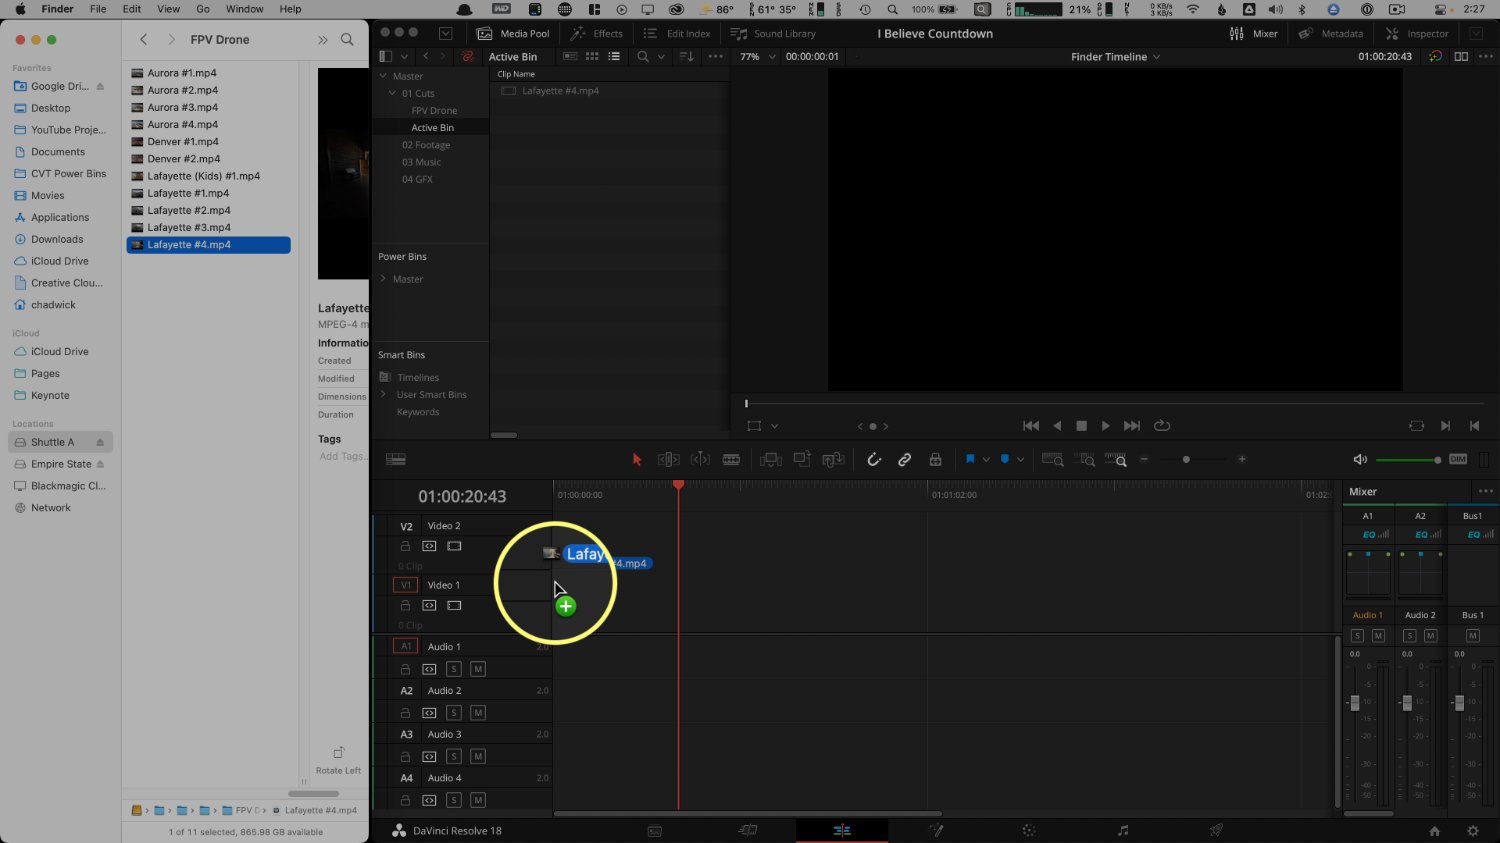
Finder to Timeline
Want to get a clip onto a timeline as fast as possible? You can drag any media clip directly from the finder to your timeline. Dragging to the timeline will import the footage in your currently selected bin when you drag it. This process can be much faster than going up to file, import, media, and then navigating to it.