
Davinci Resolve Timecode Tips with Deity TC-1
Auto Sync Failed in Resolve! Uh, yeah. Me too! Well...

What if you didn't have to ask anyone to clap, or you could freely stop and start recording as much as you'd like? And NEVER worry about capturing quality scratch audio FOR SYNCING MULTIPLE CAMERAS WITH EXTERNAL AUDIO RECORDERS?
Actually, YOU CAN, by syncing with timecode! And if you edit videos with DaVinci Resolve, I want to come alongside you today and show some of my timecode syncing tricks you've maybe never seen before, like,
Adjusting Source Timecode on Import,
And tweaking the "audio offset" column on the media page to GET PERFECT SYNC for clips, even long after they've been cut into a timeline!
And that doesn't even touch the most significant superpower Final Cut Pro and Premiere have never had, or maybe ever will. (convert audio timecode to metadata LTC timecode)
Plus, I've got a bonus, improved multi-cam, multichannel poly-wav audio tip you don't want to miss at the end.
The Problem
So, The problem is that after a shoot, we end up with a pile of SD cards and footage that we need to make sense of. Right? Multiple Cameras, a separate audio recorder - And the fastest way to organize them is to sort and group based on the timecode recorded during production (fix it in camera right). This lets us PUT THE BEST POSSIBLE AUDIO back together with any number of cameras that are rolling at the same time.
I've been syncing sound professionally for about 20 years now, so I understand waveform sync is great, but you already know it doesn't always work as you'd hoped in Resolve. And if you sync by timecode - You remove the limitation for a camera to be near the audio recorder or sound source, because the sound on the camera doesn't matter anymore!
What is Timecode?
I got this wrong for a long time, so let me clarify what timecode actually is.
Timecode is just a NUMBER to TRACK TIME, down to the individual frame.

IF you Jam sync - thats a fun word to say, Then the jam synced timecode sets each device to START with that same frame number. That's the key that I missed for many years. They START together. If you need them to always be locked over time together - that's Genlock and Wordclock and outside the general world of filmmaking that we all love. It's more of a live production system.
So that does mean that it will inherently drift over long recordings because each device is writing down data to frames on its own oscillator which actually changes with the temperature. That's enough science.
And that's why this amazing device from Deity called the TC-1 solves this problem. The TC-1 has a temperature-compensated crystal oscilator that can hold time much longer and more accurately than anything built into ANY CAMERA. So when you feed a reliable timecode clock to each device, you get reliably consistent start times. Consistent TIMECODE, to the metadata on each file.
All that to say - it makes starting to edit a pile of multicam footage or dual system sound - FAST & EASY!
Workflow Overview
The big picture of the timecode workflow goes like this. Oh, and I chapter mark all the content here on Creative Video Tips so jump to that specific moment you need to reference. It's there for you! I'm Chadwick, and I'm here for you.
1
Each device gets a generator that has a timecode clock that is in sync. If you have 3 cameras, you use 3 generators. To help with this video, Aperture sent me these devices. You really want to keep them connected all the time.

2
We have slaves and a master. It sounds archaic, but those are the terms. The master is the master. And the slaves get their timecode from their master. Simple right?
Ideally you use the time of day in real time, which is handy if a producer makes a note that something cool happened at 10 am and it's simple to find by sorting your bin column in Resolve.
The Deity timecode generators can output this timecode as either an audio signal that you can hear. It sounds awful like this.
Or it can output the timecode as metadata. Which is one of these rolling numbers I'm sure you've seen.
They'll eventually both be used as just a number.
I'll show both ways. The advantage of using the metadata output is that it skips a conversion step, and free's up your camera mic input. But not all cameras have timecode metadata input, so the audio output solves this problem.
3
You go out and do your thing. Film all-day long without worry. Turn the cameras off and on when you re-compose your shots. You don't have to worry about having tons of clips to sync. And you can save on video storage space by not filming a bunch of garbage.

4
In DaVinci Resolve, we will auto-sync with the timecode metadata instantly!
Deity TC-1 Pros & Cons
The Sidus Audio App can be managed and synchronized over Bluetooth to your iPhone, but why my favorite timecode generator is THIS Deity is because I can see everything without using my phone since it has a SCREEN.

Seems obvious, right tentacle?
Oh, another amazing thing is they include a breakout charging cable to all 3 TC-1's from 1 USB A port. Brilliant!
The one thing I wish they would include is 1 or 2 more 3.5 to 3.5mm cables in the 3-pack bundle. You do get extra camera cables, but I needed more of these. Good thing is they're cheap, so I'm using 3.5mm cables from Tentacle syncs. Any little stereo cable will work.
Deity is also always listening and recently had a firmware update to add 23.98 support for slaving TC-1s from my mixpre. The update was simple to download and install with the iphone app.
Now, there's already great tutorials on how the app works with bluetooth, so I'm going to show you how I use my Mix-Pre as a master clock, which by the way does NOT need a TC-1, as long as its a series 2 unit (because they have a real crystal clock internally), and then Jam SYNC THE DEITY TC-1 units as slaves.
If you're considering buying a Deity TC-1, or any cables, links are down below and they help support my family anytime you click them.
Timecode Box (B&H) - https://geni.us/timecode or (amazon) - https://geni.us/TC-1
Timecode Box (Direct) - https://shop.aputure.com/products/tc-1-3pc-kit?ref=CVT
Deity FX3 Timecode Cable - https://shop.aputure.com/products/c23-for-sony-fx3-fx30-cameras?ref=CVT
Sony Timecode Cable - https://geni.us/sony-TC
Favorite Music - https://bit.ly/cvt-artlist
Resolve Templates - https://bit.ly/cvt-MotionArray
Deity Setup
Choose Timecode - Frame Rate 23.98,
TC Mode Free Run
Side note here, you'll want to match the frame rate on your cameras (and most shoot the non-integer rates like 23.98, even when they say 24 or 30, they don't really mean it - I'm looking at you sony.)
Choose Outputs - St Out Mode - LTC-Out
Plug the Deity TC-1 into the Stereo out port,
Set it to Auto Jam and L-In.
Now, Unplug the TC-1 and change to L-Out or A-Out out depending on if your camera will take audio or metadata timecode. A is for the audio timecode.
And lock for safety.
If you get stuck and need to make changes, triple-tap the main button to unlock.
Camera Setup
Sony FX3 as Metadata
Change the TC to Preset and Free Run
Use a Deity TC-3 cable or Sony VMC-BNCM1 adaptor with a BNC to 3.5mm cable to plug into the USB multiport.
You should see the EXT Timecode change.
Sony A7IV as Audio
Ensure the TC-1 is set to output Audio timecode and plug it into the mic jack. Maybe lower the volume a little from the default of 26.
BMPCC 4k
Blackmagic Pocket Cinema Camera 4k
Ensure the TC-1 is set to output L, for metadata and plug into the mic jack. Even though its going into the mic jack it is taking the linear metadata timecode from the Deity box. It's not using audio timecode.
Freely record your video, stopping and starting cameras as needed. I like to keep the audio recorder rolling long takes, because sometimes there's sound that is unexpected, and you can still use that to edit in your video with some b-roll.
Oh, and if you're learning anything new today, please like this video so more creatives like you can see and learn this stuff too!
DaVinci Resolve's Super Powers
In general, you can just add your clips into DaVinci Resolve by dragging them into a bin, but here are three specific tips for handling any timecode differences, audio timecode conversion, and perfecting sync on a per clip level.
Add into Media Pool with Offset
If you use the same camera and setup all the time, and you know there is a difference between the audio recorder and the camera timecode sync. You can change how Resolve sees the timecode when you import it to fix this difference.
My Sony Fx3 and Blackmagic cameras both seem to need a negative 1 or 2 to match up with the MixPre Audio. None of these steps change the actual timecode of the files, which is important to know. That means if a system outside of Resolve needs to link to them for finishing - this is not the ideal workflow. But this is great when you do all your post-production in Resolve because we are changing resolve-only metadata.
Just right-click and choose "add into media pool with offset". This would be for video files with Linear Timecode only.

To recap, I use -2 on the FX3 and BMPCC 4K. Your mileage will vary depending on the camera.
And to sync, just select them and choose, Auto Sync Audio - Based on Timecode, you can append if you want just to add the new audio. It's all metadata, though and completely non-destructive.
"Update Timecode from Audio Track"
Update Timecode from Audio Track converts that Audio Signal timecode on cameras like my sony A7IV, or really any camera with a mic input - INTO usable metadata timecode inside of Resolve.
Avid can do this, but not Final Cut or Premiere.
In Resolve, its as simple as right-clicking (like so much else in this tutorial) and choosing to update the timecode from audio track. And boom, you'll see the timecode values change.
The A7IV timecode matches very close to the audio recorder master timecode, but you CAN CHANGE this value after converting it by right-clicking and going to the clip attributes. And in this case, changing it to +1 frame.
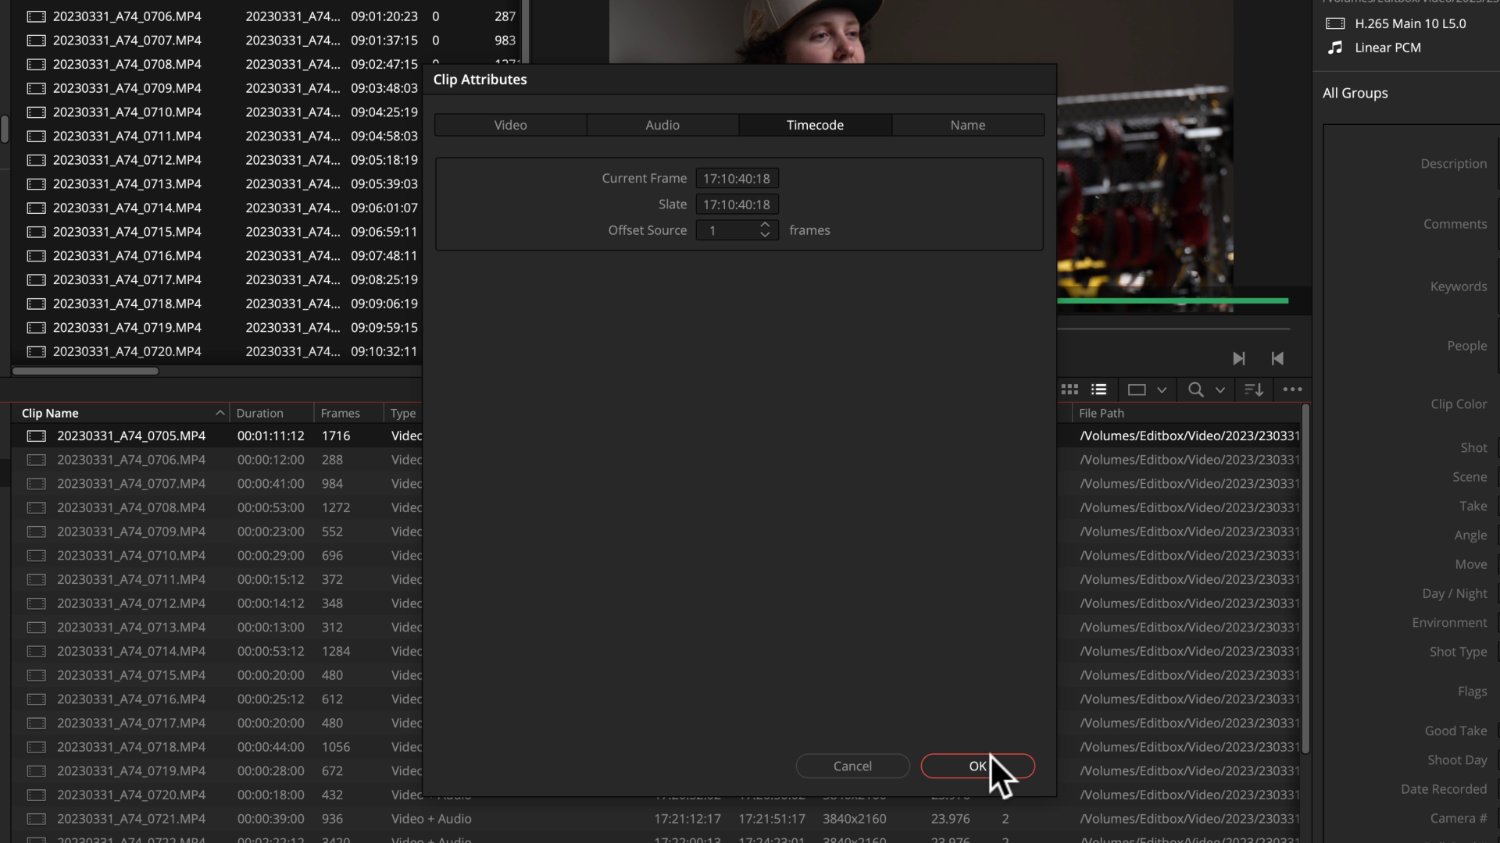
So yeah, that's even ANOTHER WAY to modify the timecode in Resolve.
The "Audio Offset" Column
Finally, use the Audio Offset Column for perfection. This isn't a timecode exclusive trick, just an audio sync tip. It will even fix sync for clips already on a timeline!
Start by showing "Full Clip Audio Waveforms" in the viewer on the media page.
This is under the three-dot menu - show full clip audio waveform.
If you have a visual cue, you can go directly to that frame to see how close the sync is.
I have a famous "Bee and Pee" trick that I teach in this tutorial for syncing without timecode or audio waveforms.
So after you've auto-synced (or manually synced) dual system audio from an external recorder, you can open up this audio offset column by right-clicking and checking the box.
Let's also choose the angle column to be visible for a later step in this tutorial.
Back to The Audio offset column, click any value in it, and you can change the number directly in here to perfect that sync! For this FX3 timecode, subtract 1 or 2, and we should be golden. You can get very granular with this for extreme precision.

Proxy Workflow
Now is the BEST TIME to create proxies. Proxies make it easy to playback footage on any computer and can sometimes make smaller files than the originals to make it fast for sending over the internet.
First, set the proxy settings you want to use:
Go to the Project settings, gear icon
Master Settings - and change your Proxy Media Resolution here.

In general, I choose 1/2 res ProRes Proxy. This makes a 1080p file from a Source and will play on 10-year-old computers easily.
On Windows, choose DNXHR LB for a similar file.
To make proxy files, select them in the media pool.
Right, Click and choose Generate Proxy Media.
The reason we waited until now to create proxies is that NOW our Proxies will get our linked external synced audio included in the files with our updated timecode.
The external Proxy Generator is great for several reasons, but not when you need to customize your settings and include your high-quality audio.
Multicam Creation
Prior to creating the multicam, I like to assign Angle Metadata to each camera to help place clips from the same cameras on the same multicam tracks.
Batch select clips from the same camera by shift selecting them.
Open the metadata panel in the upper right
Change the view to all groups
And change the Angle to 1, 2, 3 etc..
Don't forget to hit the save button at the bottom and this will apply angle metadata to them all at once.
To create a Multicam with your timecode synced clips, just right-click
Choose "create new multicam clip using selected clips"
Change the angle sync to timecode
angle name to - metadata - angle
and detect clips from the same camera with the option for metadata - angle as well
I uncheck the box to move source clips to 'original clips' bin because I'm a control freak and like to organize things myself. Maybe you can relate?
Edit With Multicam
I'll link to tutorials on editing multicam, but here is a bonus tip I've picked since teaching about multichannel multi-cam in Resolve that will save you time!
Resolve mulitcam clips like to create adaptive audio tracks, which is like a mixdown of all of the audio channels.
So, the way I like to get access to individual channels on the edit page is to just get them, when I need them by doing this little trick.
With the Muticam Viewer Open
Change the sound to only the Audio Angle with good sound, even though its still a mixdown adaptive track.
And Match Frame to Source Clip with the audio selected. This will take you directly to your poly wav multichannel source. And then, you can simply do an overwrite edit back to the timeline.
So its a Match Frame to Source Clip and then an Overwrite Edit.

Match Frame to Source Clip is different from the normal Match Frame, which matches the frame on the timeline into the source monitor. This goes a bit deeper and is why you can get to the source audio very quickly.
To overwrite edit you can hit F10, or just drag to the right monitor and see the pop-up for overwrite.
Oh, and you can also batch change your audio track types to mono using the index pannel up here. And then click on tracks.
shift, select the tracks and finally right, click to make the format to mono.
Hey, I'm Chadwick, here to help you create videos that make a difference and stand out.
If I was able to teach you anything new today, please let me know in the comments what that new thing was. I really appreciate all feedback.