
Batch Fix Audio Pops - DaVinci Resolve Crossfade Tutorial
Anytime you cut a clip with audio to trim it, you unintentionally create a pop or click. But thankfully, crossfades will fix this problem, and DaVinci Resolve just recently added THE BEST WAY to add a whole timeline's worth of FADES that I've ever seen in a video editing program. What makes it the best is it can ignore work you’ve already done and only apply fades to cuts that need it!
So today, we're doing a quick and deep dive into everything you need to know about adding audio fades to smooth out your mixes. You'll finally understand why and when you'd choose one fade shape over another, but make sure to stick around until the end, to also learn a hack for batch removing transitions in DaVinci Resolve.
Batch Fade Settings
Open the Fairlight page. It has a music note.
Go to the Fairlight menu.
Click the batch fades settings.
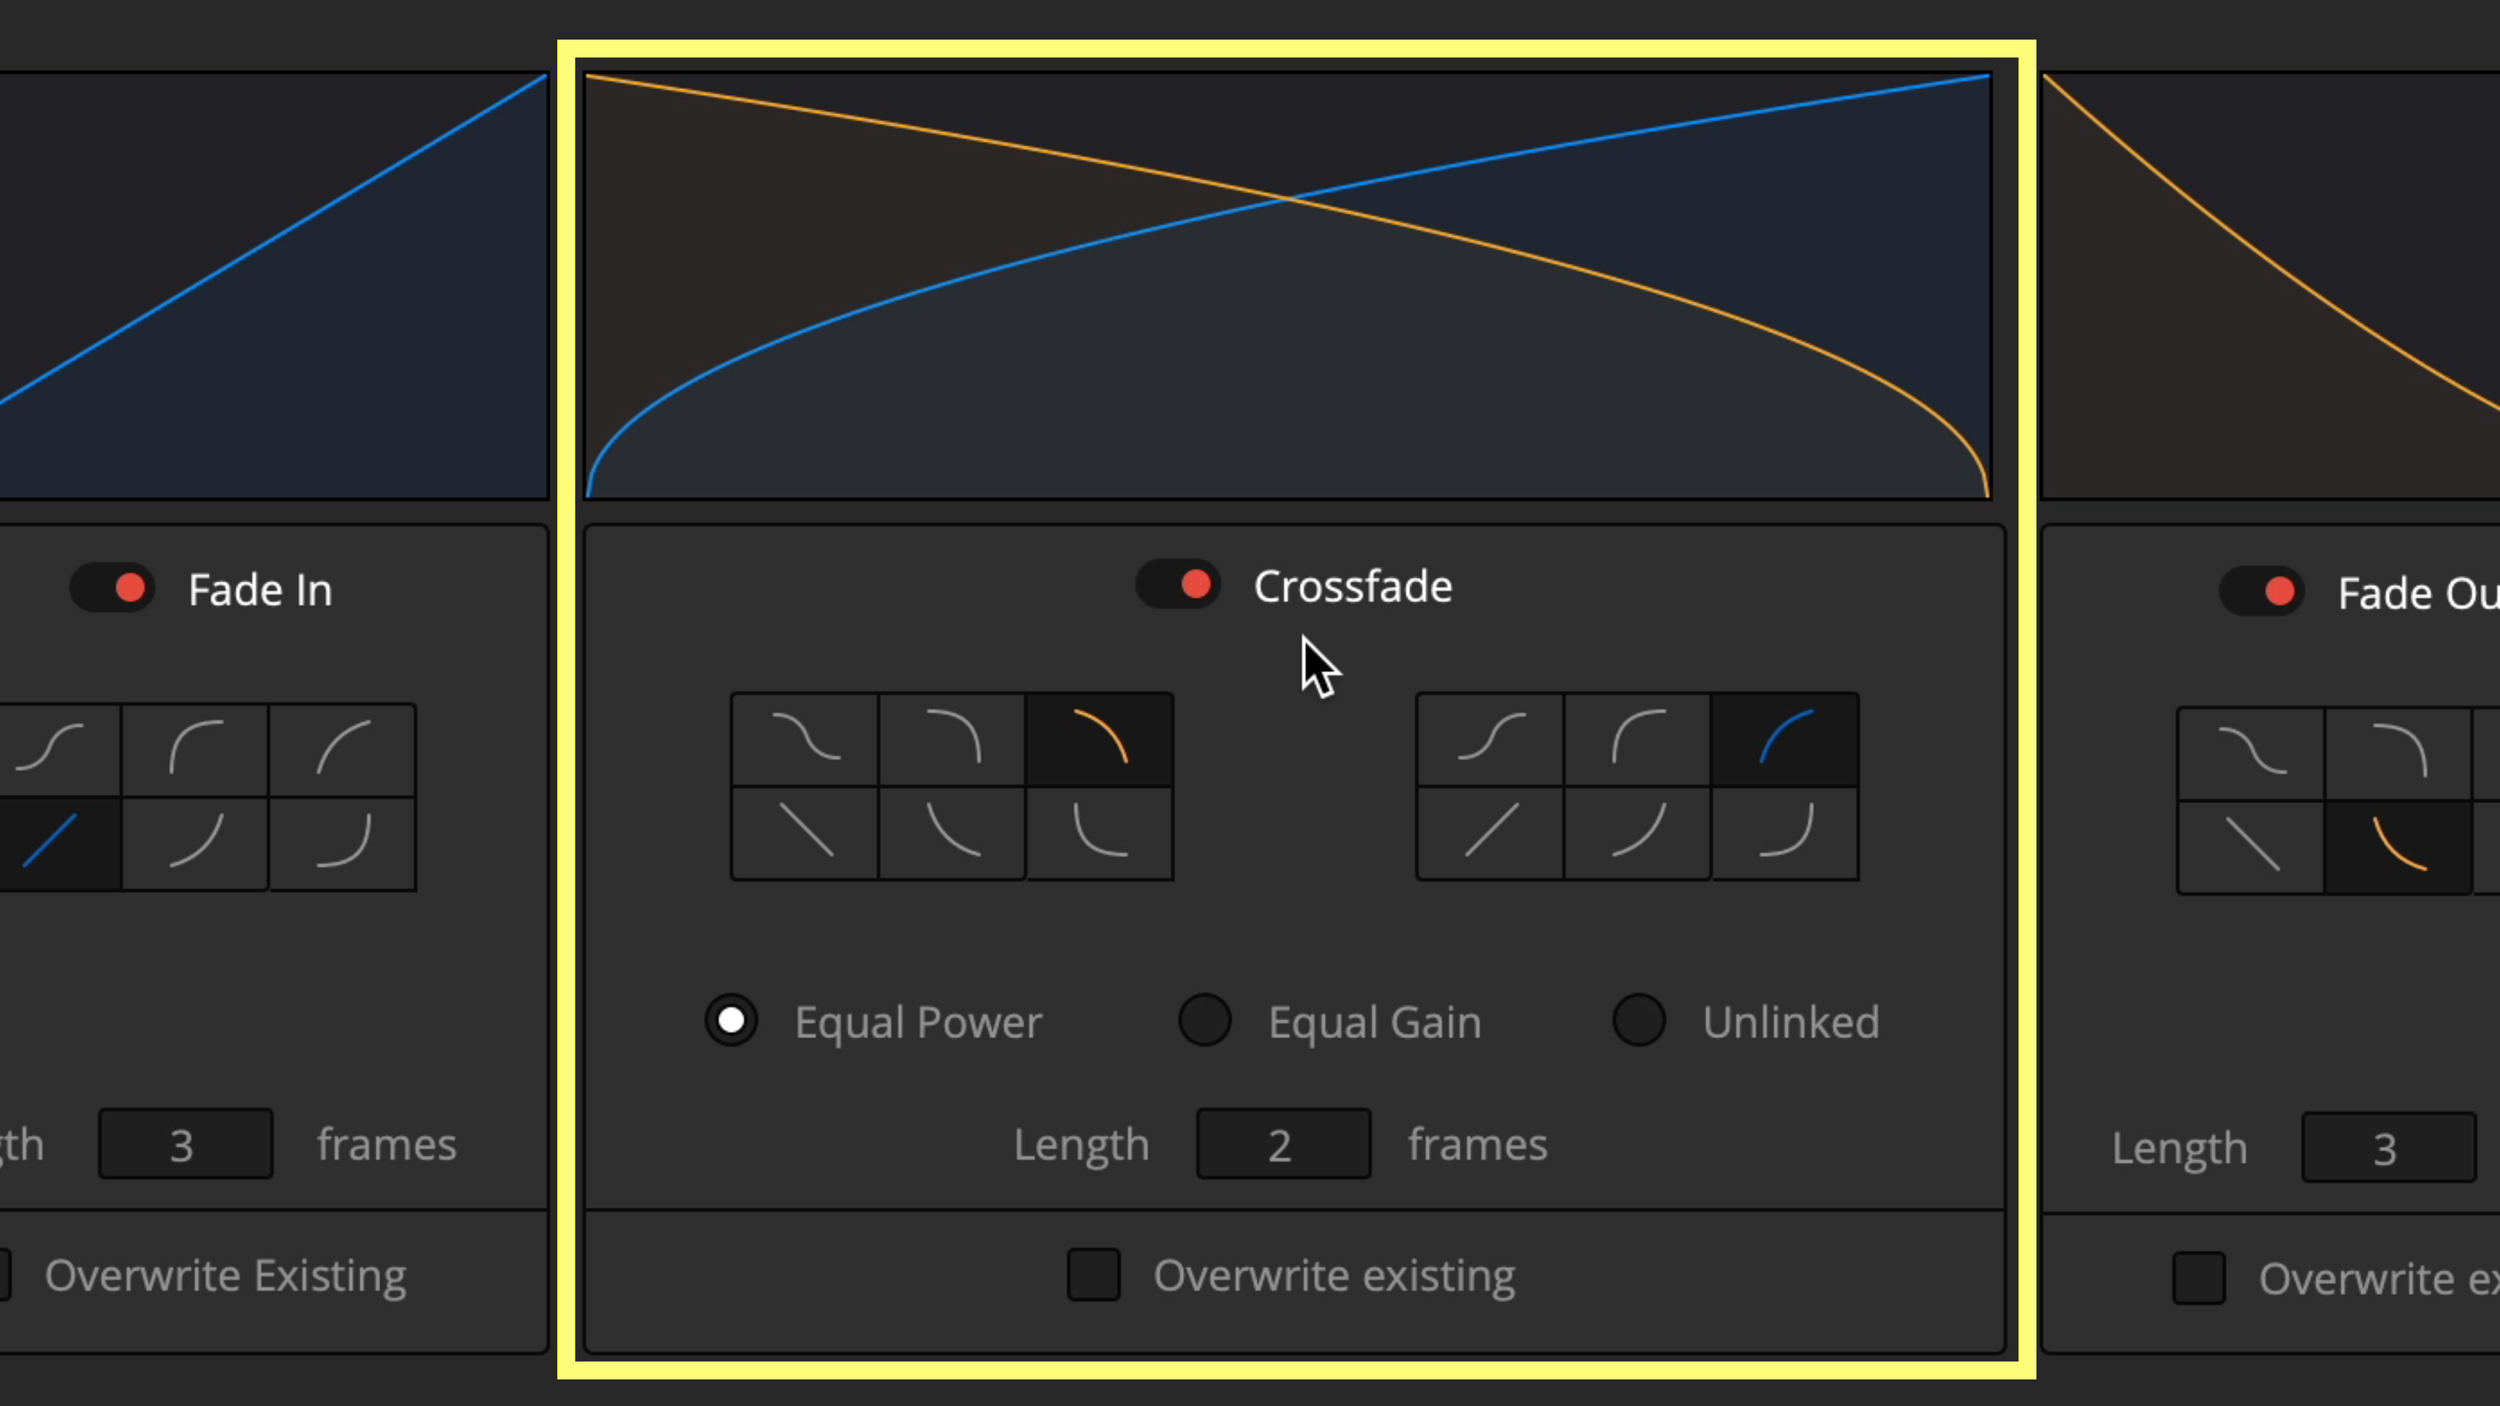
This box gives us so much control, but I love the overwrite existing checkbox the most.
Leave this unchecked, and it won't UNDO any of the work you've already done. This is so simple but so useful because I'm generally not going to apply batch fades in the Fairlight page until I'm close to finishing editing my video. This is a final finishing polishing step. Avid has this ability, but it doesn't have all this extra control that Blackmagic has.
Turn on all three orange switches.
Fade in and Out are for clips that aren't touching another clip on the timeline.
I like a linear fade-in and exponential fade-out set to 3 frames, you can also change the time measurement to milliseconds instead of frames if you're more of a sound guy, but I think in frames. Exponential fades-out are a great way to get a gentle music taper.
The middle crossfade is for clips touching each other on the timeline.
These are good for frakenbyting words together to help make a person sound more intelligent or concise than they initially sounded.
It's perfect for YouTube-style jump cuts.
But crossfades are also perfect for transitioning or ducking music, background room tone, and ambiance, that sort of thing.
The one catch for crossfades is you'll need some handles, which are part of the clip before or after your cut point, to blend the two clips together. It's just like a visual cross-dissolve. Just remember that adjacent clips need handles to create a transition, or you'll end up with a warning.
Choose Equal Power and set the length to 2 frames. 2 frames is usually enough audio samples to cover the zero-crossing issue, which I'll explain shortly.
Click Apply and your fade settings are dialed in.
Apply Batch Fades
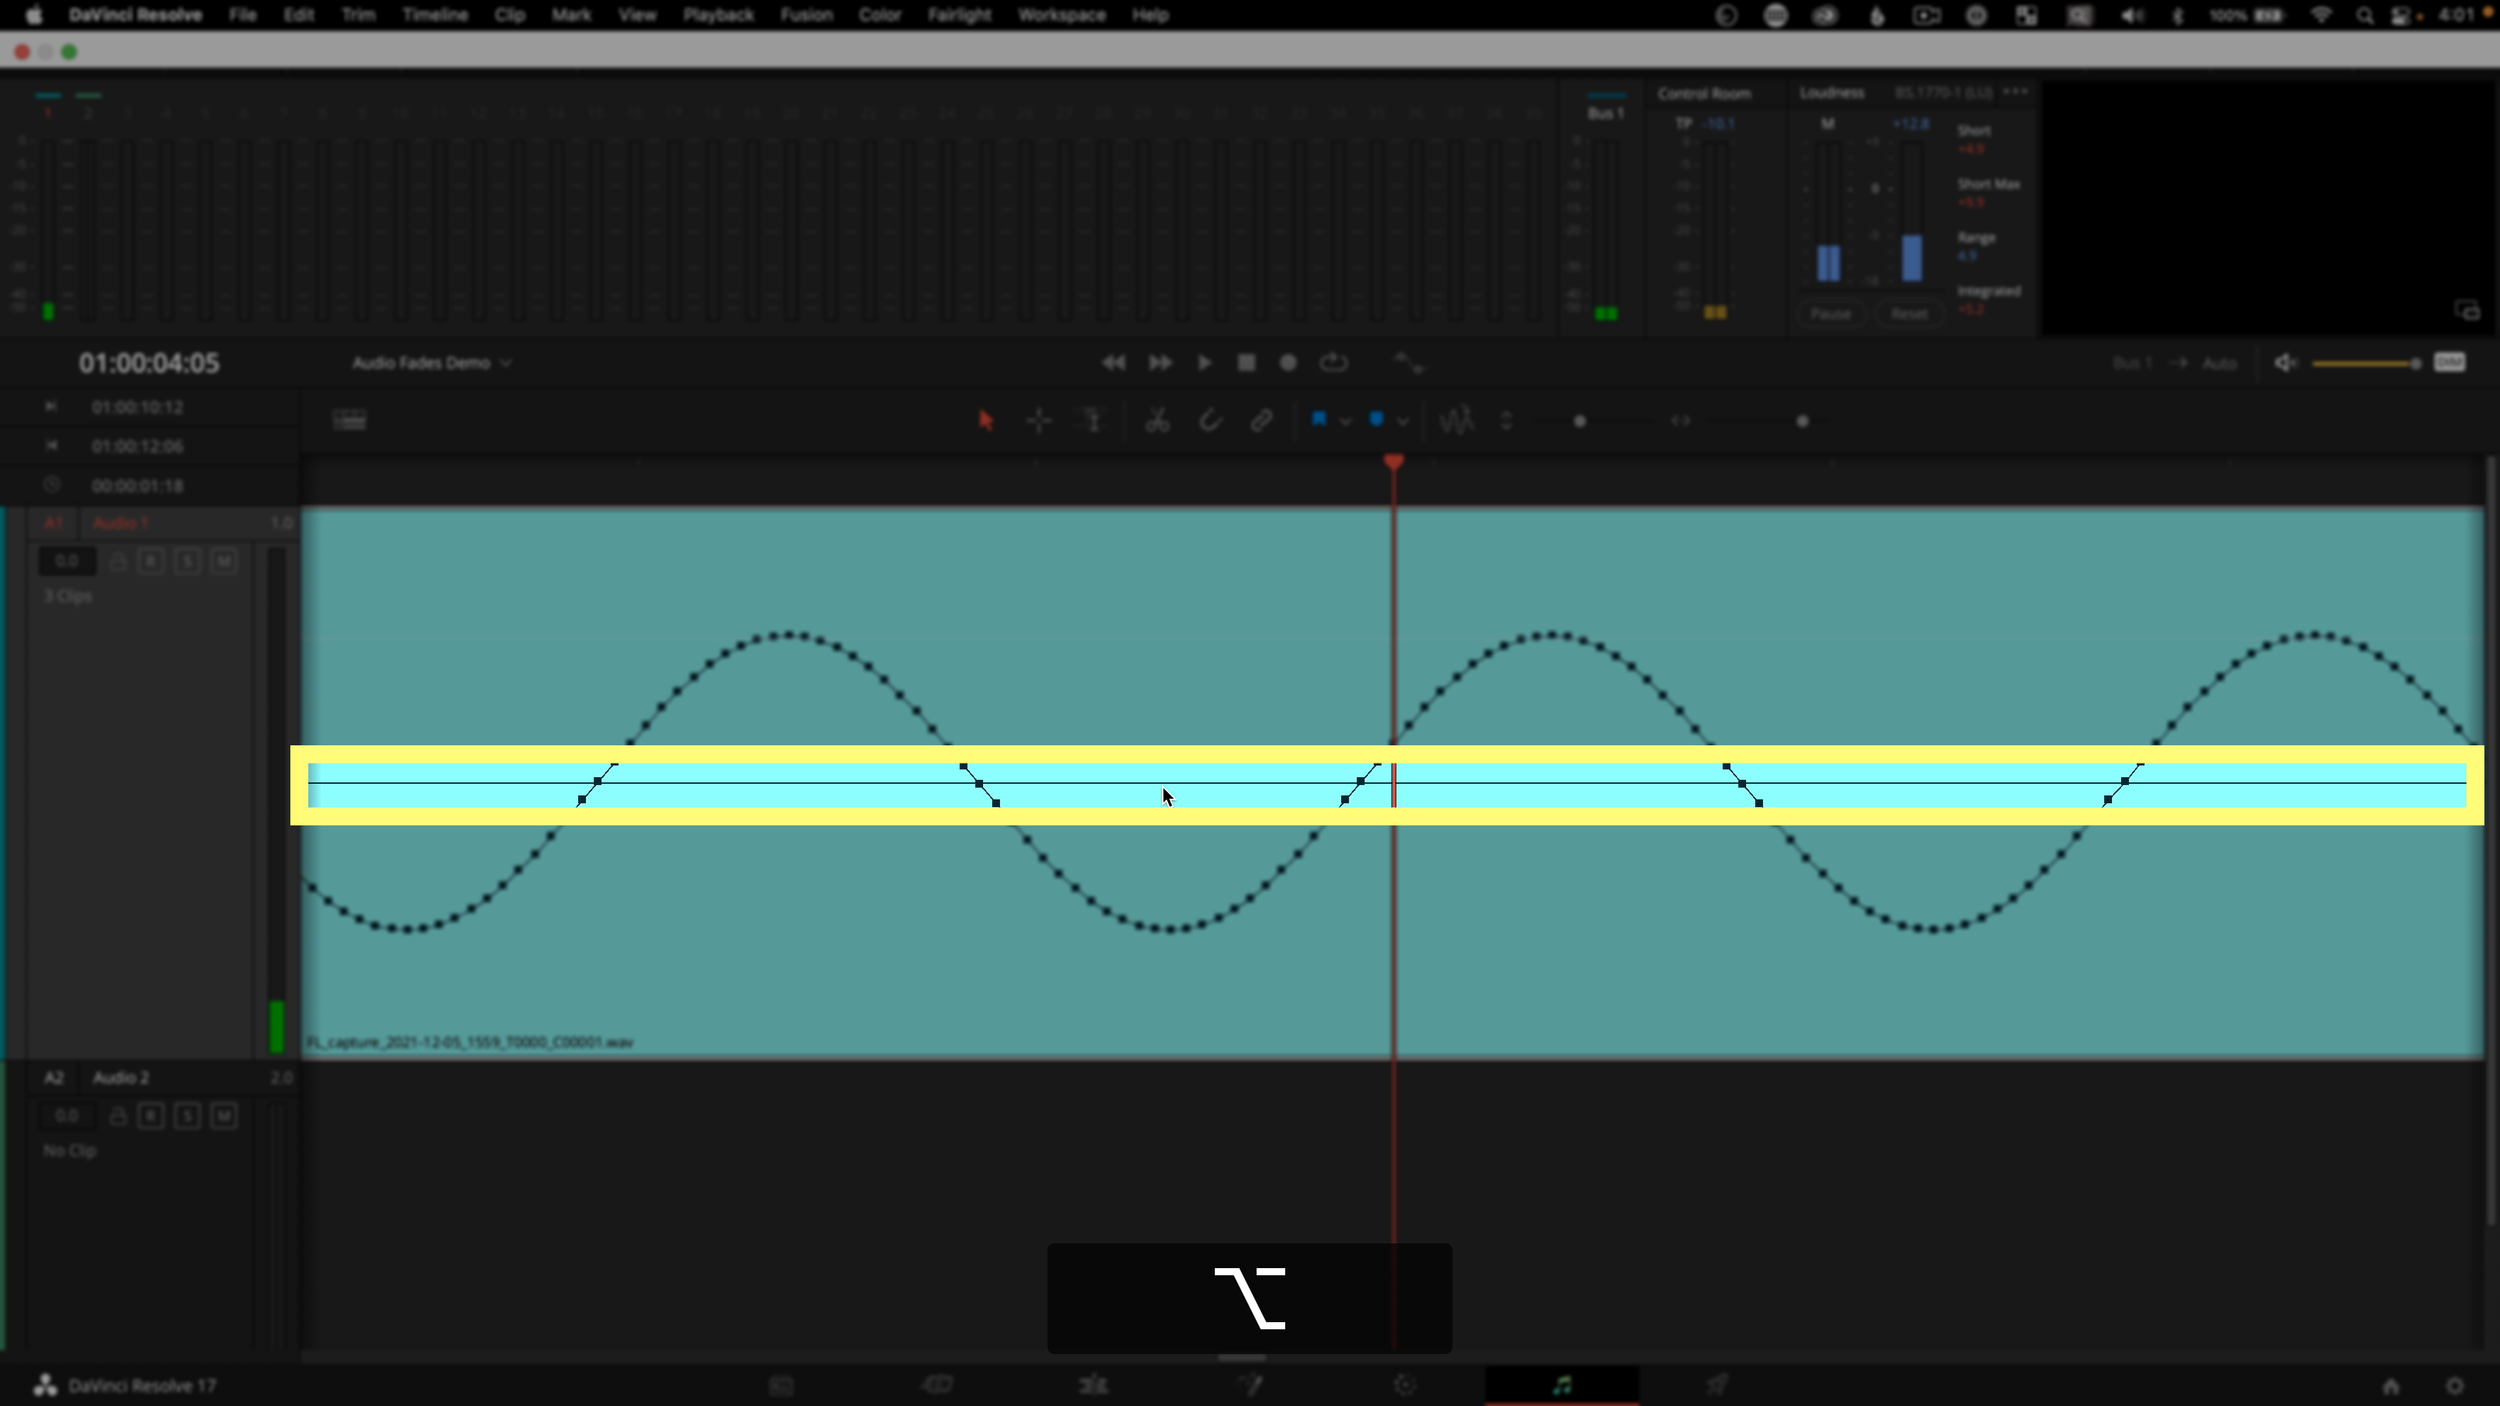
To batch add all the fades, you need to make a selection.
I select the entire timeline by going to the first frame with the home shortcut key.
Mark I on the keyboard
Now choose the range selection tool (r is the keyboard shortcut) and click on an empty track header section. This method lets you choose selections one track at a time.
You can also drag a marque over all the clips easily with the range selection tool instead.
Now go to the Fairlight menu.
And choose "Apply batch fades," and your video will sound SO MUCH BETTER.

Keyboard Customization Settings
Type batch into the search box
Click into the Keystroke field.
I like to use Shift Command F to apply Fades.
And control option command F to bring up the batch fade settings.

Why are Crossfades Necessary?
So you're thinking, great, what the big deal? Why should I care about adding fades to every single cut? Let me briefly explain.
Sound has an up and down waveform shape, and it crosses a middle line called the zero crossing.
If you cut on a zero-crossing, there's no problem at all, but in any video editing software I've ever seen, you can't cut on a zero-crossing because you're limited to video frames and not individual audio samples. Usually, there are 48,000 audio samples in a second, which is a lot more than 24 video frames in a second.
If the wave shape gets interrupted by a cut and isn't smooth anymore, it creates a pop or click when it's played back.
Some brilliant genius came up with the effect called an audio fade or crossfade, which smooths out the samples, so there isn't a jump from one side of a cut to another. The other way to fix a pop is by redrawing the waveform, which you can surgically do in Fairlight, but that's for another tutorial and not something you can batch super quick like fades.
Fades are like a quick bandaid, so nobody will be able to hear the cuts underneath.
The other big question I always had was, Which type of crossfade should I pick?
Under batch fade settings, there are two main presets equal Power and Equal Gain. Honestly, just stick to those 2 99 percent of the time.
And Choose Equal Power (sometimes called constant power) - pretty much all the time with one exception. This type of fade has a +3 decibel bump in the curve to maintain perceived volume throughout the crossfade. It has to do with the logarithmic nature of sound fall-off, but just know that's the setting to pick most of the time.
Only choose Equal Gain (sometimes called constant gain) - for music loops and cues, tone loops, or anytime you could have a phase issue when they're combined. You'll actually hear the bump in audio if you use the Equal power option when crossfading matching tones, so just be mindful of this. Equal gain has your back in this situation.
Batch applying fades is not new to DaVinci Resolve, but having this kind of control and overwriting or not overwriting existing fades is new and extremely useful, but it needs to be done on the Fairlight page. If you're an edit page-only guy, and you don't mind losing some of that control - let me show you another way to apply fades very quickly.
Edit Page Batch Transitions
Let's start by changing two settings.
Open preferences
Go to the user tab
Click on Editing
Now change your standard transition duration to 2 frames. When you start applying VIDEO transitions, you'll want to turn this up to at least 6 or 8 frames - so get used to this preference location.
And save
Set the Standard Audio Transition
On the edit page, click effects.
Audio transitions
And right-click on "Cross Fade +3 dB" to choose "Set as standard transition."
The default is 0 dB, which I would only use for in and out fades, but not for adjacent crossfades.
The +3 dB crossfade is the exact same as EQUAL POWER on the Fairlight page. I wish that Blackmagic would use the same terminology. And if you're coming from Avid, this is your dissolve midpoint attenuation.
Just Select all, with command A
And apply the crossfades with the shortcut Shift T, which is my favorite. Add Audio Only Transition is found under the timeline menu.
Or you can right-click the transition in the Effects panel and choose "add to selected edit point and clips."
Another quick tip to apply A SINGLE crossfade is to hold option and shift, then click and drag one clip on top of another.
Then if you want to center that transition up, just right-click on the transition and choose center on edit.
But then, if you want the crossfade to be asymmetric, you can hold command (control on a PC) and drag just one side with your mouse.
And I just want to show you that IF you jump to the Fairlight page for final mixing, you can see the crossfade effect turns back into our editable fade shapes, and you can click and drag the white dot around to customize it.
The edit page's fade handles are doing the exact same thing as the audio transition crossfade from the effects panel. You just need one or the other.
How to Batch Remove Transitions
Sometimes you just need to DELETE every fade or transition, and DaVinci Resolve doesn't make this obvious, so here's how I get rid of ALL OF THEM with just a couple of clicks.
Select all clips with command A, control on a PC
Now drag any transition from the Effects panel onto an existing transition.
This should have just selected every transition and excluded the clips underneath.
Now just tap delete on your keyboard, and they should be gone.