
Davinci Resolve Project Server Collaboration - Shared Database Tutorial
Did you know that multiple editors, colorists, VFX artists, and audio engineers can all work together in the SAME APP, in the SAME PROJECT, with one copy of the SAME SHARED FOOTAGE, on their computer all at the SAME TIME?
Yeah, I know, It's so cool, and this whole multi-user collaboration workflow even works with the free version of DaVinci Resolve!
After setting this up, you'll have bin and timeline locking so your assistant editor can help, and clip locking lets colorists grade a clip while an editor is trimming the SAME ONE! You can chat between creatives within the app, and it costs next to nothing because you pick your own storage. Today I'll show you how simple this works, even with just an off-the-shelf SSD.
We're covering a lot today, but as usual, I've broken the tutorial into four sequential chapters, starting with how to set up DaVinci resolve project server with shared PostgreSQL databases so everyone can open the same project.
So if you're ready to eliminate the conform process OR get some help from other creatives to therefore to turn around projects faster, then let's jump in.
DaVinci Resolve Project Server
Pick A Computer. Pick your favorite computer. For me, it's the new M1 Max MacBook Pro. This computer will do three tasks. It will act as a video editing station, a file server, and a project server that will run the shared PostgreSQL database.
And the two reasons you might set up a PostgreSQL database for Resolve instead of the default disk database are one: if you want to open the same project in another edit bay in the same facility without needing to export and import a project. Or two, if you're going to use Resolve's multi-user collaborative workflow features.
The computer you pick to run the project server should stay on and be available anytime the other computers need access and needs to be on-premise in the same network. If you have the luxury of a high-speed fiber connection, you could potentially tunnel in through a VPN connection remotely, but that's beyond the scope of this tutorial.
Download and Install Project Server
Go to Blackmagic Designs support page. Links are in the description to download the DaVinci Resolve Project Server software. This is a stand-alone app, and the best way to find the latest version is by clicking on DaVinci Resolve and Fusion software icon box and scrolling down to the latest downloads. Follow the prompts to complete the installation like any other application and reboot the computer.
When you first open the project server, you'll notice it looks a lot like the project manager in Resolve, but it is, in fact, different and stripped down to only performing database management.
The correct version of PostgreSQL comes with Resolve Project Server. It's an old version, but don't be tempted to get the newest version on your own. That won't work. I already tried that.
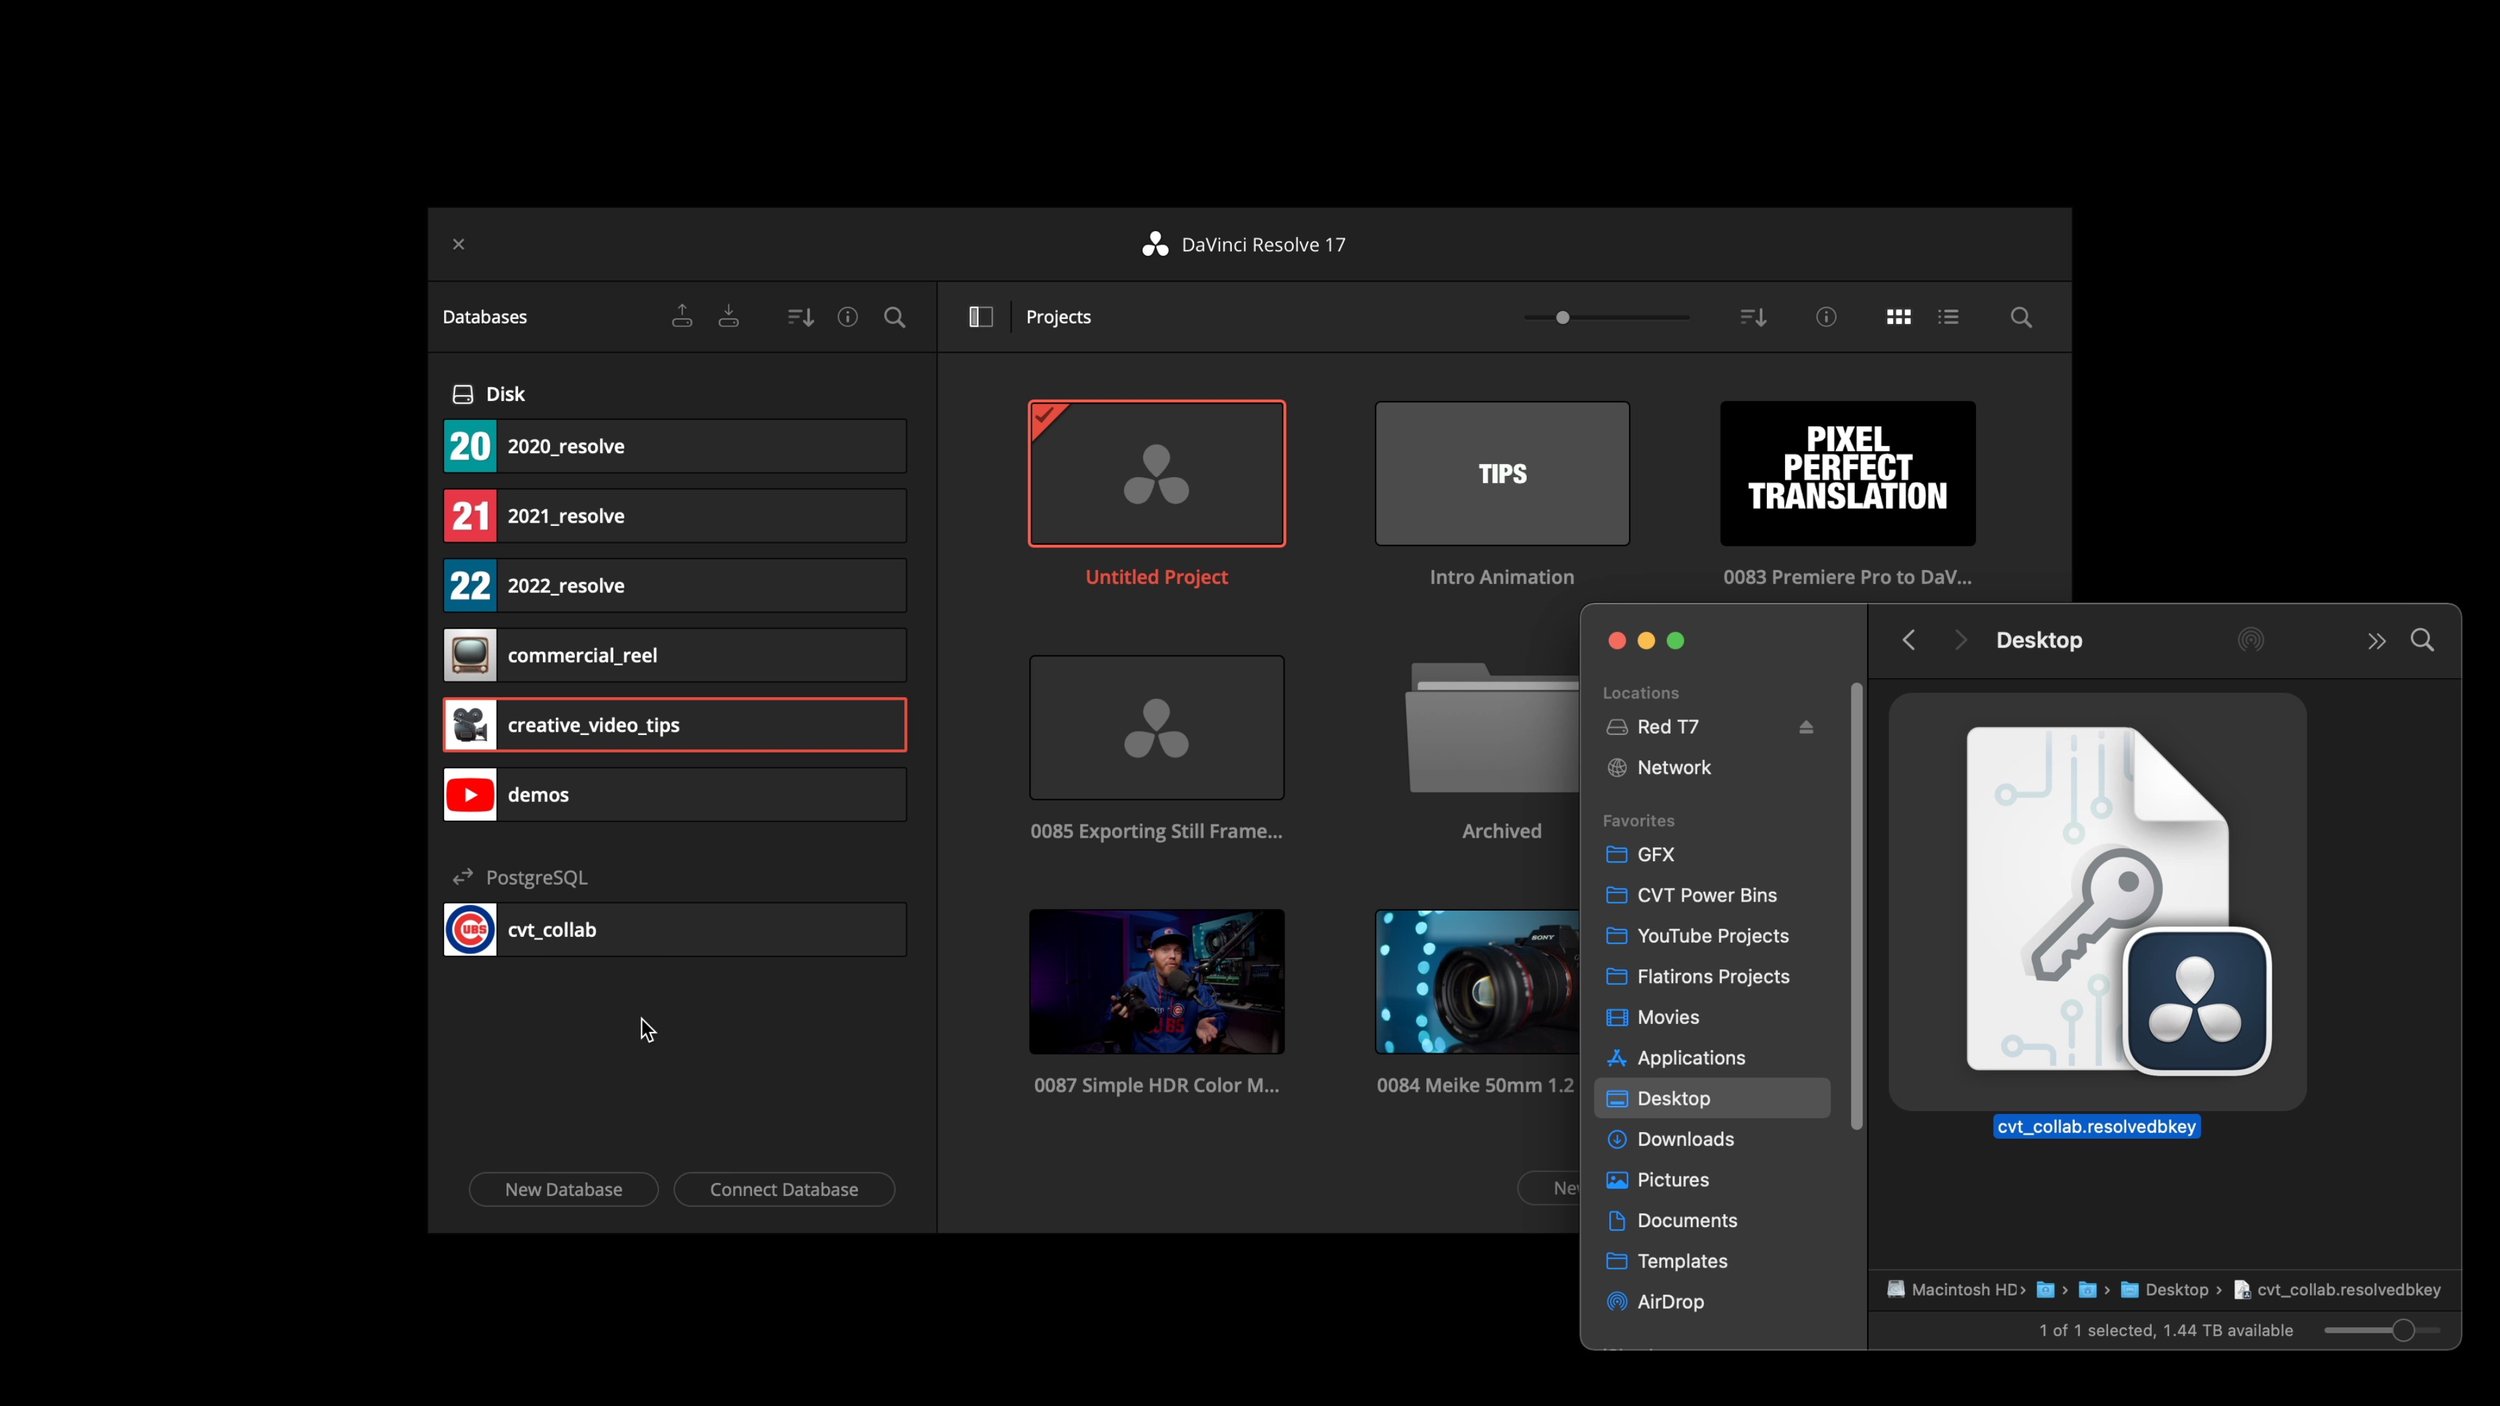
Create a New Database
Click the icon in the header section to create a new database within Project Server. The naming rules won't allow for spaces, just like in disk databases, so feel free to use underscores to make it readable. A simple visual flare you can is right-clicking to load a small image like this 200 by 200-pixel jpeg to help quickly identify each database. For instance, you might use a client logo to use different databases for each client or brand.
Share the Database

Now we need to share the database. Click the enable sharing button at the top, which will ask to authorize the configuration of the PostgreSQL server. Just enter your user admin credentials, and you'll see blue left and right arrows to indicate that the database is now shared.
Access Keys
Blackmagic created a cheat sheet text file if you click on the top right to generate and export an access key. This will include the IP address of the project server and login information, so you don't have to think about it. Suppose you're curious about this information (and I'm always curious). In that case, you can open the access key with text edit or see the IP address from the project server up under file, with the network interface dropdown meu.
The point of this file is to send it to a computer that needs access to the database. It's tiny, so you can email it or use airdrop.
Time for me to run upstairs to my sons' computer, which will act as the assistant client computer.
Before I add this access key, it's a good idea to make sure you're running the same version of DaVinci Resolve on all the machines. They don't need to all be the paid Studio version, but they should have the same number. The free and paid versions always come out in tandem. You can grab the latest versions from the Blackmagic support page, and for reference today, I'm working with 17.4.3.
Now on the assist client computer, after you have launched Resolve, click the upper-left icon in the project manager to show and hide databases and simply drag the access key file into the project manager window, and bam! Sorry I grew up with too much Emeril Lagasse in my home.
Anyways, as you can see, you don't need any of the project server installation stuff going on for the client computers.
However, the project server does not store the footage and media assets. It only keeps the databases that hold projects that point to your media assets. The footage is stored wherever the heck you want it to live, so next up, let me show you how to share a single SSD to collaborate with one copy of the footage.
Mac OS Shared Volume
Connect 2 Macs. We will connect two Macs using a cheap but long, gigabit ethernet cable for a basic scenario that could even be used on set. And if you're workstations sit close together, you can even use a thunderbolt cable to bridge them for much faster speeds.
Just plug the cat six cable into both computers (on my MacBook, I needed to use a thunderbolt to ethernet adapter). You do not need to use a specialty cross-over cable like in the olden days. An off-the-shelf ethernet cable will give you about 75 to 95 Megabytes per second of real-world video data transfer. Once you plug in both computers, go to system preferences, network.
And allow them to connect over DHCP with a self-assigned IP address. DHCP is an automatic way for computers to generate a unique IP address. It can change over time, so you might want to set a manual static IP for long-term use, but this will get you quickly started with no networking knowledge needed at all.
Shared Volume
This SSD has all the footage on it. It's a good idea that the drive is as fast as possible. NVMe SSDs like Samsung T7s or Sandisk Extreme Pro's fit this bill perfectly and are very accessible.
So to share it out, plug it into the project server computer, my MacBook pro. Head over to system preferences again, click sharing, then check the box for file sharing, and hit the plus button to add your volume or SSD that you want to share. You can also drag it in there from the desktop. This will share the drive out over smb protocol.
Under the users section, make sure your user account on this computer has read and write access on that drive. Read and write means precisely what it sounds like. It means you can see the files and manipulate or edit any changes. Keep this in mind when we get to bin locking.
Now over here on the client assistant computer, open finder.
Click the Go dropdown menu and go down to network. The shortcut is command shift K.
Find the editor server computer that was shared and connect as and enter the login information as if you were logging in on the server computer.
An alternate way of connecting is to go to the bottom of the go menu to connect to server or use command K. Using connect to server you can enter the local IP address of the server computer, the MacBook, by typing in smb://… the address to mount that drive in a faster way. The advantage here is that you can also bookmark the server computer's IP address with the plus icon for future use.
DaVinci Resolve Collaboration
Make sure you have the same version number running on all the machines. And disable dynamic project switching if it's on. This is a simple right-click. Dynamic project switching lets you have multiple projects open simultaneously, which I use to copy and paste between projects or queue up a batch of deliverables all at once. However, dynamic project switching does not work with shared PostgreSQL projects.
Create a new project in the project manager and open it up. Go to the File menu and down to enable collaboration. Save it, and from now on, live save is turned on for every click or change. Note here that you'll need to turn on "enable collaboration" for every new project if you want to work together with your buddies.
Create Proxies
Feel free to add footage to your project on the client computer, and I suggest creating proxy files on a low bandwidth solution like gigabit ethernet. One of my favorite codecs is 4k Blackmagic Raw 12:1 compression. That's what you're watching right now, which is relatively small and high quality but does use about 370 megabits per second. And a smaller proxy at 2k resolution with H.265 compression-only uses about ten megabits per second. Not only will it play easier through the ethernet cable, but it also takes up much less hard drive space, and side note - it makes a project archive easy to send over the internet. If you don't have a recent computer with H.265 decoders, ProRes Proxy and DNxHR LB at 2k are about 40 megabits per second and are both battle-tested workhorse codecs. ProRes Proxy is more for a mac workflow and DNxHR for windows. Essentially you will edit with the proxy files and then export with the full-resolution originals. The proxy files link behind the scenes and get used when you have the checkbox selected under the playback menu for "use proxy media if available." Uncheck it, and you're back to the raw clips. I have a full tutorial on this with a link in the description.

It's also worth pointing out that each client computer can locally have its own cache files for the best performance. You set that location in the project settings, under master settings, and working folders for cache files location.
And if by chance on the assistant computer you see red offline media, there is an issue with Resolve not looking at the same file path, but it can be relinked easily with the broken chain link icon on the edit page and pointing to the closest folder that you know the media resides. One more quick thing to point out with offline media is that some of the newest cameras will shoot 10-bit formats that are simply not supported in the free version of DaVinci Resolve. Instead of saying not supported, it will say offline. This is a moment when you need to either upgrade to the paid version or decide not to film with 10-bit settings on the camera.
Collaboration Features

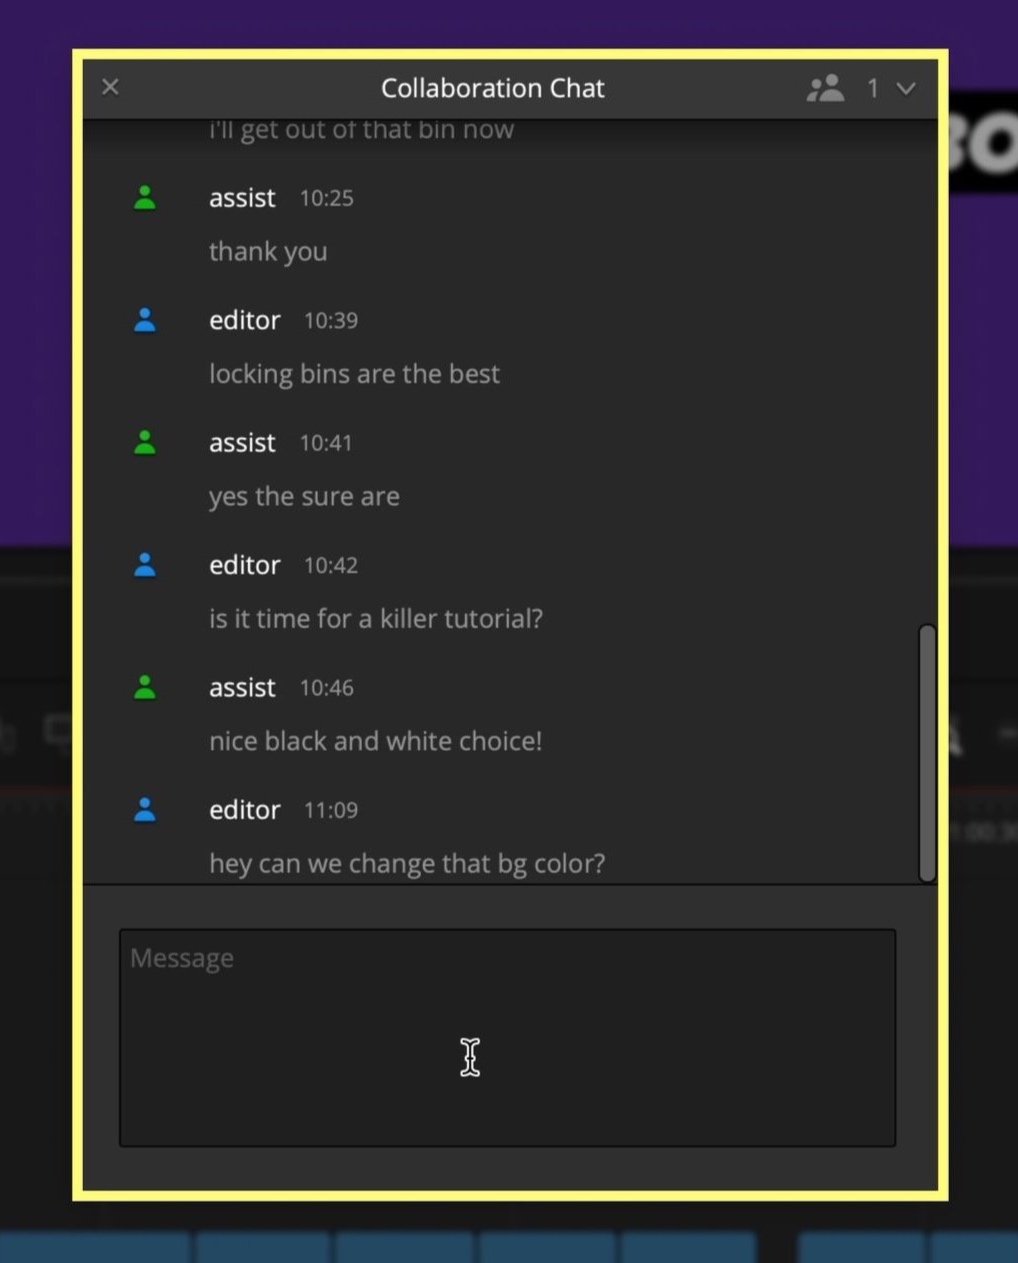
Identity badges in the lower right let you change your name to be something more personal than the computer hostname, and if you click on the person icon, you can choose your favorite color. The color is helpful because it lets you visually see what bin another project member is working on. And if you need to get access to a locked bin, you can click the chat window down in the lower right to message them right within DaVinci Resolve. No Slack or Microsoft Teams (or internet) needed. After sending a message, it will appear orange on the other computer to see a new message notification.
Bin, Timeline, and Clip Locking

Bin locking is one of my favorite three things that Avid Media Composer does an excellent job at. This is the crux of post in most big-budget productions. DaVinci Resolve kicks this up a notch by not restricting collaboration to editorial but also finishing, mixing, and color. And it does this by utilizing bin, timeline, and clip locking, which depends on which page you are working on. The locking term prevents version conflicts and means the first person to access it get read and write permissions. Everyone else gets read-only permissions. As soon as a project member clicks away from their timeline, bin, or clip (in the case of the color or fusion page), it becomes unlocked so anybody else can gain full access to it.
It's helpful to organize a project, so an assistant has their working folders or bins, and then the editor has theirs because the first person to open a bin has read-write access. You can see who has this full access to the contents of a bin by the colored icon from the other creatives' computer.
Suppose an assistant needs to help add graphics to an editor's timeline. In that case, they can still go in while the editor is cutting and duplicate the timeline (Blackmagic, please make this a keyboard shortcut) or copy and paste the clips in to their own timeline in their own bin that they have full access to. The same principle applies to an audio engineer working on the Fairlight page since both the edit and Fairlight pages work on an entire timeline at once.
In contrast, a colorist or VFX artist can work one clip at a time in the color or fusion pages. And they can both work on the same shot simultaneously because fusion and color manage the changes independently. Can you see the power this has to work effectively with everyone together?
To refresh changes from another creative, click the refresh icon in the upper right of the timeline viewer to get the latest color grade. This is a manual refresh, so it's not changing on you unexpectedly during a supervised session with people sitting behind you. You can also click to update on the clip in the timeline or refresh by clicking the bin in the media pool.
If you want to always have read and write access to a specific bin because you're worried another person will jump in and hog it, you can manually lock it so even after you leave it, you'll still be the only editor with read-write control. To do this, right-click and choose "lock bins," and a lock icon will indicate that nobody else can mess with it. And then, you can manually unlock it with the right-click option as well. I wouldn't keep a bin manually locked from one day to the next because of the overused getting hit by a bus metaphor.
On the flip side, if you are the first into a bin and don't want the read and write access because you're just window shopping, you can option-click the bin, so someone else can go in to make the changes. The read-only mode has an eyeball icon.
Timeline Comparison

Timeline comparison is a cool feature that is not unique to shared collaborative projects in Resolve and something I haven't used much yet, but I plan to in 2022. It's a window that offers a stacked visual timeline representing the differences between 2 different versions of sequences. To use it, go to the media pool, right-click the timeline you want to compare against and choose to compare with the current timeline. You can change the zoom level using the slider on the right, open a difference index on the left, and right-click to accept changes from the one timeline to the next. Close this window out in the lower right. Are you as pumped as me?
Deleting PostgreSQL Old Databases

I can almost guarantee you might set up a test database that you will want to delete in this new PostgreSQL Project Server, and Blackmagic Design safeguards you from doing so. That makes sense, but if you need to get rid of it, here's how to do it.
In DaVinci Resolve Project Server, right-click the database you no longer want and disconnect it from the project server. It's not deleted at this point. You need a tool like PG Admin 4, which you can download for free. The link is in the description. PG Admin 4 can remove it from the system altogether. Install it like any other app and create a quick password, so no freelancers come messing with your precious work. Click the servers and enter the password "DaVinci" to get access. Right-click the database you want gone forever, no turning back, and choose delete drop.