
How to BACKUP + CLEAN INSTALL DaVinci Resolve 18
In this video, I'm going to show you the best way to do a CLEAN INSTALL of DaVinci Resolve 18. This is PERFECT for those of us upgrading to the newest, latest version of Resolve or if you just need to troubleshoot some bugs. This actually fixed a Multicam playback issue that I was having this week.
I'll take you step by step through how to back up your PROJECTS, LUTs, KEYBOARD SHORTCUTS, FUSION TEMPLATES and FARILIGHT PRESETS. I'll also point out the SPECIFIC FOLDERS that you'll want to trash (and are not removed with the uninstaller), All so that you can get back to cutting your masterpiece in no time.

Backup: Keyboard Shortcuts
Start by backing up your keyboard shortcuts by going up to the DaVinci Resolve Menu, Keyboard Customization, and click the 3 dot menu to choose the export preset for your custom keyboard layout.
Let's save all these different backups in the same folder so it will be easy to reload after doing a clean install.
So I'll create a new folder on the desktop and call it Resolve Backup Files. Hit Create and then save.
This special text file can be re-imported with the same three-dot menu using the import preset command.

Backup: LUTs
Next, I like to backup all the LUTs on the computer. A fast way to find them is to open up the project settings with the little cogwheel in the lower right.
Go to color management.
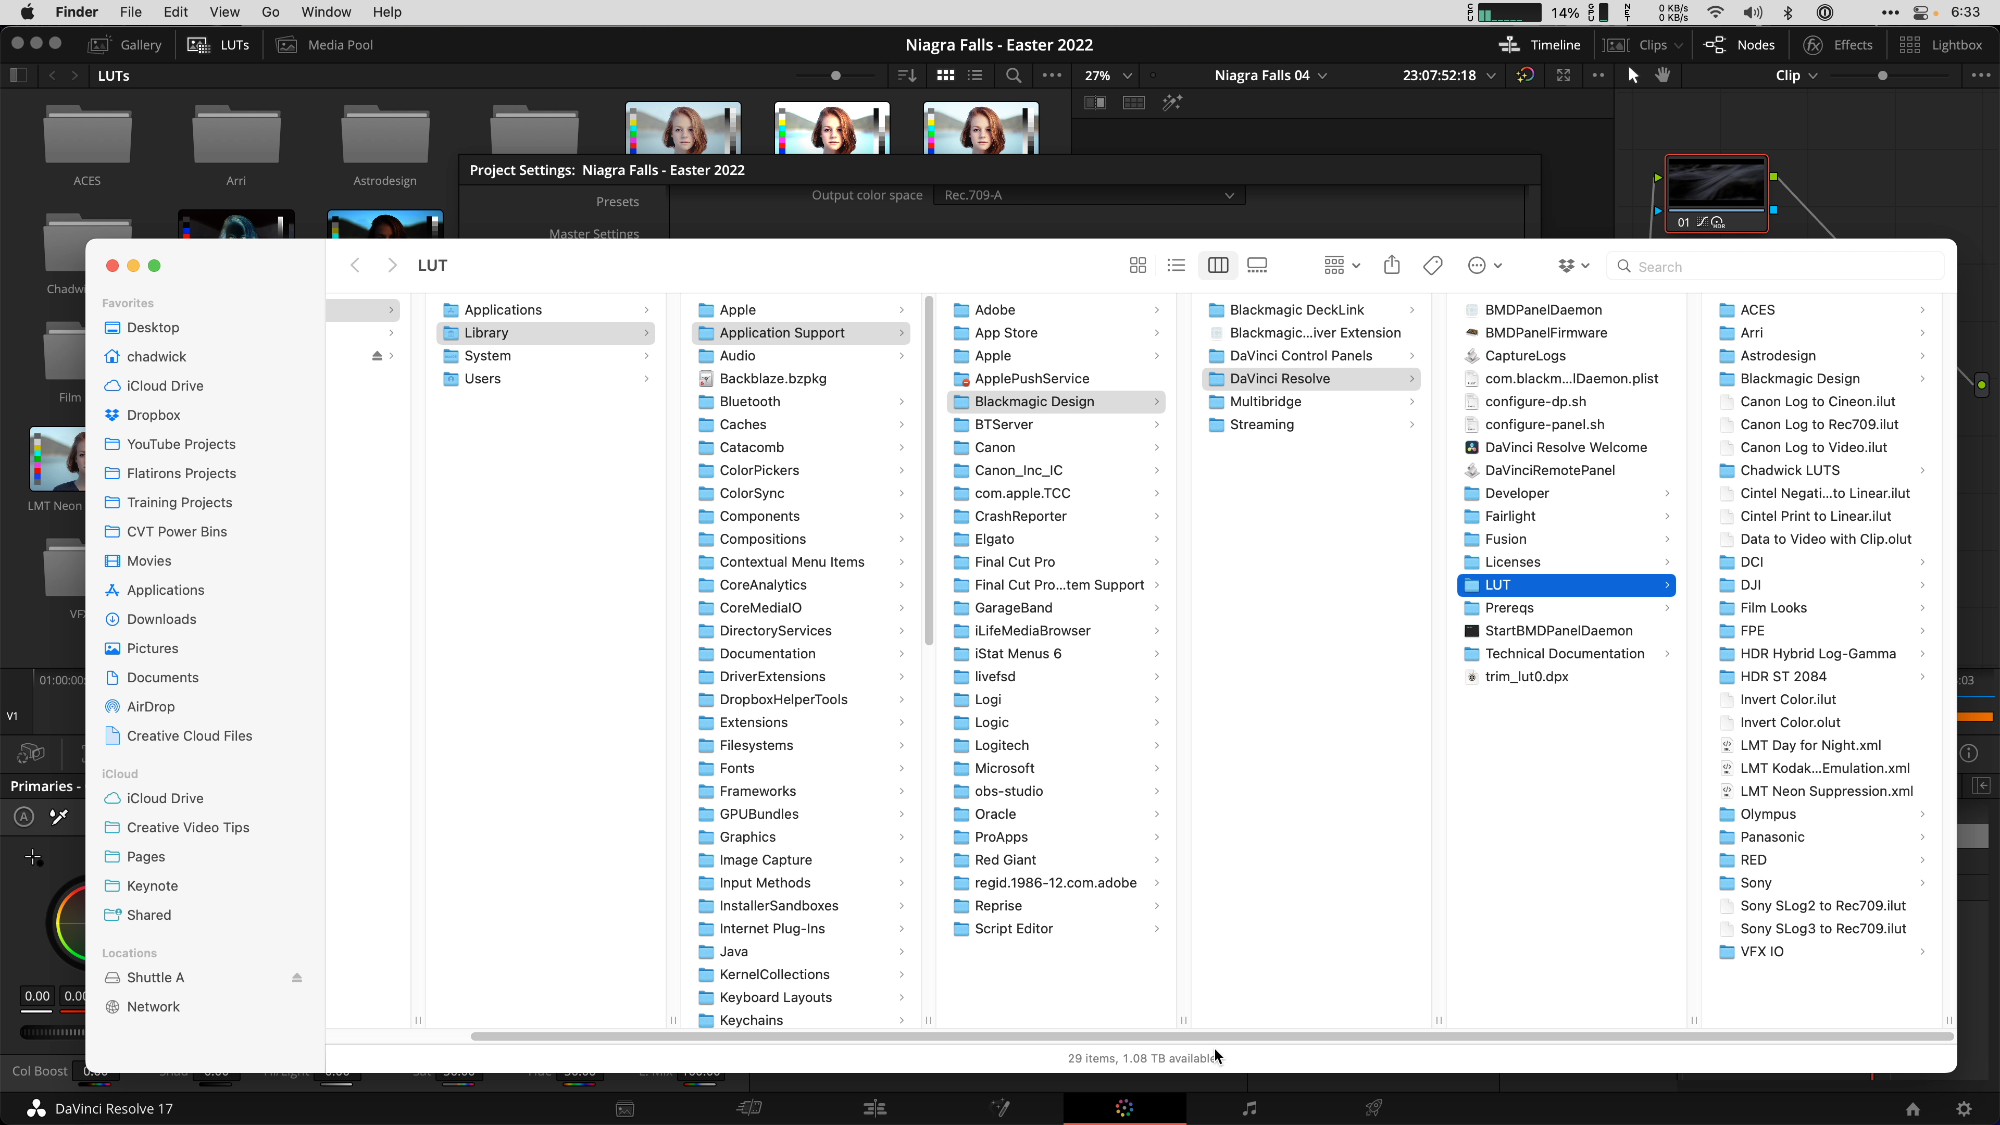
And then down to the Lookup Table box to click on "open LUT folder".
This is folder 1 of 3 that you need to know. It's in your system, library, application support folder for Blackmagic design a mac.
You can turn on the helpful breadcrumb trail in finder up under view - show path bar. These are clickable links that can help you navigate folders a little faster.
Anyways, to backup the LUT files, we're going old school with edit - copy on the LUT folder, and then navigate to your backup folder and edit paste item.
Backup: Fusion Templates & Plugins
Here's the trick to quickly find where your Fusion templates live. Open the Fusion page. Then click on the Effects tab and click on the Templates folder.
Now you can click the 3 dot menu to choose "show folder."
Because we already turned on our path bar, you can see the location this is at. We're actually inside the specific USER LIBRARY FOLDER and not the system-wide folder. The dot DRFX files and dot Settings files are whats' important here. So to back these up old school let's navigate back a little differently.
Command-click the template header name, and choose the fusion folder.
A quick side note, if you store your disk database in the default location, this is where they're kept, and I'm going to show you the best way to back it up in just a few seconds.
Now click the Templates folder to select it, go to edit copy, and then back to the backup folder, edit paste.

Backup: Fairlight Presets
Fairlight presets live in the 3rd folder you need to know. I don't know of a way to take you directly to this folder from within Resolve, so this gives me the chance to show you one more Finder Pro Tip about the USER Libary folder on a mac.
Even if you've never saved a Fairlight preset before, which by the way, are super handy if you film with a similar audio setup, this library trick is a really good one!
With finder open, click the dropdown to the go menu and then choose home, this is the user home folder. We need to get into the user library folder and by default, the mac OS has always hidden this folder. You won't see it in this list.
Now there's a trick to see it by holding down the option key when you click the go dropdown menu and you'll get access, but that's only a temporary view.
Instead, what I like to do from the home folder
Is click view - show view options - and check the box for "Show Library Folder". Now this folder will always be visible on your Macintosh. Pretty useful right?

Now let's head into the preference folder to grab those Fairlight presets. Just click on Libary, Preferences, Blackmagic Design, DaVinci Resolve and you're there.
This is the 3rd out of 3 settings folders you really need to know besides the actual app folder inside of applications.
Simply go into Fairlight and Select the presets folder, manually copy, and then go back to your backup folder and edit paste.
Backup: Database Projects (Project Library)
Those last 4 steps were important because they contain files that are NOT part of the disk database that stores all of your projects. Thankfully there is a very simple backup button from the project manager to create a portable database backup that will be simple to restore after installing the latest version of DaVinci Resolve.
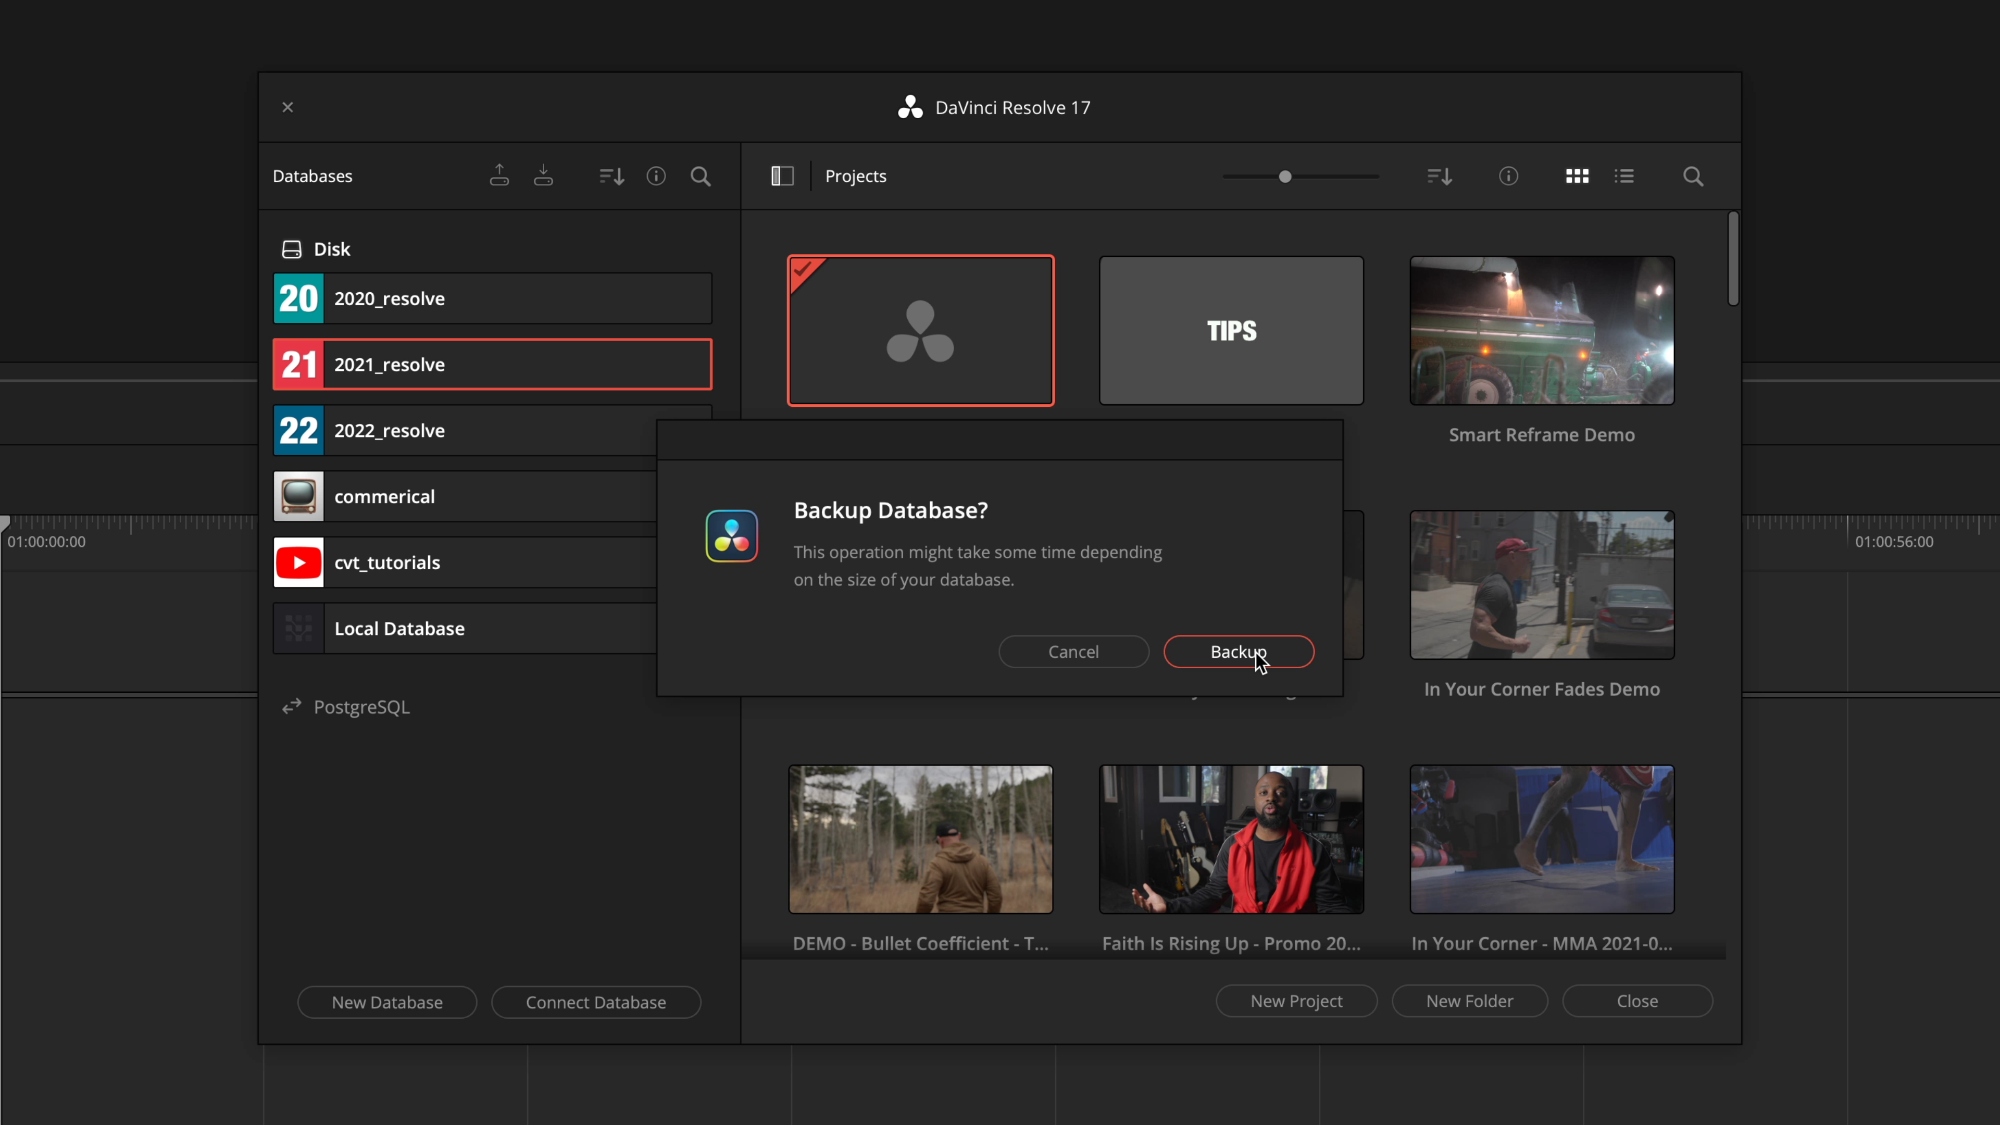
Open the project Manager with the home button in the lower right. Click on the show database button in the upper left if they're hidden, and backup the currently selected database by clicking this up arrow backup button.
Choose your backup folder, click save, and backup. Yes, this could take a few minutes if you have tons of projects. It'll create a dot diskdb file that is extremely valuable since it has all your projects in it and is easy to backup to a cloud service. I do this on the first of every month using iCloud. Rinse and Repeat for each database if you use several like me, and you're done with backups!
Uninstall Resolve
Before you run the uninstaller if you're running Resolve Studio, the paid version, this is a good moment to: A,
Make sure you have and know your license key if you're not using a dongle, and then B,
Deactivate your current license under the help dropdown menu, and choose to deactivate license. It will warn you about knowing your serial number so now you've been double warned.
Click deactivate and quit Resolve.
Now head to your application folder for DaVinci Resolve and run the straightforward Uninstall Resolve application that comes with every install of Resolve.
So now that the app went bye-bye, it's time to clean out these 3 supporting settings folders to the trash.
User Library - Preferences - Blackmagic Design - right-click to move to trash
User library - Application Support - Blackmagic Design - right-click to move to trash
System Macintosh HD - library - application support - blackmagic design - davinci resolve - right-click to move to trash
Finish the clean uninstallation by rebooting.
Install DaVinci Resolve 18
Download the latest version of DaVinci Resolve 18 from blackmagicdesign.com/support. Click the davinci Resolve box and then you can choose the paid studio version or the free version with links to each operating system from there.
After downloading the app, just double-click the zip file to open it up and then load the disk image with the installer.
Double click the Install Icon and let that run. Add your Activation serial key if you're using the paid version and you have a fresh install!
To restore your old database, make sure to show databases and then click the downward restore database button. Click your dot diskdb file to open it and here is your opportunity to rename it and save it in a more accessible folder location.

This process basically takes that backup bundled file and unwraps it like new into your designated location.
I store mine inside of documents and inside a folder I created called blackmagic design. Inside of here, I create a folder for each of my databases to stay organized.
So choose a name without spaces and point it to a location with browse, create it and restore.
Now import your keyboard shortcuts into the keyboard customization window and then close davinci resolve to copy and paste those other 3 folders back into place for your LUTs, Fusion Templates, and Fairlight Presets and you're back in business.
Because you did a proper database restore you should still have all your project presets, power bins, and power grades available, you just might need to tweak some preferences and export presets to your liking.
I'm so excited about the newest version of DaVinci Resolve, but I really need YOUR HELP to know - What are YOU most interested in learning about with all these great tools we have at our fingertips?