
Circle Mask Video Effect in DaVinci Resolve
Learn how to SYNC and MASK a video clip into a circle for a fun picture-in-picture,webcam-style video effect. I packed this tutorial with new DaVinci Resolve 17 features and tools you probably missed. Enjoy!
Start by placing the footage you want to mask in a circle on video track two of the timeline, so it's on a layer above your background screen recording. New tracks will automatically be created for you.
Synchronize 2 Clips
Now to synchronize these, it's as simple as selecting both clips with your mouse with a click and drag.
Right-click on them and choose - "Auto Align Clips," and for this, we'll use based on waveform.
Now that they're synced, I would disable the audio on one of the clips by selecting it with the Option or Alt key with D for disable. This will mute that clip, but still, keep it around in case you need it later.

Two tips to be aware of when you sync up clips this way are one:
You need good reference sound on channel one of the clips. So if you have four-channel audio on your camera, make sure you aren't leaving channel one silent.
And number two, you can only sync one clip per track at a time on the timeline.
Resolve FX - Transform
Next, you'll add the transform effect to crop the video into a circle.
Open the effects tab in the upper left.
Click on Open FX
and use the search bar to start typing the word transform
You can drag this down to your video clip on layer two, or sometimes better yet,
Pro tip - select the clip on the timeline first and then double click the effect from the effects pallete. You'll know it's applied because of the new fx badge on the clip.
Open the inspector in the upper right of the edit page and click the effects tab property.
There are so many parameters to this effect, so to see them all, click the dropdown carrot in the upper right to expand the inspector view.
And then, under the advanced options, look for EDGE ROUNDING and crank this setting all the way over to one to make a perfect circle.
If you click on the video tab in the inspector, you can make a tweak underneath the transform mask to center and scale up a face using the position and zoom sliders for a closer headshot.
Fusion Shape Nodes
Now we'll add a basic fusion shape to outline the circle with a stroke. Hang with me if you're a fusion noobie like me. This is going to be super simple.
Open the media pool
and right-click to create a new fusion composition
change the duration for as long as you'd like. I'll change it to 10 minutes,
call it outline, and create.
Let's place this fusion comp directly above the circle clip on video track three with a three-point edit.
Select your circle clip on track two,
And use the keyboard shortcut Shift A to mark in and out points on the timeline.
Now drag the fusion comp to your timeline viewer and choose PLACE ON TOP.
You have just precisely dropped the blank fusion comp on top to fill that whole duration.
You can always drag and drop and trim with all kinds of methods. I just wanted to point out the Shift A command to mark a selected clip, because it's new to me.
To actually create the circle, right-click the fusion comp and go down to open in fusion page.
Let's open the effects tab
Choose Tools
and then Shape
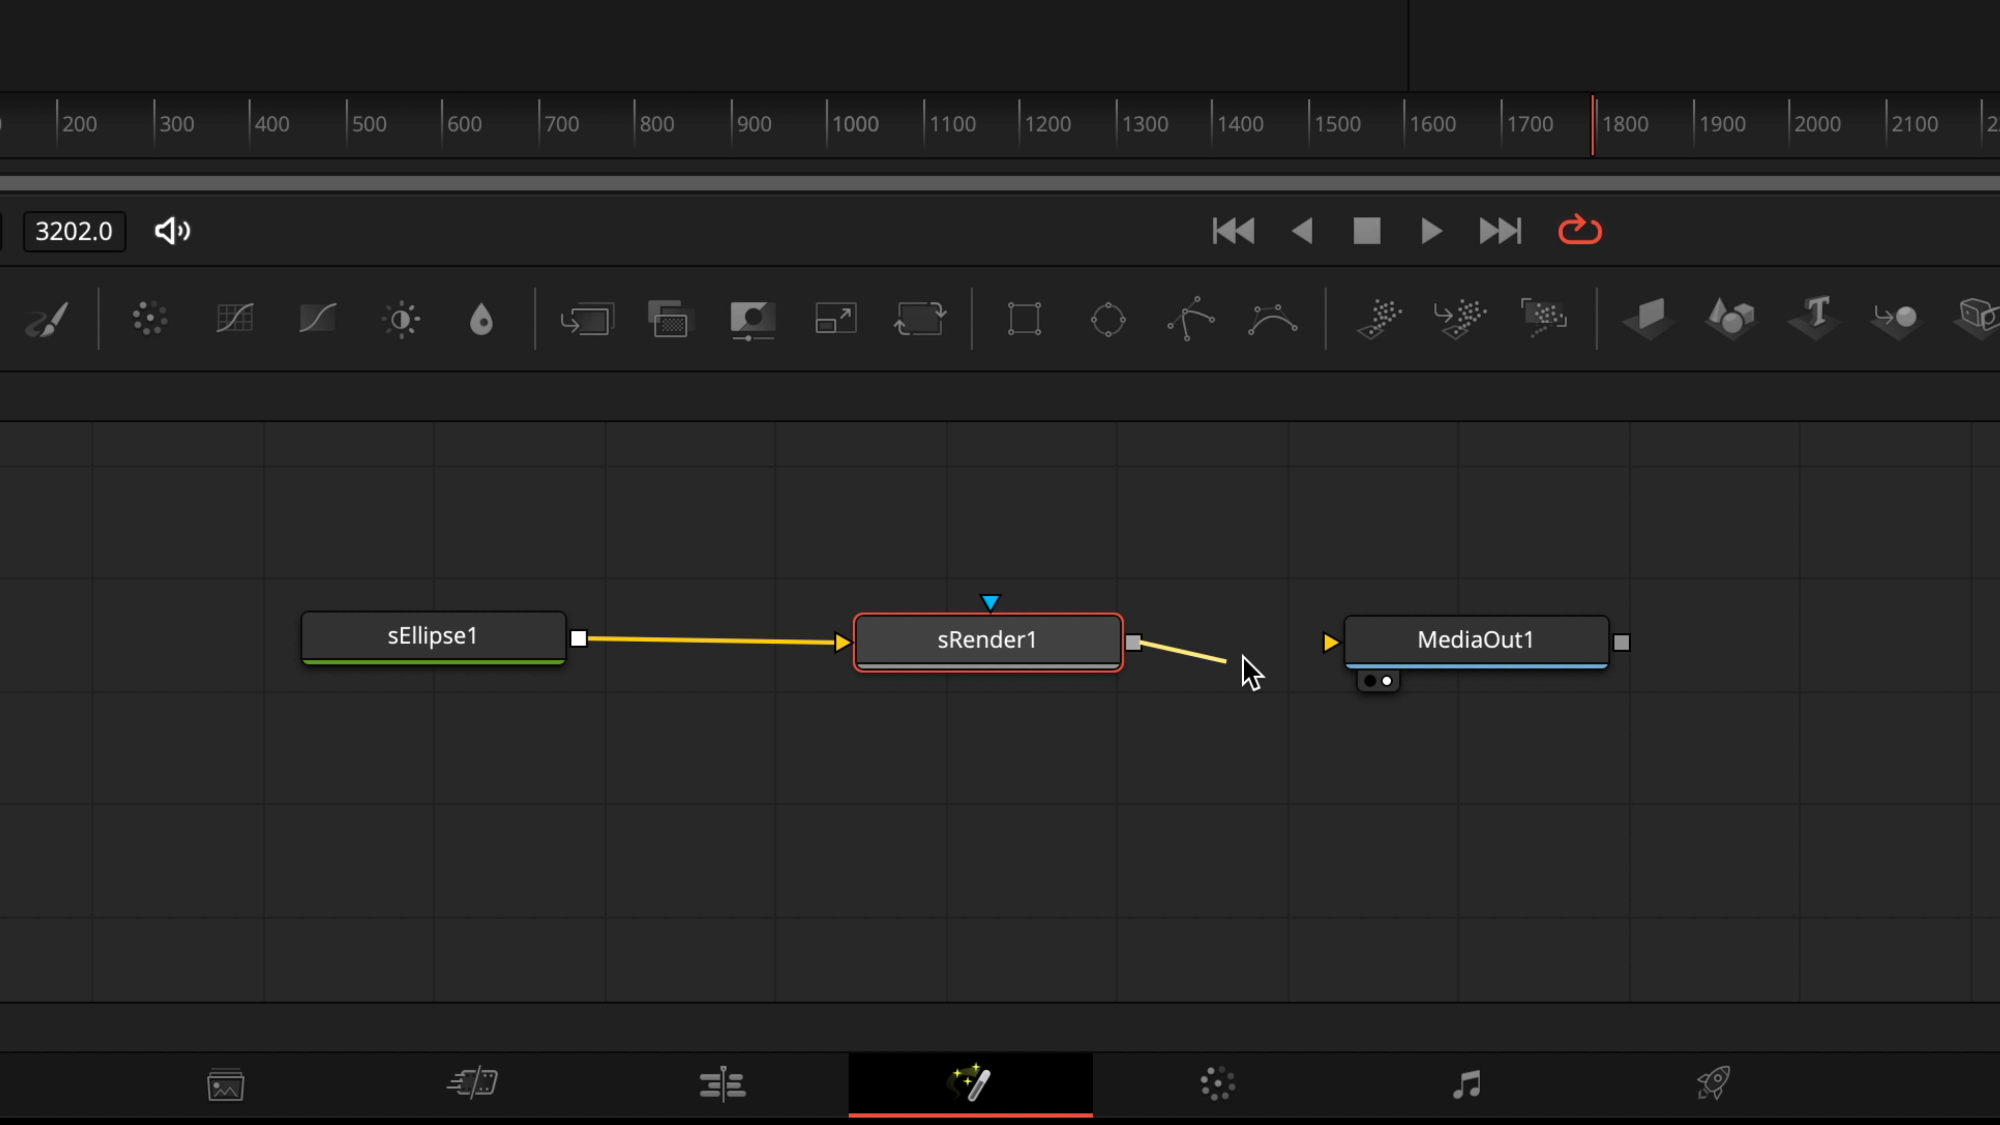
and Click on s Ellipse
and then also click on s Render
s Render is basically rasterizing the vector pixels from the ellipse shape node
They should have a yellow connection line between them, but if they don't
just drag from the grey output of the ellipse node to the yellow input of the render node
Now drag from the grey output of the render node to the yellow input of Media Out.
Now we have a circle! Fancy!
But we want an outline, right?
Just click on the ellipse node
Go to the inspector and uncheck the box for solid
Increase the border width to something around .02
And jump to the style tab to change the color
I'm a fan of the banana color
Now let's jump back to the edit page to wrap this up.
Compound Clip
We need to shrink the video clip down to fit inside our circle, so to do that, choose the effects tab.
And then you can drag the zoom slider down a bit.
For extreme precision, double click the box and use up and down arrows on the keyboard to zoom it perfectly. The left and right arrows take you to the tens digits for extreme precision!
Now to shrink and position it all down together,
Select both clips and right-click to create a compound clip
I'll call it webcam

This is nesting both of these clips into a single clip to make it easier to manipulate. In After Effects, it would be considered a pre-comp.
To change the scale and position with on-screen controls,
Click the transform tool
and drag the handles toward the middle to scale the clip down.
You can move your mouse to the center to click and drag for moving it anywhere you'd like on the screen.
Once you're happy with the placement, click the transform tool again, and the controls will go away.
Drop Shadow
To make this compound clip pop even more,
go to effects
make sure you're still on open effects
and search for DROP SHADOW
drag the drop shadow effect to the compound clip
Adjust the strength, the distance, or even the angle

Sometimes it's easier to see what you're doing by turning the blur all the way down to zero, doing some tweaks, and then adding back some blur.
And that's how you put your video inside a circle using DaVinci Resolve.