
Linear Gain to Color Balance by Numbers
DaVinci Resolve and Fusion operate in a 32-bit floating-point color space. That means we always have way more color precision than even any typical Photoshop document. And because we can easily work in a linear space, we can correct color casts as if we were adjusting the white balance before it was baked into our H.264 or H.265 footage, recorded in-camera. A few weeks ago, I showcased the chromatic adaptation plugin on the color page that operates in an LMS color space to mimic the cones and rods in our eyes. Still, this week I thought we would look at Linear Gain for color balancing since that was made very popular recently by the exceptional color scientist, Cullen Kelly.
Linear Fusion Management
The Fusion page of DaVinci Resolve will automatically work in the Linear Light color space when you enable project-wide DaVinci YRGB color managed in the project settings. For Log-encoded footage, it’s a good idea to choose the color processing mode as HDR, DaVinci Wide Gamut, or the native color space of the camera used to film the footage. The color processing mode is the working space that DaVinci Resolve can manipulate to help you sculpt your image. This is all done while viewing the image under an output color space that matches your computer or reference display. Typically, this is Rec709 for the majority of us.

The reason linear is so powerful is that this is physically how light works. It’s also how the camera sensor views the light intensity. Working in linear, reverses the gamma or log encoding that was baked into the footage, and this can allow us to alter the gain of color channels in a CLEAN AND PHOTO-ACCURATE WAY.
Fusion Color Corrector
The color corrector tool in Fusion is the most obvious go-to tool for adjusting color in an image, but be careful not to use the color wheel, which will tint the image based on the selected ranges for shadows, midtones, and highlights - these are not the same as Lift, Gamma, and Gain.
Lift, Gamma, and Gain are broader tools that are toward the bottom. Gain is what we aim for when adjusting a color cast. Gain will pin the darkest value and leave it unchanged, while changing the rest of the signal smoothly, with the most affected values on the higher intensity RGB code numbers.
In the lower left of the Fusion viewer, RGB code values show up for the pixel that the cursor is hovered over. They are normalized to a 0-1 scale with several decimal points. The idea to remove a color cast, or neutralize a pixel is to make all the Red, Green, and Blue values equal. The RGB numbers down in that lower left info section need to be the same. The Fusion color corrector gain slider can get us there.
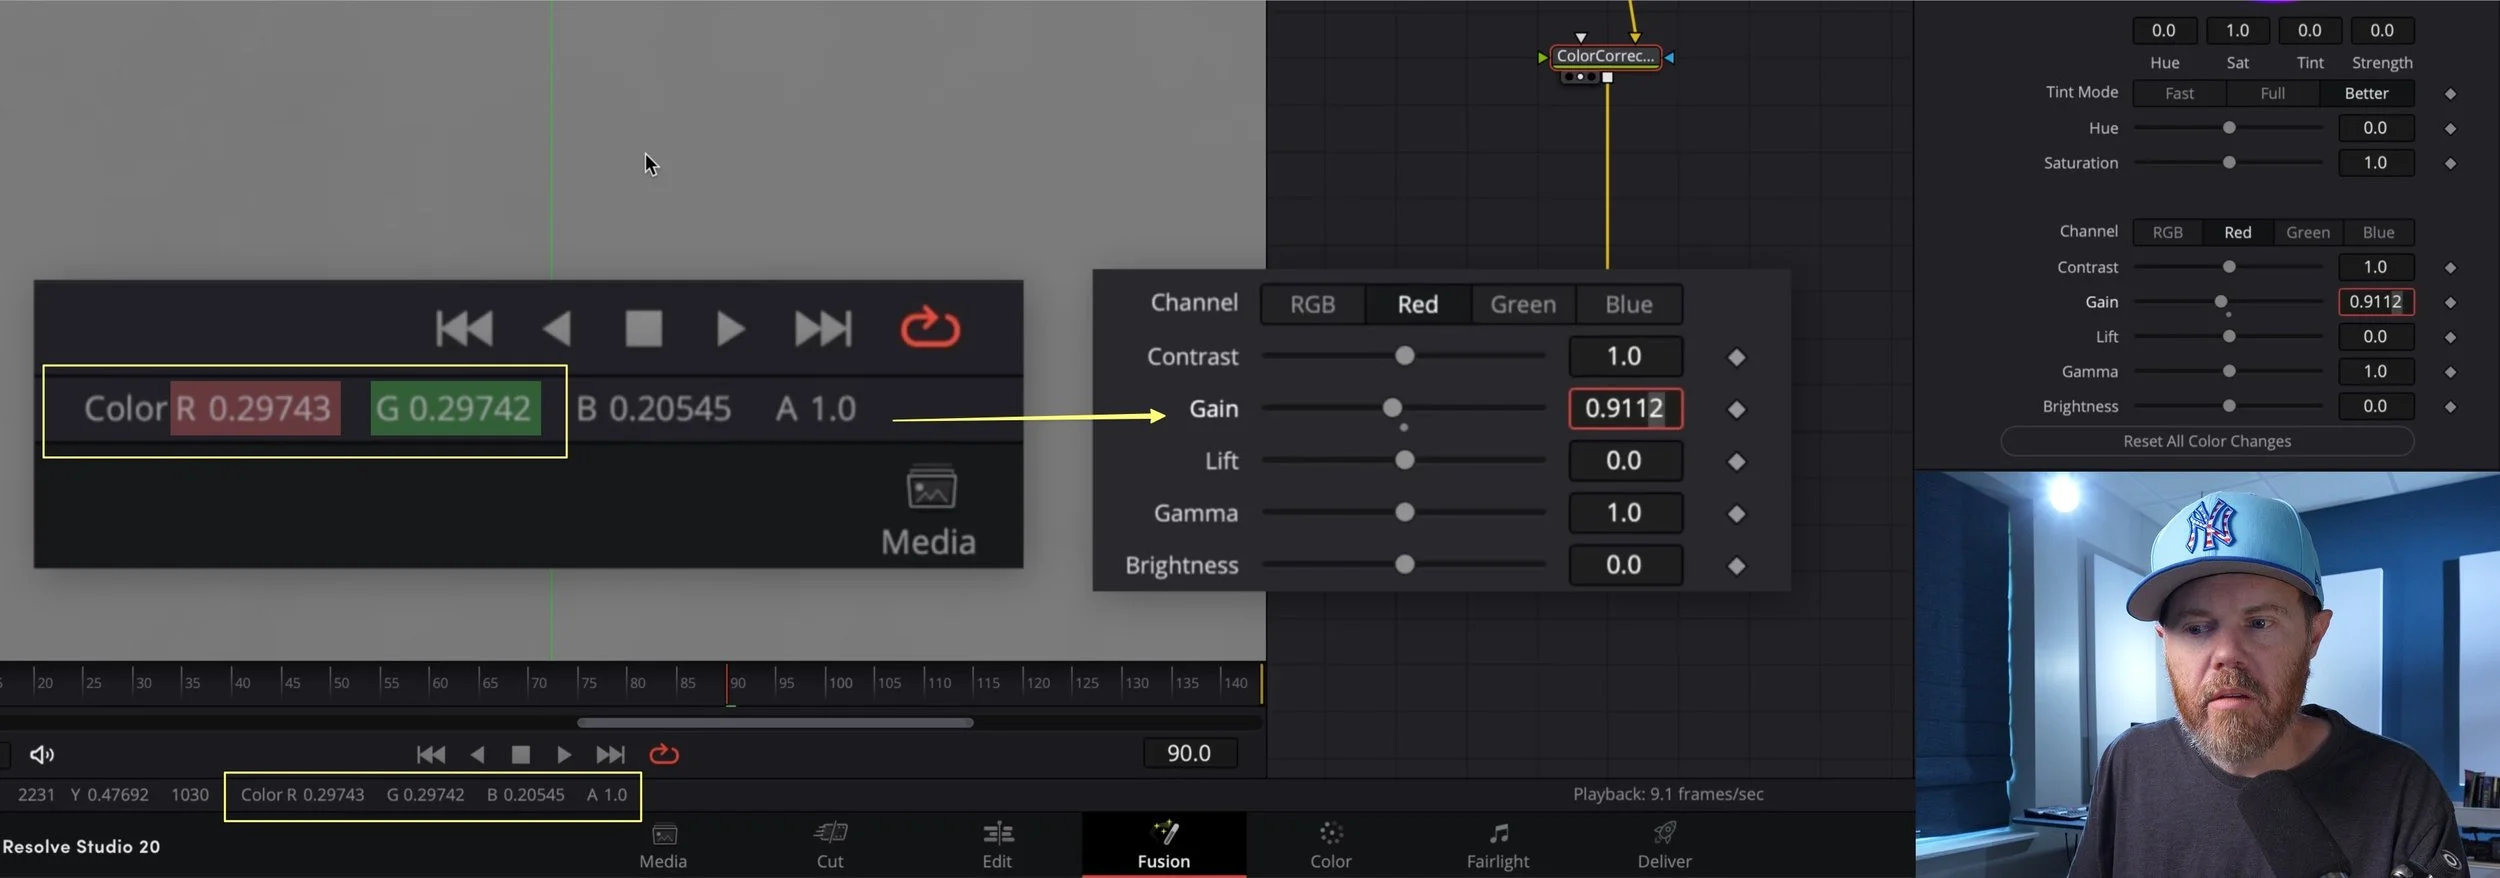
Ideally, you want to match the Red and the Blue channels to the Green channel. THE GREEN CHANNEL SHOULD BE YOUR REFERENCE. The reason is that green carries at least 2/3 of the luminance of the image. It’s just how video works, and has some magic that mimics how our eyes are most sensitive to green wavelengths of light as well. So leave green alone, and click the button on the color corrector tool to alter just the red gain, and dial in to match. Once that matches, click on the blue button and dial that to match. Afterward, you should have a neutralized pixel and a white balanced image.

Fusion also has a couple of other useful tools for adjusting white balance. One is the white balance tool that features a color picker eye-dropper. For this tool, open a 2nd viewer loaded with the MediaIn source to sample and the other viewer to view the result of the white balance tool. Just click hold and drag the eye dropper onto a part of the image that is suppose to be neutral and it does the work for you.
Another tool for adjusting gain in Fusion is the Color Gain Tool. This is doing the exact same thing as the color corrector tool, except it allows you to see all the values at the same time - I prefer this tool, but wanted to showcase both.
Buffer Split Wipe
Instead of solely relying on the code values for RGB, you can also make use of the RGB channel viewers and the buffer split wipe to compare the grey light intensity for each channel by eye. This can get you closer, faster, before you get in to tweak very carefully with the arrow keys on a keyboard.
Tapping R-G-B with the keyboard hotkeys will change the viewer to view those channels. And comma, period, and forward slash will load the A-B buffer split wipe. The idea here is to load the green channel on one side and red on the other, the proceed to adjust the red gain to match the green side. Then, replace the red side with blue and adjust the blue gain accordingly. Once they’re all the same, the image is white balanced.
