
Record Voiceover in DaVinci Resolve 20
DaVinci Resolve 20 NEW Voiceover Tool!
In previous versions of DaVinci Resolve, I’ve demonstrated how to record audio directly into the Fairlight page. However, this requires multiple steps, including selecting the correct input track, arming the track for recording, and then hitting the record button. Thankfully, in Resolve 20, we can now utilize the new voiceover tool, built directly into the timeline toolbar, on both the edit and cut pages. This is extremely useful even for a craft editor who needs to try out some temporary narration.
Media Storage Location
Also new to DaVinci Resolve 20 is the concept of a per-project prompted selection for a “Media Location”. This location is used for all new media created in Resolve. It’s not a forced location for source footage like an Avid Mediafiles folder. You can continue to store your source footage in any place, as you have done in the past. This new media location is used for writing out voiceover audio files and downloading footage from Blackmagic Cloud.
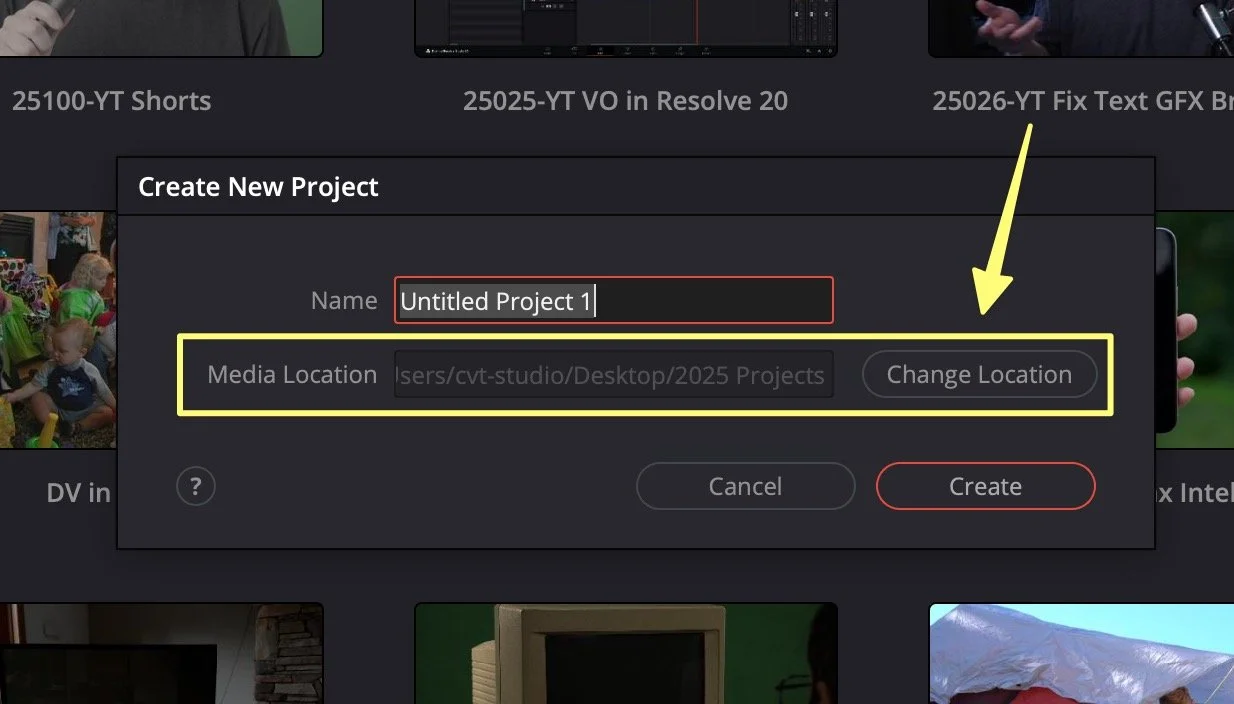
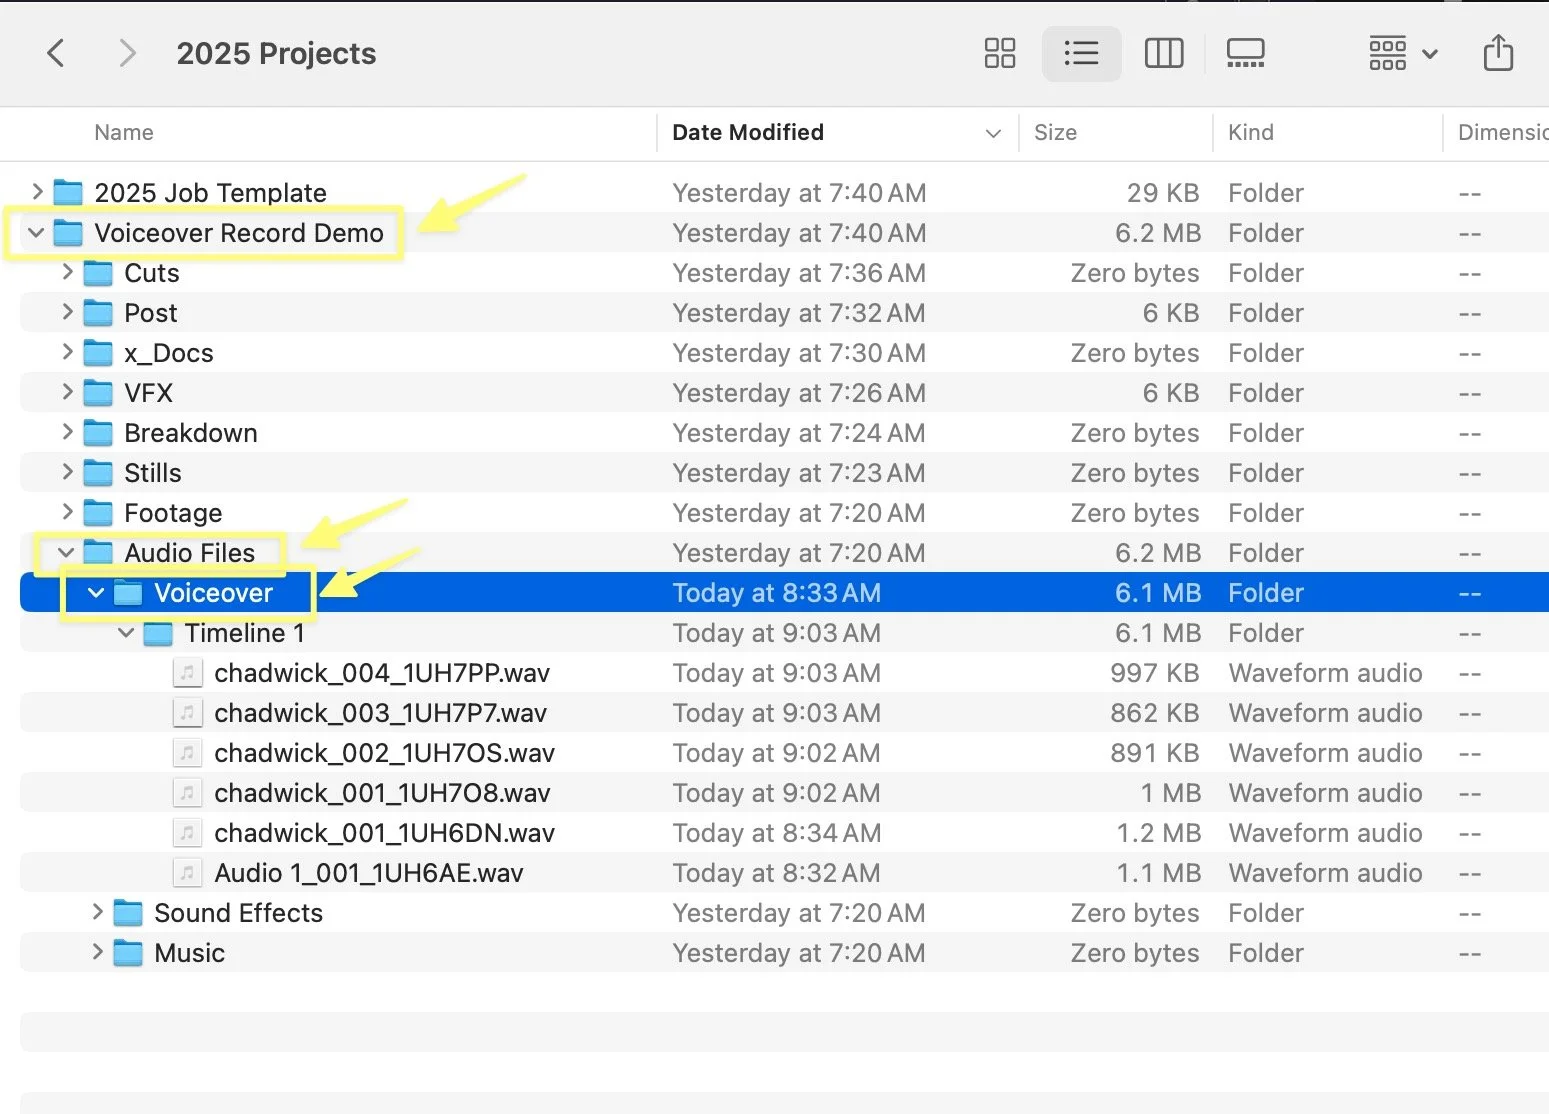
Inside the location you choose (it can be local, external, or network storage), DaVinci Resolve will create a folder using the project name. Inside the project folder, a folder named "Audio Files" will be created, and within it, a folder named "Voiceover" will be created. The reason I mention this is that I have decided to build my latest job folder template around this, so that Resolve is not creating folders for me. Instead, I will always still have my audio files inside my job folders for easy archival and transport, but I’ve built this hierarchy into my elements folder template.
Recording Audio
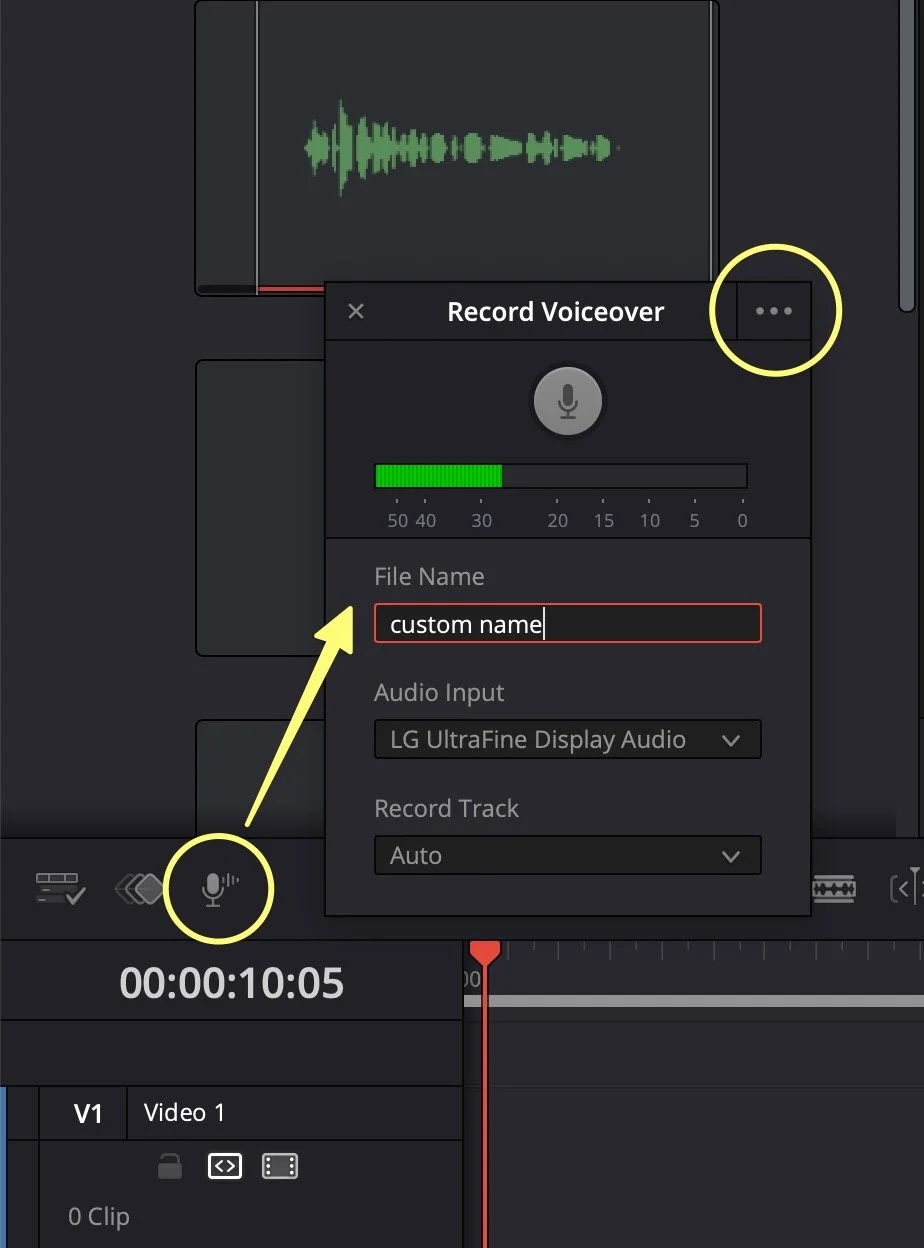
To record on the edit page of Resolve, click the new microphone icon above the timeline track header to use the new floating panel. You can give the file a custom name. New recordings will be assigned a sequence of 001, 002, 003, and a unique six-digit suffix will be appended to the file on disk to facilitate relinking in the future.
The voiceover tool also features a simple dropdown to select your microphone, which is connected to your system. Pro tip here, if you’d like to use your iPhone as a microphone, you can! Connect it with the USB-C cable and select to use it with Continuity Cam. Then, speak into the back of the phone, as the microphone it utilizes is located near the camera lens. You can choose any track to record to or leave it on auto, and the audio will be written to a brand-new audio track. Since Resolve is non-destructive, it will never delete recordings on your hard drive, but it will always start placing them at the playhead position.
But what about setting the correct input recording level? What level should I put my microphone gain to get the best possible sound? That’s easy; it should peak at -18dbfs. DO NOT set levels to peak between -6 and -12 dBfs, like I mistakenly did for many years. This is bad advice and does not give anyone enough headroom to avoid clipping the signal. When you clip the audio signal, it sounds horrible and distorted and is not very recoverable. And because most audio recorders can capture 24-bit lossless audio, you have 144 decibels of gain to increase the volume in post-production easily. For anyone curious, I use an Earthworks Ethos small diaphragm broadcast condenser microphone at my desk, and the Universal Audio Volt 2 as my USB interface, which converts the analog signal to 24-bit digital audio for DaVinci Resolve. I love this combo.
To record, push the record button. No patching or arming is needed on the edit page. To stop the recording, you can click the record button again or press the space bar on your keyboard to end the recording.
There are other options available in the three-dot menu, such as a three-second countdown, audio monitoring, muting the timeline, and stereo recording, among others, but I leave those off. Direct monitoring is best performed using the USB interface itself, with headphones. And of course, turn your speakers down all the way so they don’t bleed back into the microphone.
Processing Audio
Because we safely recorded the audio to peak around -18 18db, it’s too quiet to deliver that way, and we need to pump up the volume. I like to make use of 3-track level effects on just about all dialogue. Those are the equalizer, compressor, and limiter.
I use the EQ first to roll off the low end using what is called a “high pass filter” because it lets the high frequencies pass through. Essentially, an EQ is a volume control for different frequencies. I roll the bottom off because it will generally have rumble from air conditioning or wind, things that I don’t want in my mastered recording.
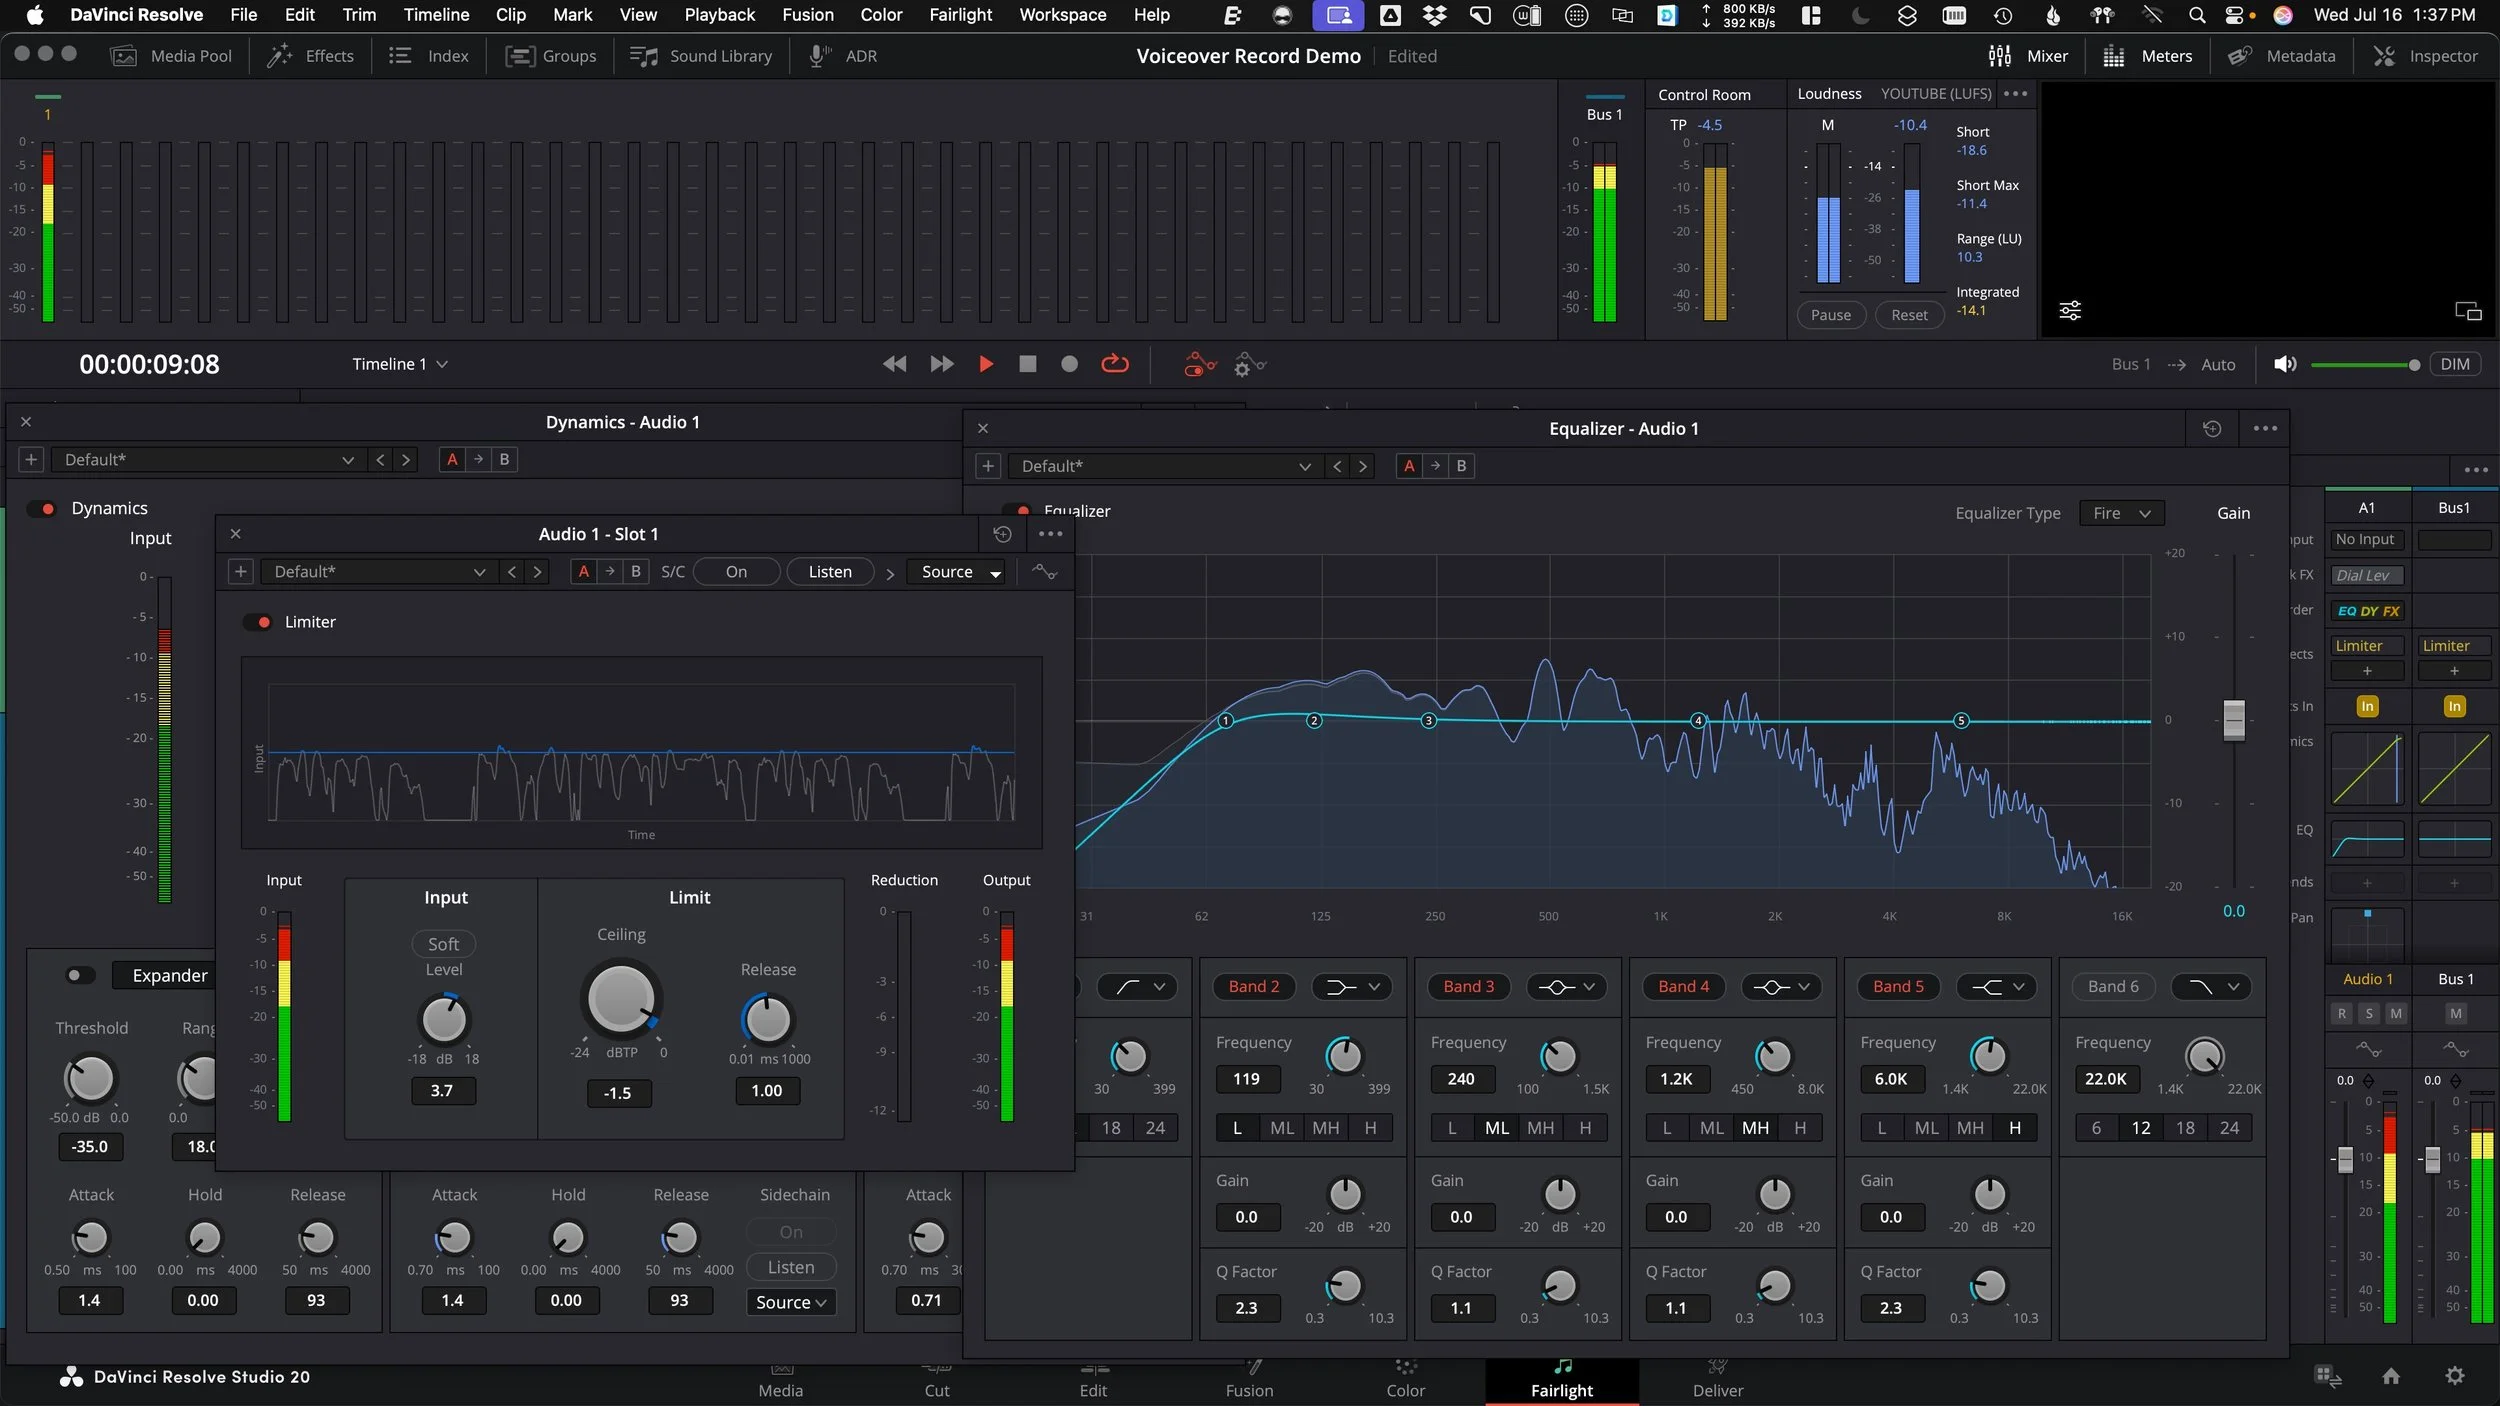
The next effect is part of the built-in dynamics panel on Fairlight, which allows you to access the compressor. I’ll use a ratio of 3:1, which means for every 3 decibels over my threshold, volume is reduced by 1 decibel. This technique reduces the dynamic range of the voice, enabling us to increase the overall signal in a later step without clipping the loudest transient moments. The threshold needs to be adjusted to find the sweet spot, depending on the recording. However, if you’re peaking at -18, setting the threshold at -21 would just start to kick in.
Finally, placing a limiter at the end of the signal chain will allow you to increase the input level to turn things up as much as you’d like, without putting a ceiling on the high end. However, I don’t use the limiter built into the dynamics panel; instead, you should use the plugin FX in the dynamics section, namely Failight Limiter. I set the high end of the limiter to -1.5 dB for a mono voice-over track. It is essential to change the default processing order from EQ to DYN to FX so that the final limiter is applied last.
Additionally, it’s not a bad idea to also place a limiter on the final stereo bus as well to protect your final render from any clipping. I hope you found this turorial about recording voiceover in DaVinci Resolve helpful. Please let me know what you’d like to learn next!