
Resolve Planar Tracking Corner Pin Tutorial
DaVinci Resolve Fusion has a cool Planar Tracker, but it can be challenging to use properly. Learn the most common steps to comp any graphic into log footage with professional results.
I know, you’re thinking - I already know how to planar track an object in DaVinci Resolve Fusion. But today, if you’re up for it - I’m going to take you on a more in-depth, chapter-marked, sign replacement tutorial that covers things like: How to composite in Fusion with ACES and OCIO view LUTs so you can blend HDR and SDR elements, mimic real-world light, and perfectly round trip the vfx plate to color. Preprocessing tips to get better results from the Fusion planar tracker. Avoiding distortion on a logo insert when the dimensions of the elements don’t match. How about adjusting for a curved edge? Ever had a curved monitor that needs a screen or lens distortion? I have a solution for that. Color matching to the plate and creating sky separation. Finally, we will take the footage into the color page grade under an ACES transform to rec709.
The footage and project file can be downloaded from my website, creativevideotips.com, by joining the cutting club. Thanks so much to those that have already joined. It really helps support these free tutorials.
Compositing with ACEScg and OCIO
Compositing should always be done in a linear light space. This means that you remove the gamma. We remove the gamma curve because it doesn’t exist in the real world. It’s a hack that was both created for screens to display, for cameras to show more dynamic range in a smaller bucket, and for our human eyes to see predators in the dark. The industry standard is ACEScg for compositing and it is simple to setup in Resolve Fusion.
Place and ACES transform after all media coming into your composite and assign the input transform to match the source of the camera. If the source is an sRGB logo, use the option called sRGB “Texture”. This places all elements into the same “scene”. They live in the same world now.
On some compositions you don’t want a graphic to live in the same world. In that case, either convert to a standard Log space like ACEScct, or leave it alone and pass it pass it along to a 2nd media out to composite as a separate layer in the color page.
To roundtrip the color back into the Log video space - swap the input and output transforms right before going back to the MediaOut (to render to the edit page and color page).
OCIO view LUTs can be downloaded OCIO Config File. OCIO 2.3 is currently supported with DaVinci Resolve 19. You will want to get the “studio” version which contains all the camera transforms. OCIO 2.2 is the latest version that works with Affinity Photo, which IMHO is the best external paint tool you can get for Fusion.

Planar Tracking Corner Pin
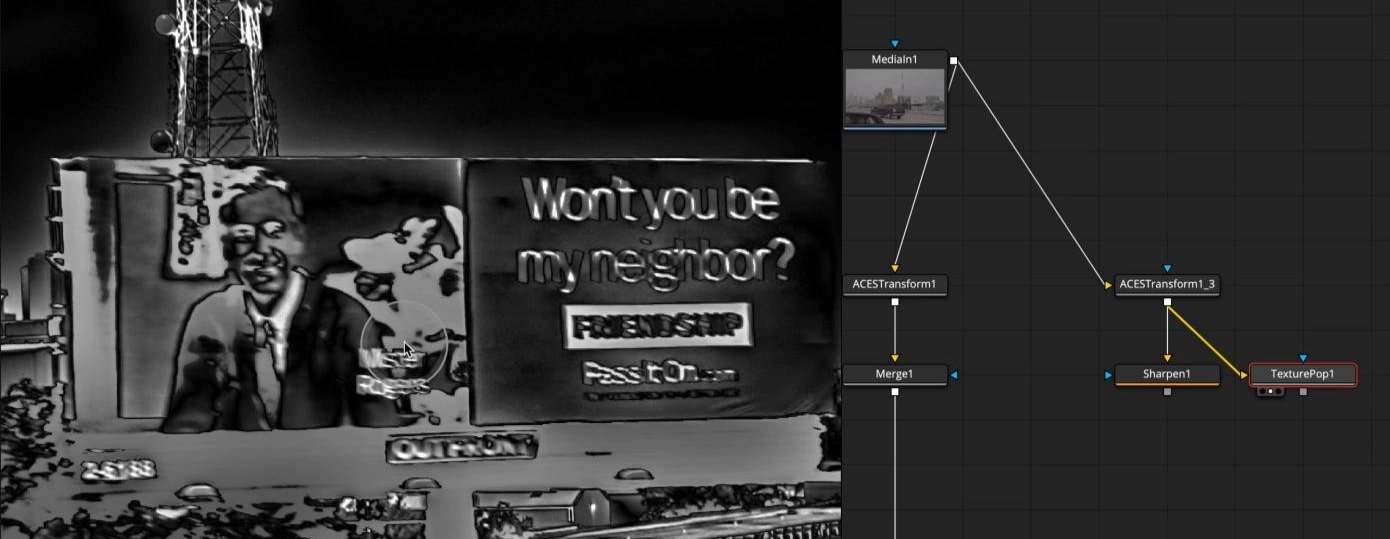
The planar tracker in Fusion often needs some pre-processing steps to achieve a better result. I have found that tracking in ACEScg does not work well with it. The four big tips I will always try to get better solutions are:
rec709 transfer
sharpen
texture pop
manual frequency separation
There are two algorithms built into the planar tracker. Hybrid Point/Area and Point. Generally, it’s best to start with Point, and if it sucks, create a garbage mask, plug that into the occlusion mask input, and try using the hybrid point/area method. It’s worth noting that the less information you collect, like less than perspective, you can get a more stable result and then later adjust with manual keyframes.
The other important thing to know is that you want to draw the tracking shape around the inside of the area to track. Do not extend beyond the edges as you would do with the industry standard tracker, Boris FX Mocha Pro.
To evaluate and QC the result of the track, move to “Steady” mode and leave the cursor parked while playing back to check for any erratic movement.
To corner pin a graphic, plug it into the green corner pin input and change the mode to corner pin in the tracker. On the reference frame adjust to location of the corners and you’re golden.

Crop Tool Distortion Fix
Anytime you place an object into an unknown dimension of a wall you need to kind of eyeball it into place. This is easiest to do with a crop tool placed after the graphic insert.
However, if you do know the dimensions or can find them online, you can merge your logo on top of a custom sized BG that matches the known dimensions.
Grid Warping to Bend Edges
The grid warp tool is ideal for adding distortion to match a perfect straight graphic to a curved edge in the footage. I use a crop node before the grid warp and extend the edge of the element out to give extra space to warp into. “Keep aspect” and “Keep centered” are checked to maintain the correct size for what the corner pin inside the planar tracker is expecting.
Leave the source side of the grid warp tool alone, and on the destination tab you can warp to your hearts’s content.
Finally, adjust the planar tracker points again to fit the corner of the plate on the reference frame.

Color Matching
Matching the colors, the whites and the blacks, to the plate should be a complete tutorial in and of itself. However, a simple, quick method is to sample a color to a background color. Then, pin that background color. For neutral bright things like this sign, you can copy and paste the value into the gain value per channel of a color corrector node.

Sky Color Correction
Resolve Fusion has a useful Luma Keyer tool for quickly extracting a mask from an image. Choose the channel that works best for the image you are keying and adjust the Low and High threshold values to create a greyscale matte.
The matte can be used to limit the effect of anything in the blue mask input of another node. In this case, we color-correct the full image to have a blue sky and then limit that effect with the luma keyer, with white targeted at the sky.
The blend slider in the settings tab will turn down the overall opacity of the node for a more controllable final result.

Color Page ACES to 709 Transform
The media out from Fusion sends the footage back to the edit page and the color page. To keep in this ACES world, apply an ACES transform at the end of your color node tree setup. At this point, choose the source camera space (assuming you round-tripped it in fusion). And the output should be the color space you can see on a calibrated display. Typically, for most of us, this will be Rec709.
The reference gamut compression setting should also be enabled at this time to protect very saturated highlights.
Make use of the awesome Resolve HDR grading controls in nodes before this transform and you’re done!

I’m Chadwick. Thank you so much! If you enjoyed this one, you might want to check out this tutorial on Phone screen replacements.