
Resolve + Fusion VFX Connect
More speed WITHOUT more money for Fusion VFX

Convenience is the name of the game with Fusion inside of Davinci Resolve. It’s the “ALL-IN-ONE” app. But did you know that it can only use about 56% of your computer's RAM? Or... did you know that if you have DaVinci Resolve Studio, you also have access to the standalone Fusion Studio, which DOES NOT cap your available RAM? This is a slick VFX Connect workflow that I’ve never seen demonstrated. This not only unlocks your computer's hardware potential to composite using Fusion Studio…. But it also addresses challenges I’ve had with how VFX Connect works out of the box, such as losing source timecode, resolution, and handles or baking color into VFX shots too early.
Follow these steps, and you’ll be able to view new, updated COMP versions from a single clip on your DaVinci Resolve timeline WITHOUT dealing with slow Render Caches or Render in Place. Oh, and if you edit multiple versions of your video for social media aspect ratios or maybe commercials with shorter durations, this will update to your approved version in ALL of your timelines with a single click!
Timeline Setup
Download and install the matching Fusion and DaVinci Resolve Studio version from blackmagicdesign.com/support. The same license is used for both applications, so there is no need to make a new purchase.
DaVinci Resolve memory is set to 75% of your computer memory, and then Fusion inside of Resolve can get 75% of the Resolve memory but…
I like my Fusion memory set to 85%, which I find gives me great performance with 64GB of RAM on an M2 Max Mac Studio.
Color the VFX with the clip color set to orange to quickly identify composites in the Resolve timeline.
Duplicate Clip on top on “option-shift” drag up.
This gives you a reference to the original footage, including all attributes that are necessary to copy to the VFX clip.
It also gives you an empty timeline space to drag handles out. Handles are extra frames to allow for small edit changes or transitions to be applied later on.
Manually extend 10 frame handles by trimming out the clip.
Pro Tip: The preferences/user/editing can be set to 10 frames for the “default fast nudge length.”
Right-click to Remove ALL Attributes from the Duplicate.
Don’t worry, we will copy this data back to it later after creating the VFX connect plate.
Timeline Settings - Match the Timeline Resolution to the Clip Resolution
Create VFX Connect
Next, you will create the VFX Connect clip. Essentially, VFX Connect clips are like a managed nest of clips with a dynamic link or connected conform type system to a specific and unique folder name built by Resolve on your disk.

Right Click - Choose New VFX Connect Clip
Format - The process I find that works best is to always render out new media for the VFX plates.
Quicktime ProRes 4444 for Mac
MXF DNxHR 4444 12-bit for Windows
EXR RGB half (PIZ) for ACEScg image sequences
Shot Name = sh010_clipname_colorspace
label OCN (original camera negative) colorspace in file
Choose a custom location so each shot has its own folder inside a “shots” folder
shots/shotname_filename_colorspace_comp
each shot gets a new shot name folder on disk for repeated use of the same clip from different segments of time (think long 10-minute clip, and you only need 3 seconds each time). This folder should also include all still image plates.
Starting with sh010 and incrementing by 10, allows for new shots to get slotted in between. So if an edit needs a new VFX connect clip between shots 10 and 20, it would get the name sh015.
Also include color space information in the clipname, filename.
Common color spaces:
_SLog3_SGamut3Cine_comp
_bmdfilmG5_comp
_ACEScg_comp
_ACEScct_comp
Open in Fusion
It should be full source resolution and include handles, and no color should be baked into the file to retain all the dynamic range.
Click the Render button to Render From Fusion
The format is already setup for you and versions will right inside the “Fusion” folder for this specific composition.
Render location is what matters for Resolve to automatically link this as a version.
Pro Tip - choose ProRes HW if you have ProRes encoders built-in, like the Mac M2 Max and Ultra computers.
Open DaVinci Resolve
Timeline Settings - now that the VFX connect clip has been created you can return the timeline settings back to any easy to work with resolution, or delivery resolution.
To apply all effects for the original clip to the VFX Connect clip, Copy from the original clip, and “paste attributes” to the VFX connect clip.
Versioning
Version up from Fusion Studio and not DaVinci Resolve. This saves a new comp file with the script with command shift S. However, versioning up the Fusion comp file does not change the saver filename that you render out. So be sure to change the saver filename to match your comp name.
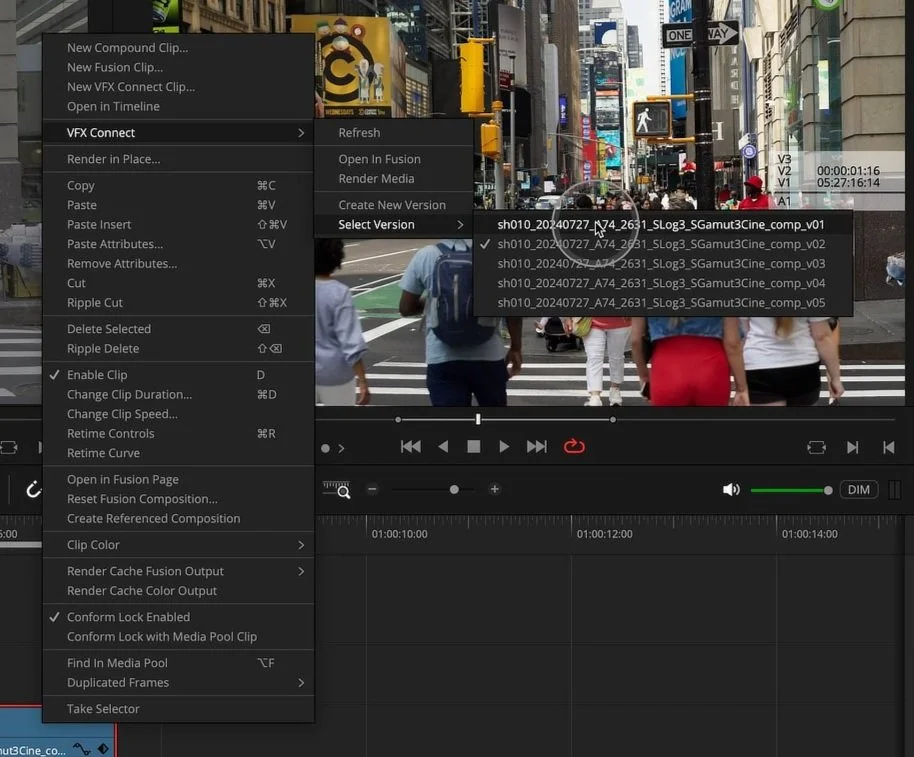
Choose the approved version in the DaVinci Resolve timeline with a right-click under “VFX Connect”
The selected version is applied across all cuts (socials, etc), much like the new Resolve 19 feature called Referenced Fusion compositions.
This workflow is very similar to Autodesk Flame’s connected conform, but it is in a much more approachable and affordable software application.
Adding Timecode
This is an optional step but recommended for a more robust VFX pipeline to retain original source timecode with VFX connect renders.
VFX connect plates do not include source timecode, but there are 2 fixes.
Create your own plate from the delivery page
Copy clipname to original media on V1
Swap the original plate out with your own render from the deliver page on disk
token %clipname
Render Individual Clips at Source Resolution AND check the box to disable sizing and blanking output
Also turn flat pass on to remove color and add 10 frame handles.
Load new plate in comp
Insert timecode with the Set timecode Node in Fusion
2nd option is in Fusion Reactor.
Fusion Reactor is a free toolset of incredible community supported Fusion tools to make our lives as compositors easier.
Bryan Ray has a fuse called “SetTimeCode” that supports 23.98 to manually apply TC = add 1 frame.
The default fusion set timecode tool only supports integer frame rates.
Following either one of these steps ensures the renders will take the original source timecode, so when you archive the shot, it can easily conform to any future projects or finishing software.
