
ACES VFX with DaVinci Resolve + Affinity Photo
Maybe you’ve heard of ACES or even used it for color grading. But today, I’d like to come alongside you and show you a high-end, commercial-quality Logo Removal workflow.
You’ll learn:
1 - How to convert RAW footage plates to linear ACES CG EXRs for compositing in Fusion.
2 - Working with Image Sequences in Resolve.
3 - How to load view ACES in Fusion an OTIO view LUT.
4- The roundtrip Affinity Photo ACES workflow for painting a clean plate.
5 - The planar tracker for match moving.
6 - Matching grain, by utilizing a denoised plate and a free plugin from Fusion Reactor.
7 - Finally rendering the finished comp to go to Color.
If you decide you’d like to follow along, I have the RAW footage available to download here by joining the cutting club. Thank you to so many of you that have already joined!
Convert to ACEScg
Applying the color page ACES transform can Convert Log and RAW footage to ACEScg. You choose the camera used to shoot the footage as the input and ACEScg for the output. I would also pick the reference gamut option to protect saturated highlights.
We chose ACEScg because it’s a linear light space, which removes the gamma curve and mimics how real-world light works, so it composites photos realistically. ACEScg also contains the AP1 primaries, which is a fancy way to say it's a giant bucket of colors to preserve data. Finally, ACES is an industry standard that unifies all the major camera capture formats to get predictable, non-destructive results.
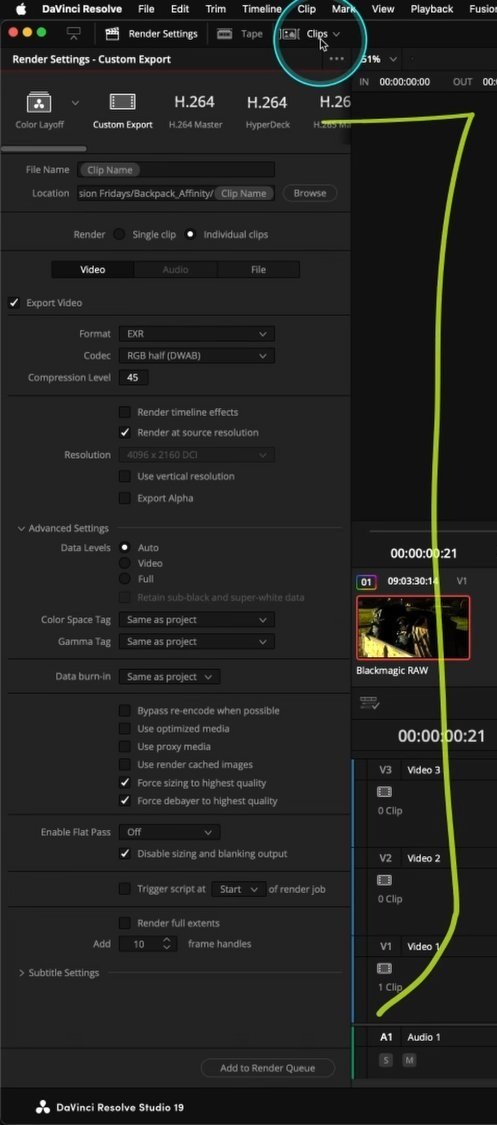
To render out the footage for use in Resolve Fusion, Nuke by the Foundry, or Autodesk Flame, I like to use EXRs rendered with DWAB compression 45 with “half float.” Half float means 16 bits and is perfect for any camera footage.
Other important render settings often forgotten are in the screen grabs here, including the checkbox to disable sizing and blanking output. Tokens for Clip Name are perfect for auto-naming the filenames and folders.

OCIO Configuration
Since ACEScg is a linear image, you need to view the image through a display view transform, a LUT. And thankfully, applications like Fusion and Affinity Photo have an option to load an open source OCIO config file.
The current supported OCIO config supported in Affinity Photo 2 and DaVinci Resolve Fusion 19 is the studio version 2.2, which is available to download from here.

Affinity Photo 2 ACES Settings
To non-destructively use Affinity Photo to paint a clean plate there are 2 settings you’ll need to be aware of. The first is in the settings, color tab, and uncheck “perform OCIO conversions based on filename”. And the second is when you export the saved EXR to uncheck “color profile from name”.
To accurately view your ACEScg exr in Affinity Photo, you simply point Affinity to the OCIO config file in the settings - color tab option. This is not converting the file, it simply places a view LUT to make it easy to see.


Track, Composite and Regrain
The Planar Tracker in Resolve Fusion is a great tool to match move any static element, like a cleaned up patch painted in Affinity Photo or Photoshop. But anytime you composite a “frame hold” or frozen freeze frame, it will need grain applied to make it fit into the scene. Grain or Noise is the last thing applied in the image processing pipeline.
My favorite tool to “regrain”, is the ReGrain tool from Millo Labs that is available on Fusion Reactor. Reactor is a marketplace full of incredibly useful tools built by the community and is part of the steak under water website and forum. You can learn how to install Fusion Reactor here and in my opinion it’s an essential tool for DaVinci Resolve 19.
