
QUICKLY Reverse Animations in DaVinci Resolve Fusion
Today I want to show you two tricks for re-using animate-in keyframes for a DaVinci Resolve Fusion title graphic to also animate it out and off the screen. But here’s the kicker - we’ll do this WITHOUT adding new keyframes for the outro. To get straight to the point and so you can follow along, I’ve provided a link in the description to download this Free Fusion Motion Graphic. Once you download it, also install the Rubik font, which you can use for free from fonts.google.com on any project.
Now open up Resolve, and on the edit page,
Right-click to create a new fusion composition
Give the clip a name. I’ll call this responsive reveal title
And I’m leaving the frame rate at 24 fps for this one. You can go higher if you want a smoother look.
Click Create
And then right-click on the title in the media pool to open it on the fusion page.
If you’re new to Fusion, don’t worry, there are very few steps to make this work.
The motion title provided here is simply a text file, a piece of Lua code, which is how Fusion works behind the scenes in DaVinci Resolve. Open this up in a text editor, I’m using Text Edit on a Mac, and I think notepad is the windows equivalent. It looks scary, but simply select all with command or control A. Copy it all, and then on the Fusion page, click on the node flow area and hit command or control V to paste this code in, and you should see all the nodes that make this work.

You just need to make one connection.
Click and drag from the grey outgoing Merge2 node to the yellow input of MediaOut1.
To see the animation on the fusion page, click and drag the Media Out node into the viewer.
And you should be able to see it and play it.
Feel free to customize the text node by clicking on it
Open the inspector and change the title
And if you need to change the size of the background box to fit your new text,
Click the Rectangle node click the three-dot menu to make sure you see a checkbox for show controls.
And click and drag the green bounding box to fit.
A quick side note is that you do not want to be working in a Davinci Color-Managed project while doing fusion graphics, or your colors won’t look right at all. This project setting isn’t a default, but color-managed workflows are huge for me, so I have a tutorial linked below that will show you how to deal with that specific issue using Render in Place and still use color management if you’d like.
Anyways, this is cool and all, but currently, the title only animates in, and I want to show you how to use the intro animation in reverse to wipe off-screen. So let’s check out how to do this on the edit page first.
Edit Page - Compound Clip Method
Back on the edit page, where most of us, myself included, are more comfortable,
Drag the fusion title down to a timeline.
And then, Pro tip here: tap B to change to the blade tool if you’re coming from Final Cut Pro and love the skimmer. This is a little like getting two playheads that Final Cut has.
Make a cut sometime after the intro animation has been completed.
Select the backend static part of the clip and delete it.
Now copy and paste the opening segment by option or alt dragging it to the right.
At this point, You’d think you’d right-click and change the speed to play in reverse, but you can’t on a fusion composition.
So the trick is you right-click on the clip and go up to new compound clip.
Name it outro
And now you can change the clip speed by tapping R on the keyboard, which pulls up the clip speed dialogue box and check the box for reverse speed.

Now you can see we have both the animated INTRO and the OUTRO working nicely.
However, suppose you need the motion graphic title on screen longer. In that case, you need to trim out the left clip to extend that hold period.
But you’re constantly managing two graphic clips with this method which can get messy if you want to modify the opening animation or anything about the clip.
So next, I want to show you two simple node tools you can add to this comp in Fusion so you can work with one single title clip and extend it as long as you need to.
Fusion Page Expression Method
Start fresh from the media pool by right-clicking on the fusion comp and opening it on the fusion page.
Start by clicking in an empty area of the node flow, so nothing is selected.
Hit Shift Spacebar to pull up the tool list
The first tool we need to add is called time speed
So type that in and click to add it
Then click in the empty space again
Hit Shift Spacebar and add the tool called dissolve
In a nutshell, time speed will reverse the composition, and dissolve will control a switch for when we want the reversal to happen with a straightforward expression that you can copy and paste from the description.
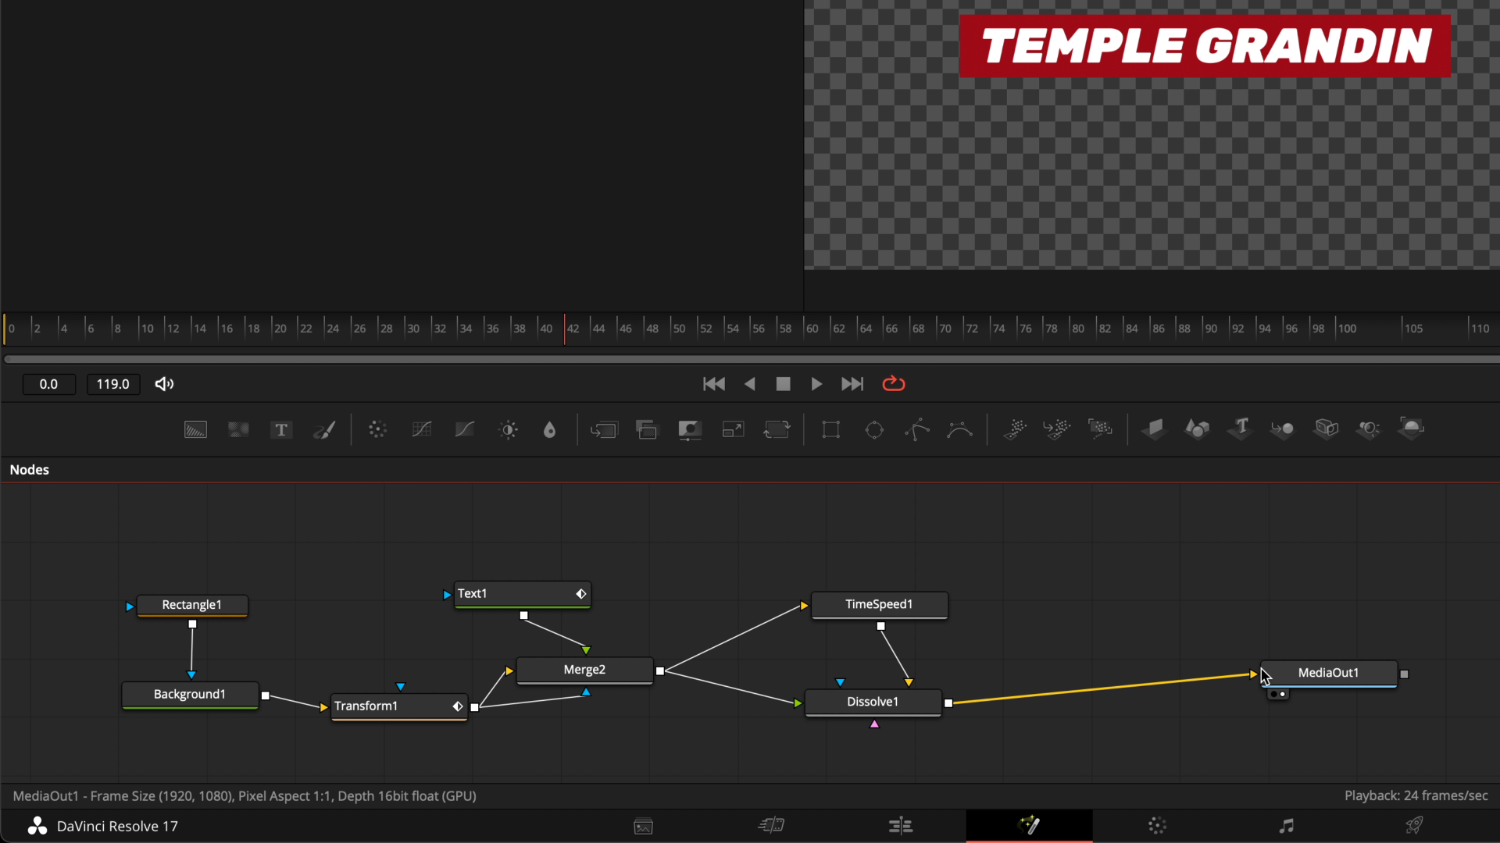
So, to connect these new nodes up, start by disconnecting Merge2 from Media Out by clicking on the right side of the connection pipe when it turns blue.
You’ll lose your viewer here, but don’t sweat it. Let’s connect the time speed and dissolve.
Drag the output of merge2 to the yellow input of time speed
Next, drag the grey output of time speed to the yellow input of dissolve. You’ll probably see the input knots move around, don’t worry. That’s normal and doesn’t affect the behavior at all.
Now also drag the output of merge2 to the green input of dissolve (this is the power of node-based compositing right here).
And finally, drag the grey output of dissolve to the yellow input of Media Out.
Click to play this, and you’ll see nothing has happened yet. We just have two parameters to change.
Click to open the inspector if it isn’t already and click on the time speed node.
Change the speed to negative one.
Now click on the dissolve node, and we are going to add an expression to the background - foreground parameter, which will tell the output when to pay attention to the background inputs. The yellow lines. Or the foreground inputs. The green lines
To add the expression, hover your mouse over the words background - foreground, right-click and choose expression.
In this new little box, delete the number one and type in the following:
And hit return to lock it in.
Tap the space bar to preview it, and you should see it animate in and out.
It can be easy to mistype this, so feel free to copy and paste this from the video’s description. If you’re curious what this all means, the first part before the comma says if this part is true, then return 0 as the result for dissolve, but if it isn’t, then return 1.
Now over in the edit page, drag this modified title to the timeline, and you can see that you can shorten or length the clip to your heart’s content. Just make sure to do it from the backend of the clip.
Motion VFX
One thing that has helped me out a lot as I’ve been learning to transition from creating titles in After Effects to DaVinci Resolve Fusion has been using the Motion VFX plugins. Motion VFX is not sponsoring this video, but since the built-in fusion graphics that come with Resolve are kind of lame, and we always need stuff in a pinch because we don’t have enough time to build a new title from scratch - they gave us the code CVT15 to use at checkout for 15% off your order. I have an affiliate link below which is a way you can help support this channel, and you’ll still get the discount with code CVT15. I think this offer is just for a limited time, so I’d jump on it before it’s too late.
Motion VFX Links:
YouTube Titles (Affiliate Link) ➡️ https://motionvfx.sjv.io/c/3027052/1162319/10011
Hype Titles (Affiliate Link) ➡️ https://motionvfx.sjv.io/P0nR3j
If you’ve watched any creative video tips before, you’ve seen me use the subscribe animation from their mTuber pack on almost every video since it came out. But one of the newest title packs that I’m digging is mTitle Hype. These presets work entirely on the Edit page, so they’re super simple to customize in the inspector, AND they come with a checkbox for animating in and out. But hopefully, just like this title says - Nothing is Impossible, you now have a great grasp of the possibilities with using motion graphics in DaVinci Resolve.